
Related Manuals for Synthes VEPTR


Summary of Contents for Synthes VEPTR
- Page 1 VEPTR – Vertical Expandable Prosthetic Titanium Rib. A new treatment concept for paediatric three-dimensional thoracic deformities. Technique Guide...
-
Page 3: Table Of Contents
Replacement Procedure Image intensifier control Please note that specialised training is mandatory. In order to perform procedures associated with the VEPTR system, a wide range of additional basic spine surgery instruments are required. For further details contact your local Synthes representative. - Page 4 Synthes VEPTR Technique Guide...
-
Page 5: Treatment Concept
Designed to mechanically stabilize and distract the thorax to improve respira- tion and lung growth in infantile and juvenile patients. VEPTR devices control and may correct scoliosis. Devices are attached perpendicularly to the patient’s natural ribs (superior at- tachment point) and to more caudal ribs, a lumbar vertebra or to the ilium (inferior attachment point). -
Page 6: Indications
– Congenital chest wall defect, posterolateral – Acquired chest wall defect, posterolateral – Chest wall tumor resection – Traumatic flail chest – Surgical separation of conjoined twins Secondary Thoracic Insufficiency due to lumbar kyphosis (non gibbus) Synthes VEPTR Technique Guide... -
Page 7: Contraindications
Contraindications The VEPTR device should not be used under the following conditions: – Inadequate strength of bone (ribs/spine) for attachment of the VEPTR – Absence of proximal and distal ribs for attachment of the VEPTR – Absent diaphragmatic function – Inadequate soft tissue for coverage of the VEPTR –... -
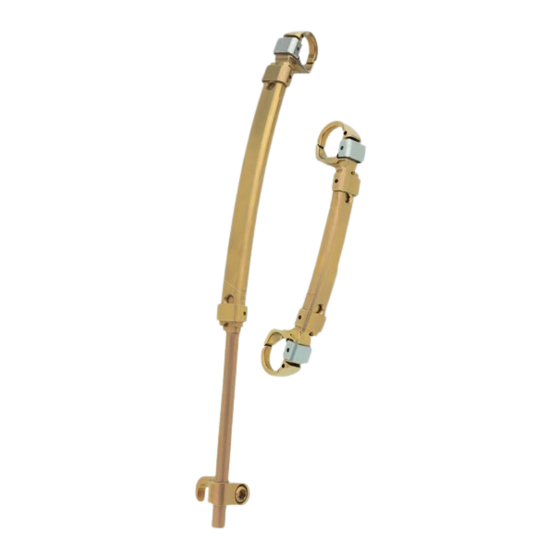
Page 8: Construct Options
Construct Options The VEPTR set contains 220 mm and 70 mm radius constructs. 220 mm radius constructs are used to treat most of the VEPTR indications and are the standard VEPTR constructs. Synthes VEPTR Technique Guide... - Page 9 Assemble the construct as stated in the rib-to-rib construct section. After the construct has been completely assembled and locked, use the Pliers to again grasp rods and contour around implanted rib-to-rib construct, leaving space to re- move the locks and expand the construct. Synthes...
- Page 10 – Components available in 220 mm radius 1 Cranial Rib Support 2 Closing Half-Ring 3 Lock for Rib Support 4 Lumbar Extension Rod 5 Extension Bar 6 Closure for Extension Bar 7 Extension connector 8 Ala Hook Synthes VEPTR Technique Guide...
- Page 11 4 Caudal Rib Support 5 Extension Bar 6 Closure for Extension Bar Rib-to-rib 70 mm radius 1 Cranial Rib Support 2 Closing Half-Ring 3 Lock for Rib Support 4 Caudal Rib Support 5 Extension Bar 6 Closure for Extension Bar Synthes...
-
Page 12: Implants
In 70 mm radius, available in sizes 4–11 in neutral, right and left angulation Art. No. Angulation Sizes 497.085–497.089 Neutral 4–8 497.241–497.243 Neutral 9–11 497.091–497.095 Right angled 4–8 497.244–497.246 Right angled 9–11 497.096–497.100 Left angled 4–8 497.247–497.249 Left angled 9–11 Synthes VEPTR Technique Guide... - Page 13 Cranial Rib Support or the Caudal Rib Support Art. No. 497.128 Lock for Rib Support, blue – Closure for Extension Bar (gold) connects the Extension Bar to the Cranial Rib Support, Caudal Rib Support or Lumbar Extension Rod Art. No. 497.125 Closure for Extension Bar, gold Synthes...
- Page 14 – Attaches the Extension Bar to the Lamina Hook or the Extension Connector – Available in sizes 6–13 to correspond with 220 mm radius Extension Bar – Rod 6.0 mm Art. No. Sizes 497.131–497.134 6–9 497.251–497.254 10–13 Synthes VEPTR Technique Guide...
- Page 15 – Used with the Lumbar Extension Rod and Extension Connector to attach to the ilium – Available in left and right contours – Rod 5.0 mm Ala Hook, 45° Art. No. Contours 497.257 left 497.258 right Ala Hook, 90° Art. No. Contours 04.601.001 left 04.601.000 right Synthes...
- Page 16 – Connects the Ala Hook to the Lumbar Extension Rod – Accepts 5.0 mm and 6.0 mm rods Art. No. 498.167 Extension Connector 5.0/6.0mm 2.0mm, Pure Titanium – Holds osteotomized ribs against the construct Art. No. 497.127 2.0 mm Synthes VEPTR Technique Guide...
-
Page 17: Instruments
Instruments Below a description of all VEPTR specific instruments. A detailed overview of all required instruments (standard or new) for a VEPTR surgery can be found in the VEPTR setlist. 388.452 Lock Removal Pliers, for VEPTR Used to remove the locks (497.125 and 497.128) from the constructs for expan-... - Page 18 388.461 Holding Forceps for Rib Support Holds the Cranial and the Caudal Rib Supports. 388.462 Lock Removal Device, for VEPTR Used to remove the locks (497.125 and 497.128) from the construct. 388.464 Spreader for Rib Support Used for the expansion of the Extension Bar from the Caudal Rib Support.
- Page 19 Rib Distraction Pliers Used to expand the Extension Bar from the Caudal Rib Support or Lumbar Extension Rod. 388.472 Distractor for Extension Bar, curved Used to expand the Extension Bar from the Caudal Rib Support or Lumbar Extension Rod. Synthes...
- Page 20 Inserter for Rib Support Lock Used to pick up and hold the locks (497.125 and 497.128) and attach the locks to the constructs. 388.495 Hook Holding Forceps for VEPTR Used to bring the hooks in position at the lamina. Synthes VEPTR...
-
Page 21: Overview Surgical Technique
2. Exposure 6.6 Align Extension Bar to Cranial Rib Support 3. Remove the lock 6.7 Insert Closure for Extension Bar 4. Distraction 6.8 If using a Lamina Hook, distract if necessary and 5. Final locking tighten Replacement procedure Replacement Synthes... -
Page 22: Primary Procedure
Primary Procedure Patient positioning and cranial exposure remain the same for all types of VEPTR constructs described on pages 8 to 9 regardless of the construct being implanted. Patient positioning Place the patient in a lateral decubitus position similar to that required for a standard thoracotomy. - Page 23 Standard Hammer U44-483-20 Periosteal Elevator, curved 388.453 or Holding Forceps for Closing Half-Ring, 388.465 for VEPTR 388.456 or Lock Crimper, for VEPTR 388.474 388.461 Holding Forceps for Rib Support 388.467 Rib Support Feeler 388.475 Lock Inserter, lateral 388.488 Clip for Rib Support for No. 388.494 388.489...
- Page 24 – A 220 mm Rib Support is used with either a lumbar exten- sion or a 220 mm radius Caudal Rib Support. – A 70 mm Rib Support is used solely with 70 mm Caudal Rib Support. Synthes VEPTR Technique Guide...
- Page 25 Select proper Closing Half-Ring size Based on the patient’s anatomy, select the appropriate Clos- ing Half-Ring (standard or large). The large Closing Half-Ring is used to encircle large areas of fused ribs or two ribs. Synthes...
- Page 26 Support (Cradle Assembly Forceps). Affix the Clip for Closing Half-Ring and the Clip for Rib Support to the Pliers for Clos- ing Half-Ring and Rib Support. 388.488 388.494 388.489 Align the Cranial Rib Support to the Closing Half-Ring using the Cradle Assembly Forceps. Synthes VEPTR Technique Guide...
- Page 27 Closing Half-Ring. With a hammer, gently tap inserter to seat the lock. The Lock Crimper or the lateral Lock Inserter should be used to ensure that the lock is fully seated. The implants now encircle the rib. Synthes...
- Page 28 Additional resection of medial fused ribs may be required if distraction is difficult. Only resect visible bone adjacent to the spine. Be aware of anomalous arteries due to the abnormal anatomy. Synthes VEPTR Technique Guide...
- Page 29 7 cm, use an Extension Bar marked with a 7. Implants are identified from 4–13 in 1 cm increments. Determine appropriate matching implants and assemble construct For rib-to-lumbar lamina and rib-to-ilium constructs see page 28 ff. For rib-to-rib constructs see page 35 ff. Synthes...
- Page 30 388.468 Holding Forceps for Extension Bar 388.475 Lock Inserter, lateral 388.493 Inserter for Rib Support Lock 388.495 Hook Holding Forceps for VEPTR 388.870 Trial Rod 388.910 USS Bending Iron, left 388.911 USS Paediatric Bending Iron for Rods 5.0 mm, left 388.920...
- Page 31 Place a golden Closure for Extension Bar in this position us- ing the Inserter for Rib Support Lock. With a hammer, firmly tap Inserter to seat the lock. The Lock Crimper or the lateral Lock Inserter have to be used to ensure that the Closure is fully seated. Synthes...
- Page 32 Use the Hook Holding Forceps to place the hook in the de- sired location on the lumbar vertebra. The hook can be fur- ther secured by using a heavy, non-absorbable suture around the posterior spinous process. Synthes VEPTR Technique Guide...
- Page 33 Ala Hook to fit the ilium. Insert the Ala Hook, pointed end downward, into the apophyseal tunnel using the Holding Forceps for USS Paediatric Rods 5.0 mm (388.441) over the top of the iliac crest and lateral to the Sacro-iliac joint. Synthes...
- Page 34 Ex- tension Connector. Take care to remain within the paraspinal muscles. Tighten the set screws in the connector using the 2.5 mm Hex Screwdriver. Synthes VEPTR Technique Guide...
- Page 35 Rib Support to slide the cranial end of the Extension Bar over the Cranial Rib Support. Alternatively the Iron for Extension Bar and the Iron for Rib Support can be used to align the two implants. The Positioner for Rib Support can also facilitate alignment. Synthes...
- Page 36 Using the Spreader Forceps gently distract to further seat the hook. Use the 3.5 mm Hex Screwdriver to tighten the setscrew in the hook. Remove the Fixation Ring for Rods following distraction us- ing the 2.5 mm Hex Screwdriver. Synthes VEPTR Technique Guide...
- Page 37 Primary Procedure Rib-to-rib Required instruments Standard Hammer 388.453 or Holding Forceps for 388.465 Closing Half-Ring, for VEPTR 388.456 or Lock Crimper, for VEPTR 388.474 388.458 Iron for Rib Support 388.459 Iron for Extension Bar 388.461 Holding Forceps for Rib Support 388.464...
- Page 38 Closing Half-Ring. With a hammer tap Inserter to seat the lock. Check to ensure the lock is fully seated usig the Lock Crimper or the lateral Lock Inserter. The implants now encircle the rib. Synthes VEPTR Technique Guide...
- Page 39 Lock Crimper of Lock Inserter. Note: If the patient is older than 18 months and of adequate body size, a second device (rib-to-rib construct) may be added posterolaterally in the mid-axillary line to further ex- pand the constricted hemitorax. Synthes...
-
Page 40: Expansion Procedure
Make a transverse or longitudinal incision over the closure. Remove the lock Required instruments 388.452 Lock Removal Pliers, for VEPTR 388.462 Lock Removal Device, for VEPTR Remove the golden Closure for Extension Bar using the Lock Removal Pliers or the Lock Removal Device. - Page 41 388.472 Distractor for Extension Bar, curved 388.471 Rib Distraction Pliers 388.457 Distraction Pin for VEPTR, temporary 498.910 Fixation Ring for Rods 6 mm Use the Rib Distraction Pliers or the Distractor for Extension Bar in conjunction with a Fixation Ring for Rods to gently dis- tract the implanted device until the device is adequately lengthened.
-
Page 42: Replacement Procedure
Remove the required components and insert the new com- ponents through the fibrous canal surrounding the old de- vices. Install new Closure(s) for Extension Bars. Refer to detailed instructions within this Surgical technique to install specific components. Synthes VEPTR Technique Guide... - Page 44 Ö036.000.421öABhä 0123 Presented by:...
Need help?
Do you have a question about the VEPTR and is the answer not in the manual?
Questions and answers