Table of Contents
Advertisement
Instruction Manual
22-Channel Handheld Two-Way-Radio (Walkie Talkie)
SAMCOM FWCN30A
Main Features
● Frequency: 462.5500~467.7125 MHz
● High/Low TX Power (2W/0.5W) Selectable
● 22 channels
● 154 codes (50 CTCSS & 104 CDCSS)
● 5 km optimal range
● Group function (Dual-Channel Watch)
● 3 VOX levels
● 10 Call tones
● Monitor
● Scan
● Key lock function
● Built-in 1250mAh Li Polymer Battery
● Flashlight
● NOAA & Wheather Alert
Facebook
SANCON INC.
Advertisement
Table of Contents

Related Manuals for SAMCOM FWCN30A


Summary of Contents for SAMCOM FWCN30A
- Page 1 Instruction Manual 22-Channel Handheld Two-Way-Radio (Walkie Talkie) SAMCOM FWCN30A Main Features ● Frequency: 462.5500~467.7125 MHz ● High/Low TX Power (2W/0.5W) Selectable ● 22 channels ● 154 codes (50 CTCSS & 104 CDCSS) ● 5 km optimal range ● Group function (Dual-Channel Watch) ● 3 VOX levels ● 10 Call tones ● Monitor ● Scan ● Key lock function ● Built-in 1250mAh Li Polymer Battery ● Flashlight Facebook SANCON INC.
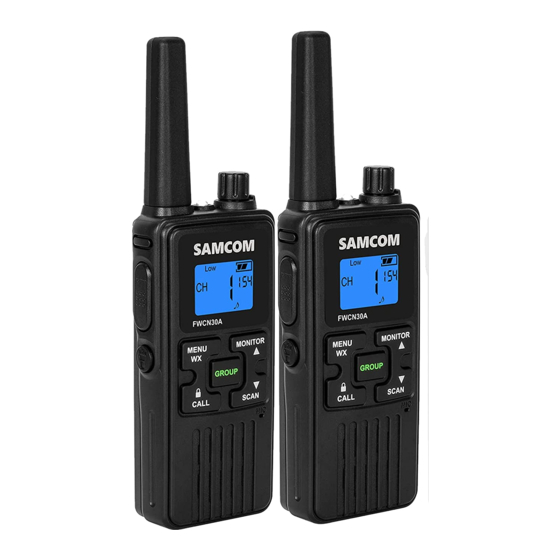
- Page 2 Overview LCD display Earphone & Charger Jack Push-To-Talk (PTT) key Up / Monitor key Down / Scan key Power / Volume Knob Group /Ok key Menu / WX key Call Tone /Key-Lock key 10. Microphone 11. Speaker 12. Antenna 13. Flashlight LED 14. Flashlight key ● GROUP Button – A broadcasting function (one-to-all) to communicate with all other radios that are programmed to monitor the same group channel (default group = CH 8). Great for home/office wide announcements or check ins.
- Page 3 Press the MENU key , enter into the menu selecting mode Press ▲ key choice the menu and monitor function, and WX mode. Press ▼ key choice the menu and scan function. Keep press 3 seconds the key to lock, Press the GROUP key to speak to all channel , press the key call function will opened...
- Page 4 GENERAL OPERATIONS Install / Removing Belt Clip Installing Belt Clip ● Slide the Belt clip into the slot A “click” indicates the Belt Clip is locked into position. Removing Belt Clip ● Pull the belt clip latch forward ● While pulling the belt clip latch, push up the belt clip Battery on First Use Since batteries leave factory without a fully charging, please charge the new batteries before using. Under normal circumstances, the battery on first use needs 5 hours of charging. The first three times of fully charging and discharging provides batteries the best capacity. When you find out the battery is low, it is required to charge or replace it. Safety Precautions 1. Do not dispose the batteries in the fire. 2. Do not dispose the batteries as household wastes, and it must be collected and treated properly. 3. Do not rip off the shell from the battery without permission.
- Page 5 Notes: 1. When charging, the temperature should be between 5 ,otherwise it may cause the leakage or even damage the ℃ ℃ battery. 2. Please shut down the transceiver with battery loaded before charging it. The use of the transceiver while charging is ongoing will affect the normal battery charging.
- Page 6 CHARGING BATTERIES When the “Battery level icon is low, you need to charge the battery with the enclosed AC/DC adaptor . Charging with AC/DC adaptor ● Plug the adaptor into the wall socket and the other end into the micro USB socket on the right side of the radio. ● The LCD “Battery” Icon will flash. ● Each adaptor can connect 2 sets of radio for charging. ● To charge fully from empty require about 5 hours. ● After charged, unplug the adaptor from the socket WARNING ● To avoid damage to the radio use only original accessories. ● The radio will be slightly warm during charging. ...
- Page 7 GENERAL OPERATIONS TRANSMITTING RANGE ● The talk range depends on the environmental and terrain. It will be reach (up to about 5km) in wide open spaces, without obstructions such as hills or buildings. Don’t try to use two units which are less than 1.5m (5feet) apart. If you do, you may have experience interference. POWER ON/OFF ● Rotate the PWR/VOL control knob clockwise until a" ka-ka "sound is heard to turn on the power. When you receive calls ,the knob provides you the ability to change the volume for your listening habits.When shutting down the transceeiver,you need to rotate it counterclockwise a "ka-ka" sound is heard. MAKING COMMUNICATIONS The radio has 22 main frequencies and 154 CTCSS/CDCSS codes You can communicate with any other user who is using the same combinations, providing they are within range. SPEAK TO OTHER RADIO ● Press & hold the PTT key, LCD TX icon indicating the radio is transmitting. ● Hold the radio in a vertical position with the microphone 3-5 cm from your mouth and then speak. ● When you finish speaking, release the PTT key. LISTEN TO OTHER RADIO ● The radio will automatically sound received signal from the other radio with the same channel and code, and meanwhile LCD shows the icon RX ● When you press the PTT key, you can’t listen to other radios. Make sure you do not press PTT key for listening. ● Adjust volume control if necessary. TALK TIME-OUT FUNCTION ●...
- Page 8 The unit has dual-channel watch function. It can monitor two channels at the same time, which are the Main (foreground) and Group (Background) channels, i.e., it can detect signal on either channel. When the unit detects a signal on the Group channel, it will automatically sound the received signal with LCD showing "Group" icon, Group channel number and associated code number. When you want to talk to a group of people that have their radios set the Group Channel number to be the same as yours, just do the following. ● Press & hold the GROUP key, LCD displays TX icon, indicating the radio is transmitting on the Group channel. ● Hold the radio in a vertical position with the microphone 3-5 cm from your mouth and then speak. ● When you finish speaking, release the GROUP key. SENDING CALL TONE You can use 1 of 10 different “Call Tones” to get attention of other user on the same channel with same code. ● Press the CALL key and the tone will sound, LCD will display the transmit icon T X and your call tone will be sent. SCANNING CHANNELS and radio will start scanning. ● Press the SCAN key once and LCD will display ● LCD display shows the scanning channel one by one. ● It will stop at those channels with signal for a while. 10. MONITOR Function key to have the unit sound signal or noise, whichever occurs on the main channel. ● Press and hold the MONITOR ● Release the MONITOR key to turn off the function. The function is useful to check for activity on the main channel before you talk. When you find the main channel busy , you can change the main channel number to a clear one. Moreover, it also can be handy for the user to verify the volume level of the radio when the radio is not receiving. You can adjust the volume, if necessary. LOCK KEYS ●...
- Page 9 can set the channels to low TX power option to conserve the energy of the radio's battery. ● When LCD shows the main screen, press and hold the key for 3 seconds to change the TX power option between High and Low. When the radio is set to High TX power, the LCD displays the icon . When the radio is set to Low TX power, the LCD displays the icon Note: the channels 8 to 14 have and only have low TX power option, as per FCC regualtions. 14. Flashlight FUNCTION To use the flashlight function ● When the flashlight is not illumining, press the Flashlight key once to turn and keep it on. ● When the flashlight is illumining, press the Flashlight key to turn it off. Menu Operation Press Menu key once to firstly enter main channel selection from the main screen, press again for next function selection etc. The menu operation flow chart is as follows. Main Screen → Main Channel → CTCSS/CDCSS → GROUP (Dual-Channel Watch) → VOX → Call Tone → Key Beep → Roger Beep → Main Screen ...
- Page 10 NOTE: There is no need to change the default GROUP number unless you either: ● Are experiencing interference or cross talk from other radios or intercoms in the area on the current group channel, or ● Desire advanced functionally by organizing your radios into groups that call all receive separate group communications. For example, if you want three different buildings, each with its own group number. This would be a more advanced configuration and is not needed for your average home or small office. To change the GROUP Number ● Press the MENU key 3 times, GROUP with group channel number will flash. or to select new Group Channel ● Press ● Press the GROUP/OK or PTT key to confirm and revert back to the main screen, or the MENU key to confirm and continue next function setting. 12. VOX (Hands-Free Function) The unit has a built-in Voice Activated Circuit (VOX) function. You can enjoy talking and listening without pressing PTT key. To have better performance, you can use this function with the external earphone (optional accessories). ● Press the MENU key 4 times, LCD displays icon and VOX sensitivity digit will flash. ● Press or key to select sensitivity level from “ , 1, 2, 3” for “OFF, Low, Medium and High respectively. After turning on the VOX function, LCD will display icon. Press the GROUP/OK or PTT key to confirm and revert back to the main screen, or the MENU key to confirm and continue next function setting. Please speak close to the mic in order to activate VOX function. 14.
- Page 11 ● Press the GROUP/OK or PTT key to confirm and revert back to the main screen, or the MENU key to confirm and continue next function setting. WEATHER RECEIVER (WX) FUCNTION The radio has the capability to tune in to broadcasts by the United States National Oceanic and Atmospheric Administration (NOAA) Weather Radio and Environment Canada Weather Radio. You can listen to a weather channel or set your radio to alert you to emergency weather broadcasts that interrupt routine broadcasts. When you listen to a weather channel, you cannot use your radio in scan mode or for two-way communications. Entering the WX Mode ● In two-way radio mode with the main screen display, press and hold the key for 3 seconds to enter WX mode , the LCD will display the icons and and the unit sounds a noise. Setting the WX Channel key 1 time unitl WX channel number flashes. ● In WX mode, press ● Press or to select the appropriate channel with good reception in your area. ● Press the key to confirm and continue setting WX. Setting the WX Alert The radio can be set to respond to NOAA Weather Radion emergency meassages. A special alarm tone sounds an alert and turns on the WX to give you immediate weather and emergency information. 2 times unitl the icon or flashes ●...
- Page 12 462.5750 Hi/Low Optional 462.6625 Hi/Low Optional 462.6000 Hi/Low Optional 462.6875 Hi/Low Optional 462.6250 Hi/Low Optional 462.7125 Hi/Low Optional 462.6500 Hi/Low Optional 467.5625 Fixed to Low 462.6750 Hi/Low Optional 467.5875 Fixed to Low 462.7000 Hi/Low Optional 467.6125 Fixed to Low 8 (as 462.7250 Hi/Low Optional 467.6375...
- Page 13 SAFETY TRAINING INFORMATION Your SANCON radio generates RF electromagnetic en-ergy during transmit mode. This radio is designed for and classified as "Occupational Use Only". Meaning it must be used only during the course of employment by individuals aware of the hazards, Warning and the ways to minimize such hazards.
- Page 14 To ensure that your exposure to RF electromagnetic energy is within the FCC allowable limits for occupational use, always adhere to the following CAUTION guidelines: DO NOT operate the radio without a proper antenna attached, as this may damage the radio and may also cause ● you to exceed FCC RF exposure limits. A proper antenna is the antenna supplied with this radio by the manufacture or an antenna specifically authorized by the manufacturer for use with this radio. DO NOT transmit for more than 50% of total radio use time ("50% duty cycle"). ● Transmitting more than 50% of the time can cause FCC RF exposure compliance requirements to be exceeded. The radio is transmitting when the "TX indicator" lights red. You can cause the radio to transmit by pressing the " PTT" switch. ● ALWAYS use SANCON authorized accessories( antennas, batteries, belt clips, speaker/mics, etc). Use of unauthorized accessories can cause the FCC RF exposure compliance requirements to be exceeded. Body-worn operations are restricted to belt-clips, holsters or similar accessories that have no metallic component in the assembly and that provide at least 1.5 cm separation between the device, including its antenna, and the user's body. To provide the recipients of your...
- Page 15 说明书 SAMCOM FWAN10A 10通道手持对讲机 (可直接与FTAN10T 对讲) 注意事项 ● 使用前请详细阅读此说明书 ● 避免阳光直接照晒或放在很热的地方 ● 不可用于油站,煤矿等易燃易爆的环境中 ● 不可用于高浓度粉尘等易爆的环境中 ● 用干净的布清理机上的污迹,不可用酒精 或其他化学品擦拭或将其他液体流入机内部 ● 不要敲击和摔打避免损坏液晶显示屏 注意: 处理废旧电池(NO BATTERY INCLUDE 在包)根据指令。 10-信道手持式对讲机的特点 ● 这是一款与INTERCOM FTAN10A 相对应的 它的频道与FTAN10A 一致,户外或移动状 可使用该手持机方便与台式机对讲 ● 该对讲系统可以一对一讲,也可使用群呼 主要特性 ● 472 MHz 公众使用免费频道 10 个信道, 3组号码 ● VOX ● Roger Bee On/Off ● Audo Power Off(APO) ● 10 Call Tones...
- Page 16 Overview LCD Display...
- Page 17 Install Battery ● Insert a coin to the battery door gap. ● Turn the coin with some force to open the battery door as shown on photo A ● Follow the polar directions and insert 3 x AAA size batteries. ● Close the battery door as show on photo B 1. Insert the battery door 2. Then, Press down the battery door to close it tight. 操作说明 1 开机/关机 要开机,按MENU键2秒钟,直到听到嘟嘟声,LCD显示器开启 要关机。按MEUN键2秒钟,直到LCD显示屏关闭。 2 通话信道 该机有10个频道共3组号码, 有效距离范围内有33个通道共选择, 3讲话给其他机 按下并按住PTT键LCD TX图标指示无线电信号传递 与麦克风距离3-5厘米,然后讲话。 讲话结束后,松开PTT键。 4听其他机讲话 号码相同的机讲话过来时,自动发声无需操作任何按键 当您按下PTT键。你听不到其他机的声音。确保你不要按PTT键收听。 5调整扬声器音量(8级) 按向上键+增大音量 按向上键 - 降低音量...
- Page 18 6 LCD背光开启/关闭 需要时按LAMP键开启LCD背光亮。 再次按下LAMP键LCD背光关闭 备注。 一般对讲无需打开LCD 背光, 长期点亮背光费电。 7. MENU菜单流程图 按下MENU 菜单键进入信道选择, 再按一次进入功能选择 ABC 组选择 VOX 声控对讲 Call Tone 信道选择 Main Screen 8. 选择号码 选择号码 按MENU键一次,LCD显示闪烁的是号码。 按“+”或“ - ”键选择您所需的号码。 按PTT键确认并退出或按MENU键继续下一个功能设定。 13秒后,自动回复到初始屏幕。 9. ABC 档位切换 按下 MENU 键2次 , 1,2,3 会显示和闪烁 按 + 或 - 键可选择 1,2,3 A =1 B=2 C=3 按下PTT键确认并退出, 或按MENU 键继续以下设置。 10. VOX(不用手完成对讲功能) 该装置具有一个内置的语音激活回路分析(VOX)功能。您可以享受聊天,听不按PTT键 按MENU键3次。 LCD显示VOX图标,VOX灵敏度从OFF 1,2,3为OFF低中高 开启VOX功能。 LCD显示VOX图标。按下PTT确认并退出激活VOX功能。 11.发送呼叫声音 CALL TONE 您可以使用10的不同的“呼叫音”来 获得其他用户的注意,同一个通道不同的呼叫音代表不同的人。 按下按键, 你会听到不同的音乐。 LCD会显示发射图标 ,你的来电铃声已被设定。 12 选择呼叫声音 SELECTING CALL TONE 按MENU键4次,LCD显示器1CR图标,来电铃声号闪烁 按+或 - 从01到08键来选择您想要的来电铃声 按继续下一个功能设置。 13自动关机(APO) 按MENU键5次,LCD显示器APO 图标。 按+或 - 键,从0〜4小时选择自动关机时间...
- Page 19 按下PTT键确认并退出或按MENU键返回主屏幕。 开启该功能。 LCD会显示APO图标,并自动关闭在指定的时间。 14 按键声音的开关 KEY TONE ON / OFF 按MENU键6次,LCD显示屏上的显示ON为(按键音开)或OF(按键音关) 按+或 - 键切换键调整或关闭 显示屏显示 图标表示按键声音开启。此图标消失,表示按键音关闭。 按下PTT确认并退出或按MENU键继续下一个功能设置。 15 ROGER BEEP 蜂鸣器的声音 蜂鸣器功能,按PTT发射或放开PTT 会发出短暂的蜂鸣器声音提醒。 按MENU键7次显示ON or显示蜂鸣器的声音开启, OF or显示蜂鸣器的声音关闭 按+或 - 键切换蜂鸣器开启或关闭。 按下PTT确认并退出或按MENU键继续下一个功能设置。 FCC合规性声明 该设备FWAN10A符合FCC 要求...
- Page 20 对讲机的特点 ERCOM FTAN10A 相对应的手持机。 N10A 一致,户外或移动状态时可 机方便与台式机对讲 以一对一讲,也可使用群呼号码一对多讲 用免费频道...
- Page 21 1. Antenna 2. LCD display 3. PTT(Push to Talk) Key 4. LAMP Key = LCD Backlight On/Off key 5. Call Tone Key 6. Menu Key 7. Up Key 8. Down Key 9. Micphone 10. Speaker 1. Receive Signal 2. Transmit Signal 3. Main Channel 4. A B C groups 5. Volume Level 6. KEY Tone 7. Auto Power Off enable...
- Page 22 8. VOX Enable 9. Battery Level ...
- Page 23 Call Tone APO Key tone Roger Beep 音代表不同的人。 声已被设定。...
- Page 25 Instruction Manual SAMZUK FWAN1A 22-Channel Wakie Talkie For Intercom PRECAUTIONS Read this manual before use the radio Avoid the direct exposure to solar rays and/or in front of heat Do not operate the radio in hazardous environments, explosion or fire may result. Do not operate the radio in high humidity dusty or explosive environment. Clean by using a cloth slightly dampened. Do not use alcohol, solvents or abrasives etc. Do not attempt to modify the radio. The radio is designed to comply with FCC The LCD display is made of glass and maybe damaged it dropped or impacted. CAUTION: DISPOSE OF USED BATTERIES (NO BATTERY INCLUDE IN THE PACKAGE) ACCORDING TO THE INSTRUCTION. Model FWAN1A Main Features Walkie Talkie 472 MHz ( License free wit 22 Channels 3 CTCSS sub-codes Roger Bee On/Off Audo Power Off(APO) 10 Call Tones SCAN( main channel only) ...
- Page 26 More detail information & product you can www.samzuk.com Instation...
- Page 27 LOCK TALK GROUP BUTTEN...
- Page 28 GENERAL OPERATIONS 1 POWER ON/OFF To power on the radio , press MENU key for 2 seconds until a beep is heard and the LCD display turn To power off the radio. Press MEUN key for 2 seconds until LCD display turns off. 2 MAKING COMMUNICATIONS The radio has 22 main frequencies and 3 CTCSS codes effectively giving you 66 channels you can cc any other user who is using the same combinations, providing they are within range. 3 SPEAK TO OTHER RADIO Press & hold the PTT key LCD TX Icon indicating the radio is transmiting Hold the radio in a vertical position with the microphone 3-5 cm from your mouth and then speak. When you finish speaking , release the PTT Key and a beep tone will be heard. 4 LISTEN TO OTHER RADIO The radio will automatically sound received signal from the other radio with the same channel and LCD When you press the PTT key. You can't listen to other radios. Make sure you do not press PTT key for Adjust volume control if necessary. 5 ADJUSTING SPEAKER VOLUME ( 8 LEVELS) Press the up key + to increase the volume Press the up key - to decrease the volume 6 LCD Backlight On/Off Press the LAMP key to turn on LCD backlight when necessary. Press the LAMP key again to trun off LCD backlisht REMARKS. Please always trun off the LCD backlight after used or otherwise, it will keep the LCD backlight continu battery. 7. MENU FLOW CHART Press Menu key MENU once to enter main channel selection. Press MENU again for next function sele Main Screen Main Channel CTCSS VOX Call Tone APO Main Screen ...
- Page 29 8. SELECT CHANNEL To select the main channel Press the MENU key once, Main channel number displayed will flash. Press "+" or "-" key to select your desired main channel number. Press the PTT key to confirm and quit or press MENU to continue next function seting. You have 13 seconds to decide before auto-reverting back to the main screen. 9. CTCSS CODE FUNCTION This function can help you select your group (38 CTCSS codes) of users on the same channel. Only th same CTCSS code can listen and talk to each other, press note that selecting a CTCSS code does no total privacy in radio communication. any FRS radio can listen to all communications on the same cha when using the default standard setting with Ctcss= 0 (OFF) Press the MENU key twice, CTCSS code display with flash Press + or - key to select your desired CTCSS code from 1 to 38 0 is OFF Press the PTT key to confirm and quit or press MENU key to continue next function setting. 10. VOX (Hands-fee function) The unit has a built-in Voice Activated Circult(VOX) function. You can enjoy talking and listening witho Press the MENU key 3 times. LCD display VOX icon and VOX sensitivity level from OFF 1, 2,3 for OFF respectively. After turning on the VOX function. LCD will display VOX icon. Press PTT to confirm and quit activate V 11. SENDING CALL TONE You can use 1 of 10 different " Call Tones" to get attention of other user on the same channel. Press the key and you will heard the tone. LCD will display the transmit icon and your call tone 12 SELECTING CALL TONE Press the MENU key 4 times , LCD display 1CR icon and call tone number will flash Press + or - key to selected your desired call tone from 01 to 08 Press to continue next function setting. 13 AUTO POWER OFF (APO) Press MENU key 5 times, LCD display APO incon. Press + or - key to select auto power off time from 0 to 4 hours Press PTT key to confirm and quit or press MENU to return to Main screen. After turning on the function. LCD will display APO icon and automatically turn off at designated time. 14 KEY TONE ON/OFF Press MENU key 6 times, LCD display On to ( Key tone On) or OF to ( = key tone Off) Press + or - key to toggle key Tune On or Off LCD display icon will be on when Key Tone is On. This Icon will be off when Key Tone is Off. Press PTT to confirm and quit or press MENU to continue next function setting. 15 ROGER BEEP The roger beep function enables a short tone signal which is transmitted after releasing the PTT button Press MENU key 7 times display display On ro icon ( = Roger Beep On) or OF ro (=Roger Beep Off)
- Page 30 Press + or - key to toggle Roger Beep On or Off. Press PTT to confirm and quit or press MENU to continue next function setting. 16 SCAN Before you start scanning please preset the CTCSS code to "00" first. Note: if the CTCSS setting is 01 to 38. it can not scan other channel with different CTCSS code. Press and hold + or - key for at least 3 seconds to start scanning function. LCD display show the scanning Main channel one by one. it will stop at those main channel with signal for a while. And then continue scanning Or if you want to use this channel, press PTT to confirm and your radio will change to this channel. Note: Please aware that you can listen to other radio on.this main channel. If you want to talk to other radios. Please make sure your radio have the same CTCSS code with the others. FCC COMPLIANCY DECLARATION The company Sancon declaration that the device FWAN1A complies will all the requirements specified...
- Page 31 MHz ( License free within USA...
- Page 33 ANTENNA 180°...
- Page 34 the LCD display turn on channels you can ccommunicate with and then speak. ame channel and LCD shows the icon not press PTT key for listening. LCD backlight continuously ON and drain out for next function selection etc. Key tone Roger Beep...
- Page 35 same channel. Only the users with the CTCSS code does not assure ons on the same channel on setting. ng and listening without pressing PTT key m OFF 1, 2,3 for OFF low medium and High m and quit activate VOX function. ame channel. and your call tone will be sent. at designated time. ey Tone is Off. easing the PTT button. o (=Roger Beep Off)
- Page 36 e CTCSS setting is ge to this channel. want to talk to other equirements specified in the ...
Need help?
Do you have a question about the FWCN30A and is the answer not in the manual?
Questions and answers