
Related Manuals for KitchenAid KSM180RP Series


Summary of Contents for KitchenAid KSM180RP Series
- Page 1 Manual de Usuario Batidora KSM15 Series KSM150PS Series KSM175PS Series KSM180RP Series KSM180RC Series KSM185PS Series W11256121A.indd 1 14/06/2018 15:29:21...
- Page 2 W11256121A.indd 2 14/06/2018 15:29:21...
-
Page 3: Table Of Contents
TABLE OF CONTENTS PARTS AND FEATURES �����������������������������������������������������������������������������������������4 Parts and accessories ��������������������������������������������������������������������������������������4 STAND MIXER SAFETY �����������������������������������������������������������������������������������������5 Important safeguards �������������������������������������������������������������������������������������5 Electrical requirements �����������������������������������������������������������������������������������8 Electrical equipment waste disposal ��������������������������������������������������������������8 USING THE STAND MIXER �����������������������������������������������������������������������������������9 Speed control guide ���������������������������������������������������������������������������������������9 Accessory guide �������������������������������������������������������������������������������������������10 Attaching/removing the bowl�����������������������������������������������������������������������10 Lifting/lowering the motor head ������������������������������������������������������������������11 Attaching/removing the flat beater, Flex Edge beater*, wire whip, or dough hook ����������������������������������������������������������������������������11... -
Page 4: Parts And Features
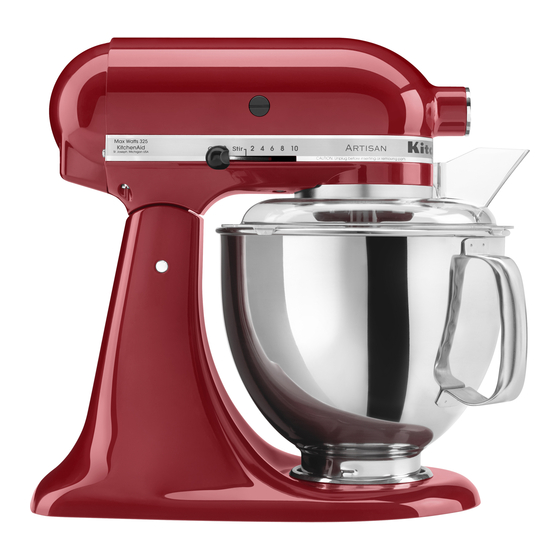
PARTS AND FEATURES PARTS AND ACCESSORIES Attachment hub Attachment knob Pouring shield* Motor head Motor head locking lever (not shown) Speed control lever Beater shaft 2.8 L stainless steel bowl* Beater height adjustment screw (not shown) Dough hook Bowl** Bowl clamping plate Flex Edge beater* Wire whip Flat beater... -
Page 5: Stand Mixer Safety
STAND MIXER SAFETY IMPORTANT SAFEGUARDS When using electrical appliances, basic safety precautions should always be followed, including the following: 1. Read all instructions. Misuse of appliance may result in personal injury. 2. This appliance is not intended for use by persons, including children, with reduced physical, sensory, or mental capabilities, or lack of experience and knowledge, unless they have been given supervision... - Page 6 STAND MIXER SAFETY 3. Children should be supervised to ensure that they do not play with the appliance. 4. If the supply cord is damaged, it must be replaced by the manufacturer, its service agent, or similarly qualified persons in order to avoid a hazard. 5.
- Page 7 10. Do not let the cord hang over edge of table or counter. 11. The use of attachments not recommended or sold by KitchenAid may cause fire, electric shock, or injury. 12. Do not use the Stand Mixer outdoors. 13. Remove flat beater, wire whip, or dough hook from Stand Mixer before washing.
-
Page 8: Electrical Requirements
STAND MIXER SAFETY ELECTRICAL REQUIREMENTS Voltage: 220-240 V~ Frequency: 50-60 Hz Wattage: 300 W NOTE: To reduce the risk of electrical shock, this plug will fit in an outlet only one way� If the plug does not fit in the outlet, contact a qualified electrician�... -
Page 9: Using The Stand Mixer
USING THE STAND MIXER SPEED CONTROL GUIDE SPEED ACTION ATTACHMENT DESCRIPTION STIR For slow stirring, combining, mashing, starting all mixing procedures. Use to add flour and dry ingredients to batter, and to add liquids to dry ingredients. Do not use Speed 1 to mix or knead yeast doughs. -
Page 10: Accessory Guide
USING THE STAND MIXER ACCESSORY GUIDE ACCESSORY USES Flat beater and Cakes, creamed frostings, Flex Edge beater* candies, cookies, pie pastry, for normal to heavy biscuits, meat loaf, mixtures: mashed potatoes Wire whip for Eggs, egg whites, heavy cream, mixtures that need boiled frostings, sponge cakes, air incorporated: mayonnaise, some candies... -
Page 11: Lifting/Lowering The Motor Head
USING THE STAND MIXER LIFTING/LOWERING THE MOTOR HEAD To lower motor head: Push the To lift motor head: Push the locking locking lever to unlock and gently lever to the unlock position and lift bring the head down� The locking the head�... - Page 12 USING THE STAND MIXER Slip accessory onto beater shaft and Hold the locking lever in the unlock press upward as far as possible� Then, position and tilt motor head back� turn accessory to the right, hooking accessory over the pin on the shaft� To remove accessory: Repeat steps 1 and 2�...
-
Page 13: Beater To Bowl Clearance
USING THE STAND MIXER BEATER TO BOWL CLEARANCE Your Stand Mixer is adjusted at the factory so the flat beater just clears the bottom of the bowl� If for any reason the flat beater hits the bottom of the bowl or is too far away from the bowl, you can correct the clearance easily�... -
Page 14: Using The Pouring Shield
USING THE STAND MIXER To remove pouring shield: Lift the front of the pouring shield Turn speed control to “0”� clear of the bowl rim and pull forward� Unplug Stand Mixer� Remove attachment and bowl� USING THE POURING SHIELD* Use the pouring shield to avoid having ingredients splashing out of the bowl when mixing, as well as to easily pour ingredients into the bowl while mixing�... -
Page 15: Operating The Speed Control
“Speed control guide” chart� sufficient� OPTIONAL ATTACHMENTS KitchenAid offers a wide range of optional attachments such as food grinders or pasta makers� They may be attached to the Stand Mixer attachment power shaft, as shown here� Loosen attachment knob by turning To attach: Turn speed control it counterclockwise�... - Page 16 USING THE STAND MIXER Insert attachment shaft housing into attachment hub, making certain that attachment power shaft fits into square attachment hub socket� It may Tighten attachment knob by turning be necessary to rotate attachment clockwise until attachment is back and forth� When attachment completely secured to Stand Mixer�...
-
Page 17: Tips For Great Results
200 mL (3/4 cup) GRADUALLY to 8 Whipping stages Watch cream closely during whipping� Because your KitchenAid Stand Mixer whips so quickly, there are just a few seconds between whipping stages� TIPS FOR GREAT RESULTS | 17 W11256121A.indd 17... -
Page 18: Mixing Tips
TIPS FOR GREAT RESULTS MIXING TIPS Mixing time Cake mixes Your KitchenAid Stand Mixer will mix When preparing packaged cake mixes, use faster and more thoroughly than most Speed 4 for medium speed and Speed 6 other electric mixers� Therefore, the for high speed�... -
Page 19: Care And Cleaning
CARE AND CLEANING Electrical Shock Hazard Plug into an earthed outlet. Always be sure to unplug Stand Mixer before cleaning� Wipe Stand Mixer Do not remove earth prong. with a soft, damp cloth� Do not use household/commercial cleaners� Wipe Do not use an adapter. off beater shaft frequently, removing Do not use an extension cord. -
Page 20: Troubleshooting
TROUBLESHOOTING Please read the following before calling your service centre� 1. The Stand Mixer may warm up during use� Under heavy loads with extended mixing time periods, you may not be able to comfortably touch the top of the unit� This is normal� 2. - Page 21 ÍNDICE PIEZAS Y CARACTERÍSTICAS �����������������������������������������������������������������������������22 Piezas y accesorios ���������������������������������������������������������������������������������������22 SEGURIDAD DE LA BATIDORA ��������������������������������������������������������������������������23 Medidas importantes ������������������������������������������������������������������������������������23 Requisitos eléctricos �������������������������������������������������������������������������������������26 Eliminación de equipos eléctricos descartados �������������������������������������������26 USO DE LA BATIDORA ���������������������������������������������������������������������������������������27 Guía de control de velocidad �����������������������������������������������������������������������27 Guía de accesorios ���������������������������������������������������������������������������������������28 Como fijar/extraer el recipiente �������������������������������������������������������������������28 Cómo levantar/bajar la cabeza del motor ����������������������������������������������������29 Como fijar/extraer el batidor plano, el batidor de borde flexible*, el batidor...
-
Page 22: Piezas Y Características
PIEZAS Y CARACTERÍSTICAS PIEZAS Y ACCESORIOS Conector de accesorios Perilla de accesorios Cabeza del motor Cubierta de vertido* Palanca de Palanca de bloqueo de control de cabeza del velocidad motor (no se muestra) Eje del batidor Recipiente de acero inoxidable de 2.8 litros* Tornillo de ajuste de... -
Page 23: Seguridad De La Batidora
SEGURIDAD DE LA BATIDORA Su seguridad y la seguridad de los demás es muy importante. En este manual y en el mismo aparato encontrará muchos mensajes de seguridad importantes. Lea y obedezca siempre todos los mensajes de seguridad. Este es el símbolo de alerta de seguridad. Este símbolo le avisa de los peligros potenciales que pueden matarle o herirle a usted y a los demás. - Page 24 11. El uso de accesorios no recomendados ni vendidos por KitchenAid puede causar incendios, choques eléctricos o lesiones personales. 24 | SEGURIDAD DE LA BATIDORA W11256121A.indd 24...
- Page 25 SEGURIDAD DE LA BATIDORA 12. No use la batidora al aire libre. 13. Extraiga el batidor plano, el batidor de alambre o el gancho para masa de la batidora antes de lavarla. 14. Para evitar daños en el producto, no use los recipientes de la batidora en áreas donde la temperatura sea muy alta, como en un horno convencional, un horno microondas o una superficie de cocina.
-
Page 26: Requisitos Eléctricos
SEGURIDAD DE LA BATIDORA REQUISITOS ELÉCTRICOS Voltaje: 220-240 V~ ADVERTENCIA Frequencia: 50-60 Hz Potencia: 300 W Para poder conectar el producto de manera adecuada verifique que: - La instalación eléctrica es adecuada de acuerdo a las especificaciones técnicas del producto que se indican en el presente Manual de Uso�... -
Page 27: Uso De La Batidora
USO DE LA BATIDORA GUÍA DE CONTROL DE VELOCIDAD VELOCIDAD ACCIÓN ACCESORIO DESCRIPCIÓN AGITAR Para agitar lentamente, mezclar, machacar; velocidad de inicio de todos los procedimientos de mezcla. Úsela para añadir harina e ingredientes secos a la masa y para añadir líquidos a los ingredientes secos. -
Page 28: Guía De Accesorios
USO DE LA BATIDORA GUÍA DE ACCESORIOS ACCESORIO USOS Batidor plano y batidor Tortas, coberturas en crema, confites, de borde flexible* para galletas, base para tartas, bizcochos, mezclas normales a pastel de carne, puré de papas densas: Use el batidor de Huevos, claras de huevo, crema alambre para mezclas espesa, coberturas hervidas, tartas... -
Page 29: Cómo Levantar/Bajar La Cabeza Del Motor
USO DE LA BATIDORA CÓMO LEVANTAR/BAJAR LA CABEZA DEL MOTOR Para bajar la cabeza del motor: Para levantar la cabeza del motor: Empuje la palanca de bloqueo a Empuje la palanca de bloqueo en la posición desbloqueada y baje la posición desbloqueada y suba suavemente la cabeza�... - Page 30 USO DE LA BATIDORA Deslice el accesorio hacia el eje del Mantenga la palanca de bloqueo en batidor y presione hacia arriba lo la posición desbloqueada e incline la más posible� A continuación, gire a la cabeza del motor hacia atrás� derecha el accesorio, enganchándolo sobre el pasador situado en el eje�...
-
Page 31: Espacio Entre El Batidor Y El Recipiente
USO DE LA BATIDORA ESPACIO ENTRE EL BATIDOR Y EL RECIPIENTE La batidora se ajusta en la fábrica para que el batidor plano mantenga una distancia mínima del fondo del recipiente� Si, por cualquier motivo, el batidor plano golpea el fondo del recipiente o queda ajustado a demasiada distancia del recipiente, puede corregir la distancia con facilidad�... -
Page 32: Uso De La Cubierta De Vertido
USO DE LA BATIDORA Levante la parte frontal de la Para extraer la cubierta de vertido: cubierta de vertido fuera del borde Gire el control de velocidad a “0”� del recipiente y jale hacia delante� Desenchufe la batidora� Extraiga el accesorio y el recipiente� USO DE LA CUBIERTA DE VERTIDO* Use la cubierta de vertido para evitar salpicaduras de ingredientes fuera del recipiente mientras mezcla, así... -
Page 33: Funcionamiento Del Control De Velocidad
ACCESORIOS OPCIONALES KitchenAid ofrece una amplia variedad de accesorios opcionales, como trituradoras de alimentos o máquinas para hacer pasta� Puede conectarlos al eje eléctrico de accesorios de la batidora, como se muestra aquí�... - Page 34 USO DE LA BATIDORA Inserte la carcasa del eje de accesorios en el conector de accesorios, asegurándose de que el eje eléctrico de accesorios se ajuste a Apriete la perilla de accesorios la entrada del conector de accesorios� girándola hacia la derecha hasta Es posible que deba rotar el accesorio que el accesorio quede bien hacia atrás y hacia delante�...
-
Page 35: Sugerencias Para Obtener Resultados Óptimos
2 claras de huevo o más GRADUALMENTE hasta 8 Etapas de espumado Con la batidora KitchenAid, las claras de huevo espuman con rapidez� Evite espumar en exceso� CREMA BATIDA Vierta la crema batida fría en el recipiente refrigerado� Fije el recipiente y el batidor de alambre�... -
Page 36: Sugerencias Para Batir
ÓPTIMOS SUGERENCIAS PARA BATIR Tiempo de mezcla Mezclas para bizcochuelo La batidora KitchenAid mezcla más rápido Cuando prepare mezclas para bizcochuelo y mejor que la mayoría de las demás envasadas, use la Velocidad 4 para batidoras eléctricas� Por lo tanto, debe velocidad media y la Velocidad 6 para ajustar el tiempo de mezcla de la mayoría... -
Page 37: Cuidado Y Limpieza
CUIDADO Y LIMPIEZA ADVERTENCIA Peligro de choque eléctrico Enchufe a un tomacorriente Siempre asegúrese de desenchufar la con conexión a tierra. batidora antes de limpiarla� Limpie la No quite el terminal a tierra. batidora con un paño suave húmedo� No use un adaptador. No utilice limpiadores domésticos ni comerciales�... -
Page 38: Solución De Problemas
SOLUCIÓN DE PROBLEMAS Lea lo siguiente antes de llamar al centro ADVERTENCIA de servicio� 1. La batidora se puede calentar durante el funcionamiento� Con cargas pesadas y períodos de mezcla prolongados, es posible que no deba tocar la parte superior de la unidad, pues estará caliente�... - Page 39 • Cuando la falla, daño o defecto se deba al transporte y/o a la manipulación de un tercero no autorizado por el Garante� • Las tareas de mantenimiento general del producto no originadas en fallas y/o no comprendidas en reparaciones derivadas de la exigibilidad de la garantía� CERTIFICADO DE GARANTIA PEQUEÑOS ELECTRODOMÉSTICOS MARCA KITCHENAID | 39 W11256121A.indd 39 14/06/2018 15:29:36...
- Page 40 Desde el resto del país a nuestra línea gratuita nacional 1 800 201736 Horarios de atención: Llámenos de lunes a viernes de 8:00 a 18:00 horas y sábados de 8:00 a 14:00 horas E-mail: serviciook@whirlpool�com Sitio Web: www�kitchenaid�cl 40 | CERTIFICADO DE GARANTIA ELECTRODOMESTICOS MENORES KITCHENAID W11256121A.indd 40 14/06/2018 15:29:36...
- Page 41 Garante: Whirlpool México, S�A de C�V� Dirección: Antigua Carretera a Roma Km 9, Col� Milagro, Apodaca, N�L� México 66634 Para una atención personalizada llámenos a la línea 01800 0022 767 Consulte también nuestro sitio web www�kitchenaid�com�mx CERTIFICADO DE GARANTIA ELECTRODOMESTICOS MENORES KITCHENAID | 41 W11256121A.indd 41...
- Page 42 Horario de atención: llámenos de lunes a viernes de 8:00 am a 5:00 pm E-mail: serviciook@whirlpool�com ©2018 Todos los derechos reservados� KITCHENAID y el diseño de la batidora son marcas comerciales en Estados Unidos y otros lugares� 42 | CERTIFICADO DE GARANTIA ELECTRODOMESTICOS MENORES KITCHENAID W11256121A.indd 42...
- Page 43 W11256121A.indd 43 14/06/2018 15:29:36...
- Page 44 ©2018 All rights reserved. KITCHENAID and the design of the stand mixer are trademarks in the U.S. and elsewhere. ©2018 Todos los derechos reservados. KITCHENAID y el diseño de la batidora son marcas comerciales en Estados Unidos y otros lugares.
Need help?
Do you have a question about the KSM180RP Series and is the answer not in the manual?
Questions and answers