KitchenAid KSM150PS - Artisan Series Mixer User Manual
User guide
Hide thumbs
Also See for KSM150PS - Artisan Series Mixer:
- User manual (229 pages) ,
- User manual (21 pages) ,
- User manual (105 pages)
Table of Contents
Advertisement
Advertisement
Table of Contents

Related Manuals for KitchenAid KSM150PS - Artisan Series Mixer


Summary of Contents for KitchenAid KSM150PS - Artisan Series Mixer
- Page 1 PIL to do new cover...
-
Page 2: Hassle-Free Replacement Warranty
“failed” Stand Mixer returned to us. Your replacement unit will also be covered by our one year full warranty. Please follow these instructions to receive this quality service. If you reside in the 50 United States and your KitchenAid Stand Mixer ®... -
Page 3: Table Of Contents
Ordering Accessories and Replacement Parts..........5 Electrical Requirements................6 Troubleshooting Problems ................7 About Your Mixer..................8 Stand Mixer Features................8 Assembling Your Mixer................9 Using Your Pouring Shield ..............10 Using Your KitchenAid ® Accessories...........11 Mixing Time .....................11 Mixer Use....................12 Care and Cleaning..................12 Beater to Bowl Clearance .................13 Speed Control Guide ................14... - Page 4 Your safety and the safety of others are very important. We have provided many important safety messages in this manual and on your appliance. Always read and obey all safety messages. This is the safety alert symbol. This symbol alerts you to potential hazards that can kill or hurt you and others.
-
Page 5: Important Safeguards
Call the KitchenAid Customer Satisfaction Center at 1-800-541-6390 for more information. The use of attachments not recommended or sold by KitchenAid may cause fire, electrical shock or injury. Do not use the Stand Mixer outdoors. -
Page 6: Stand Mixer Warranty
® Stand Mixer Warranty for Puerto Rico on page 5. KITCHENAID DOES NOT ASSUME ANY RESPONSIBILITY FOR INCIDENTAL OR CONSEQUENTIAL DAMAGES. Some states do not allow the exclusion or limitation of incidental or consequential damages, so this exclusion may not apply to you. This warranty gives you specific legal... -
Page 7: For Puerto Rico
ARRANGING FOR SERVICE OUTSIDE THE 50 UNITED STATES AND PUERTO RICO Consult your local KitchenAid dealer or the store where you purchased the Stand Mixer for information on how to obtain service. ORDERING ATTACHMENTS, ACCESSORIES,... -
Page 8: Electrical Requirements
ELECTRICAL REQUIREMENTS Volts: 120 A.C. only. Hertz: 60 WARNING The wattage rating for your Stand Mixer is printed on a tag under the mixer base. It is also listed on the trim band. If the power cord is too short, have a qualified electrician or serviceman install an outlet near the appliance. -
Page 9: Troubleshooting Problems
30 minutes before turning it back on. - If the problem is not due to one of the above items, see the “KitchenAid ® Stand Mixer Warranty” or “Arranging for Service After the Warranty Expires”... -
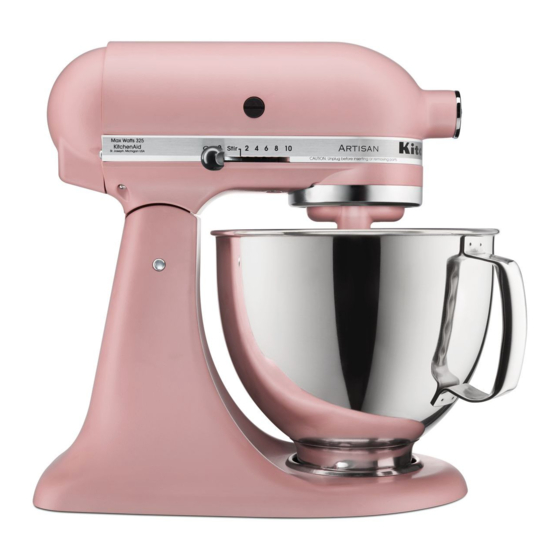
Page 10: About Your Mixer
TILT-HEAD STAND MIXER FEATURES Attachment Hub Motor Head Attachment Knob Speed Control Knob Motor Head Locking Lever (not shown) Beater Shaft Flat Beater Beater Height Adjustment Screw ⁄ or 5 Quart Stainless Steel Bowl Wire Whip Bowl Clamping Plate Dough Hook... -
Page 11: Assembling Your Mixer
ASSEMBLING YOUR TILT-HEAD STAND MIXER To Attach Bowl Turn speed control to OFF. Unplug stand mixer or disconnect power. Tilt motor head back. Place bowl on bowl clamping plate. Turn bowl gently into clockwise direction. Plug mixer into proper electrical outlet.** To Remove Bowl WARNING Turn speed control to OFF. -
Page 12: Using Your Pouring Shield
USING YOUR POURING SHIELD* To Attach Pouring Shield Turn speed control to OFF. Unplug stand mixer or disconnect power. Attach flat beater, dough hook, or wire whip and bowl. See page 9. Place the back half of the shield (without the chute) on rim of the bowl. Insert the tabs on the front half of the shield (with the chute) under the tab openings on the back half of the shield, then lower the shield to lock into place. -
Page 13: Using Your Kitchenaid Accessories
USING YOUR KITCHENAID ACCESSORIES ® Flat Beater for normal to heavy mixtures: cakes biscuits creamed frostings quick breads candies meat loaf cookies mashed potatoes pie pastry Wire Whip for mixtures that need air incorporated: eggs sponge cakes egg whites angel food cakes... -
Page 14: Mixer Use
TILT-HEAD STAND MIXER USE NOTE: Do not scrape the bowl while the Stand Mixer is operating. The bowl and beater are designed to provide thorough mixing without frequent scraping. Scraping the bowl once or twice during mixing is usually sufficient. Turn the unit off before scraping. The Stand Mixer may warm up during use. -
Page 15: Beater To Bowl Clearance
BEATER TO BOWL CLEARANCE Your Stand Mixer is adjusted at the factory so the flat beater just clears the bottom of the bowl. If, for any reason, the flat beater hits the bottom of the bowl or is too far away from the bowl, you can correct the clearance easily. Turn speed control to OFF. -
Page 16: Speed Control Guide
SPEED CONTROL GUIDE Number of Speed Stir Speed STIR For slow stirring, combining, mashing, starting all mixing procedures. Use to add flour and dry ingredients to batter, add liquids to dry ingredients, and combine heavy mixtures. SLOW MIXING For slow mixing, mashing, faster stirring. -
Page 17: Mixing Tips
With this method, sugar and the shortening, butter, or margarine are thoroughly mixed (creamed) before other ingredients are added. For all cakes, mixing times may change because your KitchenAid Stand ® Mixer works more quickly than other mixers. In general, mixing a cake with the KitchenAid ®... -
Page 18: Egg Whites
6+ egg whites...GRADUALLY to 8 Almost Stiff Sharp peaks form when wire Whipping Stages whip is removed, but whites are actually soft. With your KitchenAid ® mixer, egg whites whip quickly. So, watch Stiff but not Dry carefully to avoid overwhipping. -
Page 19: Attachments And Accessories - General Instructions
The hub and shaft housing are tapered to assure a snug fit, even after prolonged use and wear. KitchenAid attachments require no extra power ®... - Page 20 GENERAL INSTRUCTIONS FOR MAKING AND KNEADING YEAST DOUGH WITH THE RAPID MIX METHOD “Rapid Mix” describes a bread baking method that calls for dry yeast to be mixed with other dry ingredients before liquid is added. In contrast, the traditional method is to dissolve yeast in warm water. Place all dry ingredients including yeast into the bowl, except the last 1 to 2 cups of flour.
-
Page 21: Bread Making Tips
Therefore, it will take some practice before you are completely comfortable with the new process. We recommend you start with an easy recipe, like Basic White Bread, until you become accustomed to making bread the KitchenAid way. The following tips will help: Tips for Mixing and Kneading •... - Page 22 BREAD MAKING TIPS Tips for Shaping a Loaf Divide the dough in half. On a lightly floured surface, roll each half into a rectangle, approximately 9x14 inches. A rolling pin will smooth the dough and remove gas bubbles. Starting at a short end, roll the dough tightly.
Need help?
Do you have a question about the KSM150PS - Artisan Series Mixer and is the answer not in the manual?
Questions and answers
Does it need lubrivation and whete
It is 20 years old and I have no manual….when I put a dough hook in it jumps
Yes, the KitchenAid KSM150PS needs lubrication. Grease should be removed from the internal gears (either scraped or flushed with a chemical) and new grease should be applied wherever the original grease was located, primarily on the gears.
This answer is automatically generated