
Related Manuals for Progress PAG6430E


Summary of Contents for Progress PAG6430E
- Page 1 Kookplaat Table de cuisson Kochfeld PAG6430E...
-
Page 2: Table Of Contents
2 progress INHOUD Veiligheidsinformatie Onderhoud en reiniging Veiligheidsvoorschriften Probleemoplossing Beschrijving van het product Montage Dagelijks gebruik Technische informatie Nuttige aanwijzingen en tips Milieubescherming Wijzigingen voorbehouden. VEILIGHEIDSINFORMATIE Lees zorgvuldig de meegeleverde instructies voor installatie en gebruik van het apparaat. De fabrikant is niet verantwoordelijk voor letsel en schade veroorzaakt door een foutieve installatie. -
Page 3: Veiligheidsvoorschriften
3 • Zonder toezicht koken op een kookplaat met vet of olie kan gevaarlijk zijn en brandgevaar opleveren. • Probeer brand nooit met water te blussen, maar schakel in plaats daarvan het apparaat uit en bedek de vlam, d.w.z. - Page 4 4 progress • De elektrische installatie moet een isola- • De dampen die hete olie afgeeft kunnen tieapparaat bevatten waardoor het appa- spontane ontbranding veroorzaken. raat volledig van het lichtnet afgesloten • Gebruikte olie die voedselresten bevat kan worden. Het isolatieapparaat moet...
-
Page 5: Beschrijving Van Het Product
5 • Reinig het apparaat regelmatig om te Verwijdering voorkomen dat het materiaal van het op- Waarschuwing! Gevaar voor letsel of pervlak achteruitgaat. verstikking. • Gebruik geen waterstralen of stoom om het apparaat te reinigen. • Neem contact met uw plaatselijke over- •... -
Page 6: Nuttige Aanwijzingen En Tips
6 progress Als de brander na 15 seconden nog niet brandt, de bedieningsknop loslaten en minstens 1 minuut wachten voordat u opnieuw probeert de vlam te ontste- ken. Belangrijk! Bij afwezigheid van elektrische stroom kunt u de brander ontsteken zonder elektrische inrichting. -
Page 7: Onderhoud En Reiniging
7 Waarschuwing! Gebruik nooit een vlammenwerper. Informatie over acrylamides Belangrijk! Volgens recente wetenschappelijke informatie kan het intensief bruinen van levensmiddelen (met name in producten die zetmeel bevatten), Waarschuwing! Zorg dat de een gezondheidsrisico vormen tengevolge handvaten van de pot niet boven de van acrylamides. -
Page 8: Probleemoplossing
8 progress Verwijderen van vuil: ken met grillstenen, aardewerk potten of 1. – Verwijder direct: gesmolten plastic, pannen van gietijzer. gesmolten folie en suikerhoudende Reinigen van de ontstekingsknop gerechten. Dit onderdeel is uitgerust met een kerami- – Schakel het apparaat uit en laat... -
Page 9: Montage
9 Als er een storing optreedt, probeer dan Deze gegevens zijn nodig om u snel en eerst zelf een oplossing voor het probleem goed te kunnen helpen. Deze gegevens te vinden. Als u niet zelf het probleem kunt vindt u op het typeplaatje. - Page 10 10 progress Belangrijk! Controleer of de Belangrijk! Controleer waneer de installatie gastoevoerdruk van het apparaat voldoet is voltooid of elke leidingfitting goed is aan de aanbevolen waarden. De verstelbare afgedicht. Gebruik een zeepoplossing, aansluiting wordt op de uitbreidingsbrug geen vlam!
- Page 11 11 Waarschuwing! Zorg dat de vlam niet Inbouw uit gaat als u de knop snel van de maximale stand naar de minimale stand draait. Aansluiting op het elektriciteitsnet min. min. 650 mm • Zorg er voor dat het aangegeven voltage 100 mm min.
-
Page 12: Technische Informatie
12 progress voorgeschreven inbouwmaten en het keu- kenmeubel moet voorzien zijn van ventilatie- 30 mm gaten om een continue luchttoevoer te kun- nen garanderen. Om veiligheidsredenen en om een gemakkelijke verwijdering van de min 20 mm oven uit het meubel mogelijk te maken,... -
Page 13: Milieubescherming
13 NORMAAL VERMO- BRANDER inj. 1/100 mm g/uur Sudderbrander Normale brander Driekronenbrander MILIEUBESCHERMING opnemen met de gemeente, de Het symbool op het product of op de gemeentereiniging of de winkel waar u het verpakking wijst erop dat dit product niet product hebt gekocht. -
Page 14: Safety Information
14 progress CONTENTS Safety information Care and cleaning Safety instructions Troubleshooting Product description Installation Daily use Technical information Helpful hints and tips Environment concerns Subject to change without notice. SAFETY INFORMATION Before the installation and use of the appliance, carefully read the supplied instructions. -
Page 15: Safety Instructions
15 • Never try to extinguish a fire with water, but switch off the appliance and then cover flame e.g. with a lid or a fire blan- ket. • Do not store items on the cooking surfaces. • Do not use a steam cleaner to clean the appliance. - Page 16 16 progress • This appliance is not connected to a de- • Do not put aluminium foil on the appli- vice, which evacuates the products of ance. combustion. Make sure to connect the • Do not let acid liquids, for example vine-...
-
Page 17: Product Description
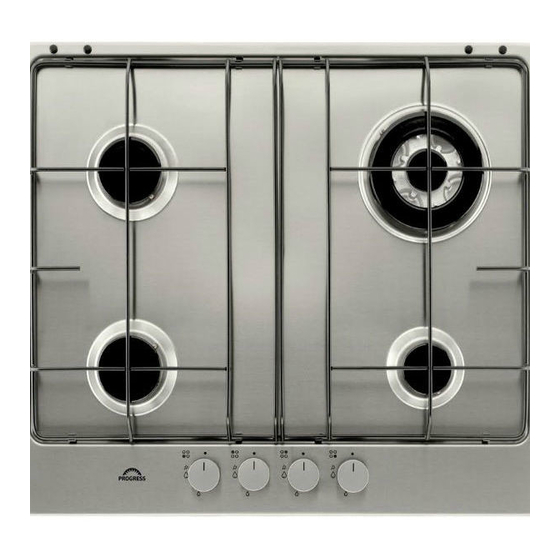
17 PRODUCT DESCRIPTION Cooking surface layout Semi-rapid burner Triple Crown burner Auxiliary burner Control knobs Control knobs Symbol Description Symbol Description ignition position / maximum gas supply no gas supply / off position minimum gas supply DAILY USE Warning! Refer to the Safety chapters. -
Page 18: Helpful Hints And Tips
18 progress Important! In the absence of electricity you can ignite the burner without electrical device; in this case approach the burner with a flame, push the relevant knob down and turn it counter-clockwise to maximum gas release position. If the burner accidentally goes out, turn... -
Page 19: Care And Cleaning
19 CARE AND CLEANING Warning! Refer to the Safety chapters. • Be very careful when you replace the pan supports to prevent the hob top Warning! Deactivate the appliance and from damage. After cleaning, dry the appliance with a soft let it cool down before you clean it. -
Page 20: Troubleshooting
20 progress TROUBLESHOOTING Problem Possible cause Remedy There is no spark when lighting • There is no electrical supply • Make sure that the unit is the gas connected and the electrical supply is switched on. • Control the fuse. If the fuse is released more than one time, refer to a qualified electrician. -
Page 21: Installation
21 If there is a fault, first try to find a solution to • Product number (PNC) ....the problem yourself. If you cannot find a • Serial Number (S.N.) ....solution to the problem yourself, speak your Use the original spare parts only. They are dealer or the local Service Force Centre. - Page 22 22 progress Important! Make sure that the gas supply Injectors replacement pressure of the appliance obeys the 1. Remove the pan supports. recommended values. The adjustable 2. Remove the caps and crowns of the connection is fixed to the comprehensive burner.
- Page 23 23 Electrical connection • Make sure that the rated voltage and type of power on the rating plate agree with the voltage and the power of the lo- cal power supply. • This appliance is supplied with a mains cable and a plug.
-
Page 24: Technical Information
24 progress Kitchen unit with oven separately for safety reasons and to let easy remove oven from the unit. The hob recess dimensions must obey the indication and the kitchen unit must be equipped with vents to let a continuous supply of air. -
Page 25: Environment Concerns
25 ENVIRONMENT CONCERNS contact your local council, your household The symbol on the product or on its waste disposal service or the shop where packaging indicates that this product may you purchased the product. not be treated as household waste. Instead... -
Page 26: Consignes De Sécurité
26 progress SOMMAIRE Consignes de sécurité En cas d'anomalie de fonctionnement Instructions de sécurité Installation Description de l'appareil Caracteristiques techniques Utilisation quotidienne En matière de protection de Conseils utiles l'environnement Entretien et nettoyage Sous réserve de modifications. CONSIGNES DE SÉCURITÉ... -
Page 27: Instructions De Sécurité
27 • Ne faites pas fonctionner l'appareil avec un minuteur externe ou un système de commande à distance. • Il peut être dangereux de laisser chauffer de la graisse ou de l'huile sans surveillance sur une table de cuisson car cela pourrait provoquer un incendie. - Page 28 28 progress • Assurez-vous qu'une protection anti- • Éteignez les zones de cuisson après cha- électrocution est installée. que utilisation. • Utilisez un collier anti-traction sur le câ- • N'utilisez jamais l'appareil comme plan ble. de travail ni comme plan de stockage.
-
Page 29: Description De L'appareil
29 brûleurs. Risque de surchauffe et de rup- • Ne lavez pas les brûleurs au lave-vaissel- ture de la plaque en verre (si votre appa- reil en est équipé) ! • Nettoyez l'appareil avec un chiffon doux • Assurez-vous que la flamme ne s'éteint humide. -
Page 30: Utilisation Quotidienne
30 progress UTILISATION QUOTIDIENNE Avertissement Reportez-vous aux chapitres concernant la sécurité. Allumage du brûleur Avertissement Faites très attention lorsque vous utilisez une flamme nue dans une cuisine. Le fabricant décline toute responsabilité en cas de mauvais usage de la flamme Allumez toujours le brûleur avant de... -
Page 31: Conseils Utiles
31 CONSEILS UTILES Avertissement Reportez-vous aux Avertissement Assurez-vous que les chapitres concernant la sécurité. poignées des récipients ne dépassent pas du devant de la table de cuisson. Économies d'énergie Assurez-vous que les récipients de • Si possible, couvrez les casseroles. -
Page 32: En Cas D'anomalie De Fonctionnement
32 progress • Lavez les éléments en acier inoxydable à Enlevez les salissures : l'eau, puis séchez-les à l'aide d'un chif- 1. – Enlevez immédiatement : plasti- fon doux. que fondu, feuilles plastique et les ali- • Les supports de casserole ne doivent ments contenant du sucre. -
Page 33: Installation
33 Anomalie Cause possible Solution Les flammes sont irrégulières. • La couronne du brûleur doit • vérifiez si l'injecteur n'est pas être encrassés avec des res- bouché et s'il n'y pas de par- tes d'aliments. ticules alimentaires dans la couronne. - Page 34 34 progress Raccordement au gaz Vérifiez les points suivants pour contrôler le bon état du tuyau flexible : Effectuez un raccordement fixe (« rigide ») – il ne présente aucune fente, coupure, ou utilisez un tuyau flexible en acier inoxy- marque de brûlure sur les deux extrémi-...
- Page 35 35 Remplacement du câble d'alimentation Ne remplacez le câble de raccordement qu'avec un câble de type H05V2V2-F T90 ou équivalent. Assurez-vous que la section du câble convient à la tension et à la tem- pérature de fonctionnement. Le câble de terre jaune/vert doit être plus long d'environ...
-
Page 36: Caracteristiques Techniques
36 progress Possibilités d'insertion Élément de cuisine avec four Les dimensions de la niche d'encastrement Élément de cuisine avec porte doivent être conformes aux indications et Le panneau installé sous la table de cuisson l'élément de cuisine doit être équipé d'aéra- doit être facile à... -
Page 37: En Matière De Protection De L'environnement
37 BRÛLEUR PUISSANCE NORMALE kW inj. 1/100 mm Auxiliaire Semi-rapide Triple couronne Brûleurs à gaz pour LPG (Butane/Propane) G30/G31 30 mbar PUISSANCE NORMA- BRÛLEUR inj. 1/100 mm Auxiliaire Semi-rapide Triple couronne EN MATIÈRE DE PROTECTION DE L'ENVIRONNEMENT les services de votre commune ou le... -
Page 38: Sicherheitsinformationen
38 progress INHALT Sicherheitsinformationen Reinigung und Pflege Sicherheitshinweise Fehlersuche Gerätebeschreibung Montage Täglicher Gebrauch Technische Daten Praktische Tipps und Hinweise Umwelttipps Änderungen vorbehalten. SICHERHEITSINFORMATIONEN Lesen Sie vor der Montage und Verwendung des Geräts sorg- fältig die mitgelieferte Anleitung. Der Hersteller haftet nicht für Verletzungen oder Schäden, die durch eine fehlerhafte Monta-... -
Page 39: Sicherheitshinweise
39 • Schalten Sie das Gerät nicht über eine externe Zeitschaltuhr oder eine separate Fernsteuerung ein. • Kochen mit Fett oder Öl auf einem unbeaufsichtigten Koch- feld ist gefährlich und kann zu einem Brand führen. • Versuchen Sie nicht einen Brand mit Wasser zu löschen, sondern schalten Sie das Gerät aus und bedecken Sie die... - Page 40 40 progress • Sorgen Sie dafür, dass ein Berührungs- • Schalten Sie die Kochzonen nach jedem schutz installiert wird. Gebrauch aus. • Kabel zugentlasten. • Benutzen Sie das Gerät nicht als Arbeits- • Achten Sie darauf, Netzstecker und Netz- oder Abstellfläche.
-
Page 41: Gerätebeschreibung
41 • Vergewissern Sie sich, dass die Flamme • Reinigen Sie die Brenner nicht im Ge- nicht erlischt, wenn Sie den Einstellknopf schirrspüler. schnell von der höchsten zur niedrigsten • Reinigen Sie das Gerät mit einem wei- Stufe drehen. -
Page 42: Praktische Tipps Und Hinweise
42 progress So zünden Sie den Brenner: Warnung! Halten Sie den Knopf nicht 1. Drehen Sie den Schalter nach rechts länger als 15 Sekunden gedrückt. Sollte der Brenner nach 15 Sekunden auf die höchste Stufe ( ) und drü- nicht zünden, lassen Sie den Knopf los, cken Sie ihn ein. -
Page 43: Reinigung Und Pflege
43 Verwenden Sie nur Kochgeschirr mit einem Warnung! Achten Sie darauf, dass die Durchmesser, der der Größe der Brenner Topfgriffe nicht über den vorderen entspricht. Rand des Kochfelds hinausragen. Stellen Sie zur Reduzierung des Brenner Durchmesser des Kochge- Gasverbrauchs und im Interesse einer schirrs größeren Stabilität die Töpfe mittig auf... -
Page 44: Fehlersuche
44 progress 2. Reinigen Sie das Gerät mit einem feuchten Tuch und etwas Spülmittel. 3. Am Ende das Gerät mit einem tro- ckenen Tuch abreiben. Edelstahl kann anlaufen, wenn es zu stark erhitzt wird. Verwenden Sie zum Kochen keine Topfsteine, Römertöpfe oder Gussei- senplatten. -
Page 45: Montage
45 selbst lösen können, wenden Sie sich an Ih- • Produktnummer (PNC) .... ren Händler oder an den Kundendienst. • Seriennummer (S.N.) .... Verwenden Sie ausschließlich Originaler- Wenn Sie das Gerät falsch bedient ha- satzteile. Diese sind beim Kundendienst ben oder es nicht von einer autorisier- und autorisierten Ersatzteilhändlern erhält-... - Page 46 46 progress Der Anschluss muss unter Beachtung der sind. Verwenden Sie hierfür eine Bestimmung NEN 1078 erfolgen. Seifenlösung und auf keinen Fall eine Flamme! Wichtig! Achten Sie darauf, dass der Gasdruck des Geräts den empfohlenen Austauschen der Düsen Werten entspricht. Das verstellbare 1.
- Page 47 47 Umdrehung für den Dreikronen-Brenner) Montage zurück. Warnung! Vergewissern Sie sich, dass die Flamme nicht erlischt, wenn Sie den Einstellknopf schnell von der min. min. höchsten zur niedrigsten Stufe drehen. 650 mm 100 mm min. 55 mm Elektrischer Anschluss 30 mm •...
-
Page 48: Technische Daten
48 progress Unterbaumöbel müssen mit Lüftungsschlit- zen versehen werden, um eine ständige 30 mm Luftzufuhr zu gewährleisten. Kochfeld und Backofen müssen aus Sicherheitsgründen über separate elektrische Anschlüsse verfü- min 20 mm gen. Der Backofen muss sich leicht aus (max 150 mm) 60 mm dem Unterbauschrank entfernen lassen. -
Page 49: Umwelttipps
49 NORMALLEISTUNG Inj. 1/100 mm g/Std. Hilfsbrenner Normalbrenner Dreikronen-Brenner UMWELTTIPPS Produkts erhalten Sie von Ihrer Gemeinde, Das Symbol auf dem Produkt oder Ihrer Müllabfuhr oder dem Geschäft, in dem seiner Verpackung weist darauf hin, dass Sie das Produkt gekauft haben. - Page 50 50 progress...
- Page 51 51...
- Page 52 359064202-B-322012...
Need help?
Do you have a question about the PAG6430E and is the answer not in the manual?
Questions and answers