Table of Contents
Advertisement
Advertisement
Table of Contents

Related Manuals for Onbon OVP-M1X


Summary of Contents for Onbon OVP-M1X
- Page 1 USER MANUAL OVP-M1X VIDEO CONTROLLER VERSION:V1.0 RELEASE DATE:2019.2.27...
-
Page 2: Statement
Statement Any companies or privates cannot copy, transcribe or translate part or whole content of this file without our written permission. And cannot use it on any business or benefit filed with any forms. The specifications and information which are mentioned on the file is for reference only, if there’s update, we will not inform you. -
Page 3: Table Of Contents
CATALOG Statement................................2 CATALOG................................3 Brief Introduction..............................5 Safety Note..............................5 About Software............................5 Function..................................6 Overview................................ 6 Characteristics.............................. 6 Physical Instruction............................. 7 Front board..............................7 Backside board............................. 8 Steps..................................9 Main Menu................................10 Operations..............................10 Initial status of main window.........................10 Main menu..............................10 LED Setting..............................11 IMAGE QUALITY............................13 CROP................................ - Page 4 USER MODE SAVE AND SWITCH........................18 Mode save..............................18 User mode switch............................18 Intelligent guiding.............................19 FAQ..................................20 Parameters................................21 www.onbonbx.com Page 4...
-
Page 5: Brief Introduction
Brief Introduction Safety Note There’s high pressure components in this products, please do not open the box and repair it by yourself. Input voltage is 100-240V, 50/60Hz, please use correct power supply. Power cable connect with GND. Please ensure that you will plug in the socket which is connecting with GND before you connect with input and output port Please take off the power supply of LED video processor before you do any hardware operations, and ESD by touching the ground. -
Page 6: Function
Function Overview OVP-M1X video controller is used for big LED screen ,platform, rental, meeting room and so on. It supports pixel-pixel input and output for high resolution LED screen, the video effect will be more clear. There are two Gigabit port on OVP-L1X, it’s the integrated type with video processor and LED big screen. -
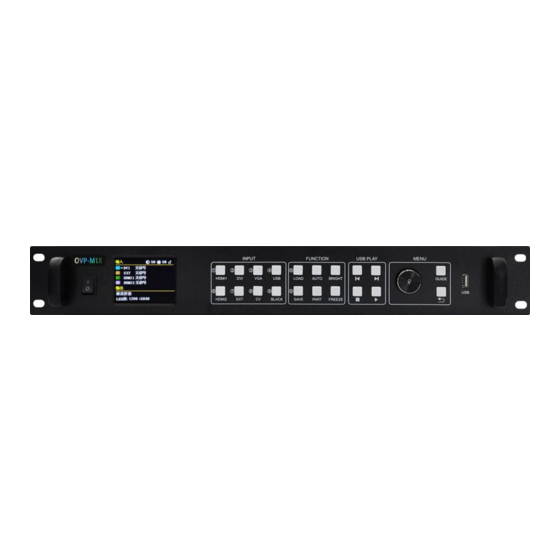
Page 7: Physical Instruction
Physical Instruction Front board ○ ○ ○ ○ ○ ○ ○ Interface Turn on/off button for power supply 2.8" full color LCD screen(320*240) LCD screen operation area, show status of system. INPUT area Buttons for inputting signals. There are 8 buttons from [DVI] ~ [USB]. Note: Output will be in black status if you press BLACK and LED indicator light is on. -
Page 8: Backside Board
Backside board Video input signal DVI port HDMI1 HDMI port 1 HDMI2 HDMI port 2 PAL\NTSC compound video VGA port Video output signal LED1~LED2 Transfer by LAN cable Audio input & output signal HDMI Embedded in HDMI video input port AUDIO_IN Audio input AUDIO_OUT... -
Page 9: Steps
Steps Click【OK】--enter into main menu, then follow the steps: Step 1: Set LED screen parameters (width, height,LAN port width,height and start, end) according to LED screen size. Step 2: Select correct signal source; Step 3: Adjust “display window”; Step 4: Save present display mode by select “save mode” or press 【SAVE】button. Note: The detailed explanation of these 4 steps, please check “Main Menu”... -
Page 10: Main Menu
Main Menu Operations Main menu includes one rotating button, one【OK】button, one【 】button and one 【GUIDE】button. In initial status, short press【OK】as to enter into main menu. In view status, if you rotate clockwise, it will move to upward or left; If you rotate anticlockwise, it will move to downward or right. -
Page 11: Led Setting
it will show: Main menu and branch menu: Main menu The second and third menu Size of LED screen (total width and total height) LAN port output setting (LAN port LED1-LED2): horizontal width, vertical height, horizontal start, vertical start. Adjust display window(horizontal width, vertical height, horizontal start, vertical start) Note:for value of LED1-LED2, system will count automatically, or set manually. - Page 12 Click【OK】as to enter into main menu, then choose “LED setting”, as below: LED Size Click【OK】as to enter into main menu--“LED setting”--”LED size”,as below: After finish settings of LED size, system will be in reset status, users need to wait for a while here.
-
Page 13: Image Quality
Width: 128~1920 Height: 64~2500 Note: If width and height value is 0 in LED1~LED2, means there’s no output . IMAGE SIZE Click【OK】as to enter into main menu--“LED setting”--”IMAGE SIZE”, as below: Width: adjust range 120~can set the maximum pixels in horizontal. ... -
Page 14: Crop
Customized color temperature: adjusting range in RED 0-100 adjusting range in BLUE 0-100 adjusting range in GREEN 0-100 Note:You can also adjust brightness by “BRIGHT”button on board. CROP Click【OK】as to enter into main menu--”CROP”, as below: Open or close CROP function, default is close. ... - Page 15 Input EDID It offers EDID editing function of DVI/HDMI input signal source, means, the recommended resolution of input signal source. In WIN7 system, when the “input EDID (recommended)” is modified which is read by PC, the output resolution of PC will be modified too;But for WIN10 system, output resolution of PC won’t be changed, users need to operate manually.
- Page 16 VGA X:adjust range 0-300。 VGA Y:adjust range 0-300。 Note: (1)Adjust range of VGA X and VGA Y is decided by system. (2)When there’s excursion of VGA input signal in display, users can click “Auto adjust” as to display correctly. And if “Auto adjust”is invalid, users can adjust “VGA horizontal start” and “VGA vertical start”...
- Page 17 Switch stunt:”switch seamless” and “fade over” Voice setting:Including switch button and volume setting. Testing photo There are 8 testing photos, photo 1-photo 8, default is “close”. Button lock Default is “close”, when “button lock” is in open status, all the buttons will be useless except 【OK】.
-
Page 18: User Mode Save And Switch
USER MODE SAVE AND SWITCH Mode save Press “SAVE” on board, as below: Select the save mode you want, then, click【OK】. Note: (1)If the circle is solid, means the present mode data is already there; If the circle is hollow, means the present mode data is not there. -
Page 19: Intelligent Guiding
Intelligent guiding It’s for the users who use it at the first time. And set for LED screen by 3 steps. It’s very simple, convenient and useful. Press “【GUIDE】”, as below: Users only need to choose “Yes”, and follow the steps. www.onbonbx.com Page 19... -
Page 20: Faq
This is a professional equipment, users should be professional on it. When you meet some problems, please try to check with below info. And if you still cannot solve, please contact with local agent or contact with us directly. Problems Checking and adjusting solutions There’s no display or Please check power supply cable. -
Page 21: Parameters
Parameters Image input port VGA×1 VESA: UXGA@75Hz downward compatible HDMI×2 VESA,HDMI 1.4 DVI×1 VESA,compatible with HDMI 1.4 CV×1 Support PAL \ NTSC compound video USB×1 USB2.0,support 1080p@30fps or 720p@60fps content Image output port By LAN port Each port supports maximum 650,000pixels @60Hz Horizontal splicing: width≤1920, height≤2500, total pixels:≤1.3 million NET×2 pixels... - Page 22 Contact Us Shanghai ONBON Technology Co.,ltd (Headquarters) Address: 7 Floor, Tower 88, 1199#, North Qinzhou Road, Xuhui District, Shanghai City, China ONBON (Jiangsu) Optoelectronic Industrial Co.,LTD Address: 1299#, Fuchun Jiang Road, Kunshan City, Jiangsu Province, China Tel Phone: 086-0512-36912687 Website: www.onbonbx.com...
Need help?
Do you have a question about the OVP-M1X and is the answer not in the manual?
Questions and answers
There's an error after video plays for 10 minutes.