
Related Manuals for Recsea WHC-G1XMkIII


Summary of Contents for Recsea WHC-G1XMkIII
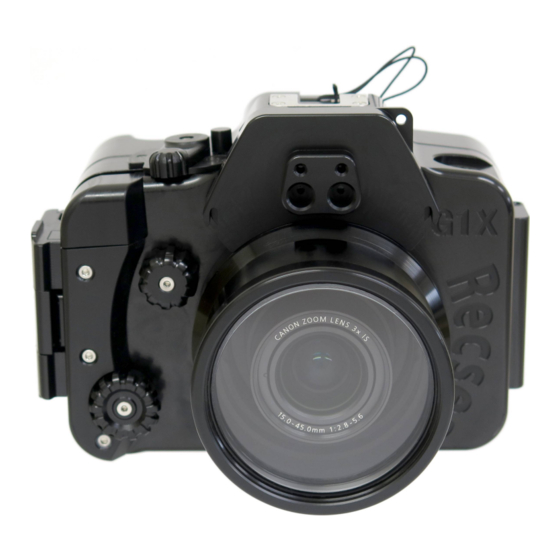
- Page 1 CANON POWERSHOT G1 X Mark III Underwater Housing Recsea WHC-G1XMkIII MANUAL Please read this manual before use. NTF CORPORATION UH Division http://www.seatool.net...
-
Page 2: Features Of This Product
INTRODUCTION CANON POWERSHOT G1 X Mark III Underwater Housing WHC-G1XMkIII ※ Thank you for purchasing the WHC-G1XMkIII Underwater Housing. ※ To ensure proper and safe use, please thoroughly read this manual. ※ Improper use may cause leakage causing irreparable damage to your digital camera. -
Page 3: Package Contents
※ Rear Mode and Exposure Compensations Dials. ※ Rear Control Dial with push button function. ※ RECSEA original Secure-Latch locking system for easy opening and closing. ※ Quality silicone O-ring with wide Back Cover contact surface. ※ Complete camera function control. -
Page 4: Warranty Information
Dealer Name Serial Number ※Dealer: Stamp your company name and contact information, purchase date, model and serial number. Recsea/Seatool Manufacturing & Sales NTF CORPORATION UH Division 390-1 Mii, Midori-Ku, Sagamihara-Shi Kanagawa 252-0151, Japan T: +81 (0)50-7541-0294 F: +81 (0)42-780-5720... - Page 5 ATTENTION! ※ Please refer to camera manual for explanation of all camera functions. ※ Open camera flash prior to installing camera.
-
Page 6: Installing Camera
※ The housing Front Dail, Mode Dial, Exposure Compensation Dial, and Control Dial are designed to turn these camera dials back and forth via friction from the O-ring that comes in contact with them inside the housing. Should the dials begin to slip, use a clean soft dry cloth to wipe away any oil and other contaminates that may cause the loss of friction from the O-rings and camera dials. - Page 7 Window as required for attaching external flash cables. 2. Insert bear fiber-optic cable (INON) or plug (SEA&SEA) into sockets provided. ※ Two (2) Tripod Screw Sockets are provided at the bottom of the housing for use in attaching Seatool/Recsea genuine tray and grip assemblies.
-
Page 8: Handling Precautions
※The Accessory Shoe can be used for installation of a target light. Be mindful of weight of the light intended to use. For heavy lights use Seatool/Recsea tray and grip assembly. ※ Please refrain from using light attached to the Accessory Shoe as a carrying handle. -
Page 9: Specifications
1. Using the O-ring Removal Pick, remove O-ring. 2. Clean sand, salt, other contaminants and old grease from O-ring. 3. Clean O-ring Groove and O-ring Contact Surface using a clean cotton swab. 4. Visually and physically check O-ring by passing through finger tips, feeling for cuts, cracks or any other defects. -
Page 10: Insurance Information
※ For replacement of consumable parts such as O-rings and the internal bezel of the Continuous Control Ring Dial please contact your dealer or Seatool/Recsea. OPTIONS The following items are optional. Please contact Seatool/Recsea or your local dealer if you wish to purchase. ・WHC-G1XMkIII O-ring ・SEATOOL O-ring Grease w/O-ring Pick... - Page 11 ※ Warranty does not cover any losses resulting from any malfunction of this product, including those related to lost profits or any related expenses. ※ Seatool/Recsea will stock parts necessary for repair for five (5) years from stop of production.
- Page 12 MEMO...
Need help?
Do you have a question about the WHC-G1XMkIII and is the answer not in the manual?
Questions and answers