Table of Contents
Advertisement
Quick Links
Advertisement
Table of Contents

Related Manuals for V-ZUG Maxi-Flex Series


Summary of Contents for V-ZUG Maxi-Flex Series
- Page 1 Operating instructions Induction Maxi-Flex with display Glass ceramic hob...
- Page 2 The product family (model number) corresponds to the first alphanumerics on the identification plate. These operating instructions apply to: Type Product family GK46TIMAS/C/F 31030 GK46TIMPS/C/F/F spec. 31029 Variations depending on the model are noted in the text. © V-ZUG Ltd, CH-6301 Zug, 2016...
-
Page 3: Table Of Contents
Contents 1 Safety precautions 5 Symbols used ..................... 5 General safety precautions .............. 6 Appliance-specific safety precautions............ 7 Instructions for use .................. 8 2 Disposal 11 3 Using for the first time 12 4 Your appliance 13 Appliance overview ................. 13 Operating and display elements ............ 14 How induction hobs function .............. - Page 4 Button signal .................... 37 Timer default value.................. 38 Factory settings .................. 38 7 Care and maintenance 39 8 Trouble-shooting 40 9 Technical data 44 Product fiche .................... 44 10 Index 45 11 Service & Support 47...
-
Page 5: Safety Precautions
Safety precautions Symbols used Denotes important safety precautions. Failure to observe said precautions can result in injury or in dam- age to the appliance or fittings! Information and precautions that should be observed. Information on disposal Information about the operating instructions ▸... -
Page 6: General Safety Precautions
1 Safety precautions General safety precautions ▪ Read the operating instructions before using the appliance for the first time! ▪ This appliance can be used by children aged 8 and above and by persons with reduced physical, sensory or mental cap- abilities, or lack of experience and/or knowledge, provided they are supervised or have been instructed on the safe use of the appliance and have understood the hazards involved. -
Page 7: Appliance-Specific Safety Precautions
1 Safety precautions Appliance-specific safety precautions ▪ WARNING: Under no circumstances may hot pots or pans be placed on the display. ▪ WARNING: If the surface is cracked or there is damage to the material thickness, the appliance must be switched off and disconnected from the electricity supply in order to avoid a possible electric shock. -
Page 8: Instructions For Use
1 Safety precautions Instructions for use Before using for the first time ▪ The appliance must be installed and connected to the electricity supply in accordance with the separate installation instructions. Have a qualified fitter/ electrician carry out the necessary work. Correct use ▪... - Page 9 1 Safety precautions Caution: Risk of burns! ▪ Overheated fat and oil can easily catch fire. Never attempt to extinguish burning oil or fat with water. Danger of explosion! Smother the flames with a fire blanket. Keep doors and windows closed. Caution: Risk of injury! ▪...
- Page 10 1 Safety precautions ▪ The hob is an item for daily use: signs of usage such as scratches or visible material abrasion from pots or cookware are normal. Intensive use leads to more distinctive signs of usage. In such cases, the appliance continues to function perfectly and a complaint is not justified.
-
Page 11: Disposal
Disposal Packaging ▪ All packaging materials (cardboard, plastic film (PE) and polystyrene (EPS)) are marked and should, if possible, be collected for recycling and disposed of in an environmentally friendly way. Disconnection ▪ Disconnect the appliance from the mains. With a fixed appliance, this is to be carried out by a qualified electrician! Safety ▪... -
Page 12: Using For The First Time
Using for the first time The appliance must be installed and connected to the electricity supply in accordance with the separate installation instructions. Have a qualified fitter/electrician carry out the necessary work. During the first few hours of use, a cooking zone can give off an un- pleasant smell. -
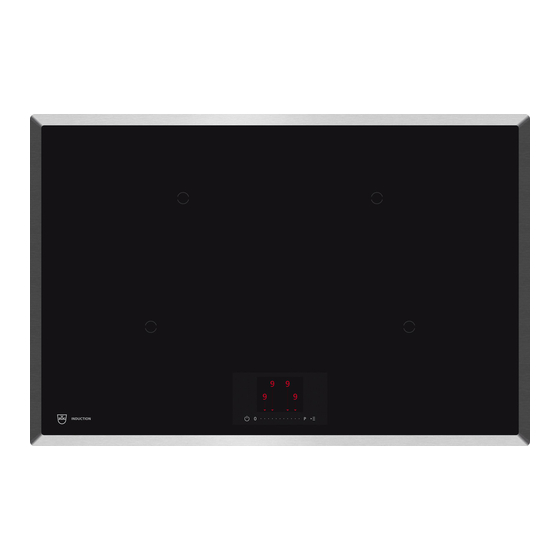
Page 13: Your Appliance
Your appliance Appliance overview GK46TIMAS, GK46TIMASC, GK46TIMASF ▪ 4 adjustable cooking zones GK46TIMPS, GK46TIMPSC, GK46TIMPSF, GK46TIMPSF spec. ▪ 4 adjustable cooking zones... -
Page 14: Operating And Display Elements
4 Your appliance Operating and display elements Buttons ON/OFF button, pause function ▪ Appliance ON/OFF ▪ Pause cooking Multi-function button ▪ Operating time ▪ Keeping warm, melting, simmering ▪ AutoCook ▪ Timer ▪ Wipe protection ▪ User settings Slider ▪ Select cooking zones ▪... - Page 15 4 Your appliance Displays 1:20 Cooking zone power level AutoCook Simmer Timer Pause cooking Operating time...
-
Page 16: How Induction Hobs Function
4 Your appliance How induction hobs function Induction hobs work very differently from conventional hobs or hot plates. The induction coils under the glass ceramic plate produce a rapidly changing mag- netic field which directly heats up the magnetic base of the cookware. The glass ceramic plate is only warmed by the hot cookware. -
Page 17: Pan Detection
4 Your appliance Pan detection Each cooking zone is equipped with pan detection. This detects suitable in- duction compatible cookware with a magnetic base. ▪ If the cookware is removed during operation or if unsuitable cookware is used, – the power level selected flashes alternately with ▪... - Page 18 4 Your appliance Coated cookware ▪ Coated cookware when empty may never be heated at a higher power level than 7. – The coating may otherwise become overheated and damaged. ▪ For frying, do not use a higher power level than 9. Never use PowerPlus with coated frying pans.
-
Page 19: Operating The Appliance
Operating the appliance Switching the appliance on and off All the appliances are operated in the same way. ▸ To switch the appliance on: Keep the button pressed for 1 second. – «0» illuminates in all the power level displays. – If no other button is pressed, the appliance switches off after about 10 seconds for safety reasons. -
Page 20: Overview Of Power Levels
5 Operating the appliance Overview of power levels Power level Cooking method Melting, gentle Butter, chocolate, warming gelatine, sauces Swelling Rice Continued cooking, Vegetables, potatoes, sauces, reducing, stewing fruit, fish Continued cooking, Pasta, soup, braised meat braising Gentle frying Rösti (hash browns), omelettes, breaded fried foods, sausages Frying, deep frying Meat, chips... -
Page 21: Bridging Function
5 Operating the appliance Bridging function The bridging function allows the two right cooking zones or the two left cook- ing zones to be switched on together and to be regulated together. Switching the bridging function on ▸ Use the slider to select the far left or far right cooking zone and keep this position pressed for 2 seconds. -
Page 22: Melting, Keeping Warm And Simmering
5 Operating the appliance Melting, keeping warm and simmering Melting With the melting function, butter, chocolate or honey, for in- stance, can be gently melted at approximately 42 °C. Keeping The keep warm setting keeps cooked food warm at approxim- warm ately 65 °C. -
Page 23: Powerplus
5 Operating the appliance PowerPlus All the cooking zones are equipped with the PowerPlus booster. When PowerPlus is switched on, the cooking zone selected works at extra high power for 10 minutes. PowerPlus can be used, for instance, to heat a large quantity of water quickly. - Page 24 5 Operating the appliance Power management GK46TIMAS, GK46TIMASC, GK46TIMASF, GK46TIMPS, GK46TIMPSC, GK46TIMPSF, GK46TIMPSF spec. PowerPlus cannot be used with both cooking zones of a group (A or B) at the same time. If PowerPlus is activated with both cooking zones of a group, then the power output is reduced for the cooking zone that was first selected.
-
Page 25: Autocook
5 Operating the appliance AutoCook Do not leave food cooking unattended while using AutoCook. Risk of boiling over, burning on and igniting! With AutoCook, a cooking zone works at power level 9 for a certain duration (see table). When this duration is up, it automatically switches back to the pre- viously set power level. -
Page 26: Operating Time
5 Operating the appliance Switching AutoCook off before time ▸ Switch the cooking zone off. ▸ To resume operation without AutoCook, select the cooking zone again and set a power level. 5.10 Operating time Do not leave the hob unattended during use. Risk of boiling over, burning on and igniting! With the operating time function, the cooking zone switches off automatically after a set time (between 1 min. - Page 27 5 Operating the appliance To increase or decrease the operating time faster, long press the slider. To clear the operating time, press and hold "0" on the slider. ▸ Press the slider below – The operating time is taken 1:20 over and displayed below the power level display for the relevant cooking zone.
- Page 28 5 Operating the appliance Switching the operating time off before time ▸ Use the slider to select the desired cooking zone. ▸ Press the button. – The «Cooking zone dependent functions» menu appears. The cooking zone selected is indicated by illuminating in the layout. ▸...
-
Page 29: Timer
5 Operating the appliance 5.11 Timer The timer functions like an egg timer (1 min.–9 h 59 min.). It can be used at any time and independently of all other functions. Setting the timer In order to set the timer, no cooking zone may be selected. ▸... - Page 30 5 Operating the appliance Querying the duration remaining of the timer In order to display the duration remaining of the timer, no cooking zone may be selected. ▸ Press the button. 0 h 46 – The «Cooking zone inde- pendent functions» menu is displayed.
-
Page 31: Pause Cooking
5 Operating the appliance ▸ Press the slider below – The timer is deactivated. – goes out above the button. Timer finished When the timer finishes, – an acoustic signal is emitted. – flashes above the button. – 0h00 flashes in the display. ▸... -
Page 32: Wipe Protection
5 Operating the appliance 5.13 Wipe protection This function prevents the power level from being changed accidentally, for in- stance when wiping the control panel with a cloth. Switching wipe protection on To set wipe protection, the cooking zones may be active. However no cooking zone may be selected. -
Page 33: User Settings
User settings The following user settings can be set and stored individually: User settings Function Possible settings Childproof lock Off* German* Language French Italian English Levels 1–9 Individual settings Brightness Level 5* Levels 1–9 Loudness Level 5* Button signal Off* Recommended value 0h00* –... -
Page 34: Accessing The User Settings
6 User settings Accessing the user settings To change the user settings, the cooking zones may be active. However no cooking zone may be selected. ▸ Press the button. – The «Cooking zone dependent functions» menu appears. ▸ Use the slider to select ▸... -
Page 35: Childproof Lock
6 User settings Childproof lock Activate childproof lock (see page 34) Overriding the childproof lock off ▸ Switch the appliance on. Childproof lock ON – The following display appears indicating that a code is re- quired to unlock the appli- ance: Override code: 2 2 6 ▸... -
Page 36: Brightness
6 User settings Brightness The preferred brightness level for the display can be set in the user settings. Changing the brightness settings ▸ Access the user settings (see page 34). ▸ Use the slider to select – illuminates brightly and appears. -
Page 37: Loudness
6 User settings Loudness The preferred volume of the acoustic signals can be set in the user settings. Changing the volume settings ▸ Access the user settings (see page 34). ▸ Use the slider to select – illuminates brightly and appears. - Page 38 6 User settings Timer default value The timer default value can be set in the user settings. If, at a later stage, the operating time or the timer are set, the timer default value appears as the de- fault setting. Setting and changing the timer default value ▸...
- Page 39 Care and maintenance Preferably, do not clean the appliance until it is cold. Burns hazard! Clean the hob after every use in order to prevent food residues from burning on. Cleaning dried-on and burnt-on dirt requires more effort. If the appliance is not cleaned correctly, the appearance and surface could be damaged.
- Page 40 Trouble-shooting What to do if … … the appliance is not working and the display is dark? Possible cause Solution ▪ The fuse or circuit breaker ▸ Change the fuse. for electrical installations ▸ Reset the circuit breaker. in the home is defective. ▪...
- Page 41 8 Trouble-shooting … a continuous acoustic signal is emitted and the following flashes in the display? Possible cause Solution ▪ A button was touched for ▸ Remove object or food that has boiled over. longer than 10 seconds. ▸ The appliance can be used again as normal. ▪...
- Page 42 8 Trouble-shooting flashes in the display? Possible cause Solution ▪ The excess temperature ▸ Allow the cooking zone to cool down. protection of a cooking ▸ Resume cooking on a different cooking zone was triggered. zone. ▸ Check cookware. … «E» and «8» flash alternately in the display? Possible cause Solution ▪...
- Page 43 8 Trouble-shooting … an acoustic signal is emitted and «Er57» illuminates in the display? Possible cause Solution ▪ Display has overheated ▸ Immediately remove the hot cookware or due to, for instance, hot food that has boiled over from the display. cookware or food on the ▸...
- Page 44 Technical data Product fiche In accordance with EU Regulation No. 66/2014 Model number GK 31029 Type designation GK GK46TIMPS/C/F/F spec. Number of cooking zones Heating technology Induction cooking zone Cooking zone dimensions 18 × 20 18 × 20 18 × 20 18 ×...
- Page 45 Index Appliance Instructions for use ........8 Switching on and off ...... 19 Appliance overview ......... 13 Appliance-specific safety precautions Language........... 35 ..............7 Loudness ........... 37 AutoCook........... 25 Loudness settings Switching off before time .... 26 Changing .......... 37 Switching on........
- Page 46 Residual heat indicator ......20 Safety ............11 Safety precautions General........... 6 Safety shut-off ........... 41 Serial number (FN) ........12 Service & Support........47 Symbols ............5 Technical enquiries........47 Timer ............29 Changing duration remaining .. 30 Finished.......... 31 Querying duration remaining ..
- Page 47 You can find the telephone number for your nearest V-ZUG service centre at www.vzug.com→Service→Service hotline. Technical enquiries, accessories, extended warranty V-ZUG is happy to help with your general administrative and technical enquiries, orders for accessories and spare parts, or information relating to advanced service agreements.
- Page 48 ▸ Press or swipe the slider to set the power level while the cooking zone is illuminated. – The cooking zone selected illumin- ates red. To switch appliance off ▸ Keep the button pressed for 2 seconds. J31029352-R02 V-ZUG Ltd Industriestrasse 66, P.O. Box 59, CH-6301 Zug info@vzug.com, www.vzug.com...
Need help?
Do you have a question about the Maxi-Flex Series and is the answer not in the manual?
Questions and answers