
Subscribe to Our Youtube Channel
Related Manuals for OWC U.2 NVMe Interchange System


Summary of Contents for OWC U.2 NVMe Interchange System
- Page 1 U.2 NVMe Interchange System for Mercury Helios 3S Assembly Manual & User Guide Install up to 16TB Designed for Locking drive bay U.2 NVMe SSD global workflows...
-
Page 2: Table Of Contents
1.5 Usage Notes ................3 Device Setup 2.1 Assembly Steps ................ 4 Support Resources 3.1 Formatting ................10 3.2 Troubleshooting ..............10 3.3 About Data Backup ..............10 3.4 Contacting Technical Support ..........10 U.2 NVMe Interchange System for Mercury Helios 3S Contents... -
Page 3: Introduction
The images and descriptions may vary slightly between this manual and the unit shipped. Functions and features may change depending on the firmware version. The latest product details and warranty information can be found on the product web page. OWC’s Limited Warranty is not transferable and subject to limitations. -
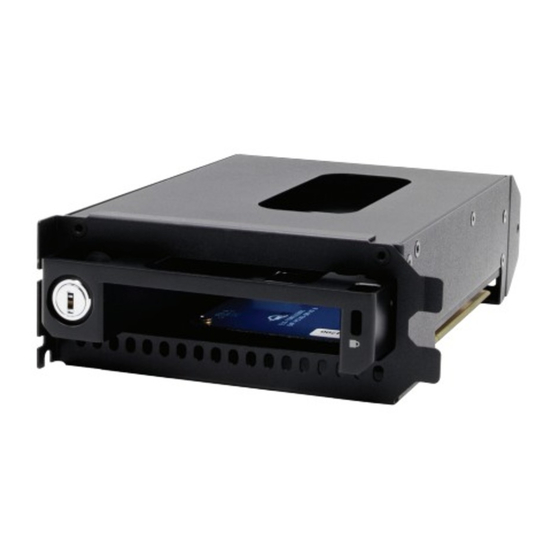
Page 4: Rear View
1. Security lock – use the included keys to unlock or secure the U.2 drive carrier tray to the Mercury Helios 3S. 2. Security slot – connect a security tether here. U.2 NVMe Interchange System for Mercury Helios 3S Introduction... -
Page 5: Usage Notes
1809 (October 2018) or later, you can eject the drive by clicking the ‘Show hidden items’ menu in the Taskbar, then clicking ‘Safely Remove Hardware and Eject Media’, and last select the ‘Eject’ option for this volume. U.2 NVMe Interchange System for Mercury Helios 3S Introduction... -
Page 6: Device Setup
DEVICE SETUP 2.1 Assembly Steps This section describes the process of setting up and installing the U.2 NVMe Interchange System for Mercury Helios 3S; drive formatting information is available in Section 3. If you received this product pre-installed and need to replace the U.2 drive, start with the final step and work backward to Step 6, at which point you can replace the drive and then follow the same instructions back to the final step. - Page 7 4. Set the U.2 NVMe Interchange System in front of you then turn the key to unlock the drive tray. 5. Pull the drive tray out and separate it from the outer case. 6. Flip the drive tray over and set it on a flat surface.
- Page 8 For now set the tray and drive aside. 9. Align the inner chassis of the Mercury Helios 3S and the outer case of the U.2 interchange system as shown. U.2 NVMe Interchange System for Mercury Helios 3S Device Setup...
- Page 9 Affix the last included screw at the location shown. 12. Re-affix the two thumbscrews you removed in Step 3, to secure the PCIe bracket on the Interchange system. U.2 NVMe Interchange System for Mercury Helios 3S Device Setup...
- Page 10 Mercury Helios 3S. Once the connector on the tray is fully seated, the edge of the tray should be flush with the edge of the Mercury Helios 3S. U.2 NVMe Interchange System for Mercury Helios 3S Device Setup...
- Page 11 17. When the installation is complete the device should appear as shown. The PCIe enclosure and installed U.2 drive can now be connected to the computer host and the drive formatted as needed. U.2 NVMe Interchange System for Mercury Helios 3S Device Setup...
-
Page 12: Support Resources
Mercury Helios 3S is the sole responsibility of the user, and under no circumstances may OWC, its parents, partners, affiliates, officers, employees, or agents be held liable for loss of the use of data including compensation of any kind or recovery of the data. - Page 13 OWC. © 2019 Other World Computing, Inc. All rights reserved. OWC and the OWC logo are trademarks of New Concepts Development Corporation, registered in the U.S. and/or other countries. Mac and macOS are trademarks of Apple Inc., registered in the U.S. and other countries. Thunderbolt and the Thunderbolt logo are trademarks of Intel Corporation in the U.S.
Need help?
Do you have a question about the U.2 NVMe Interchange System and is the answer not in the manual?
Questions and answers