Table of Contents
Advertisement
................................................................................................ 1
................................................................................................
3-1 Unpacking and Checking..................................................................................
3-2 Installing Components .....................................................................................
3-3 Leveling the Scale...........................................................................................
4-1 Specifications & General Features ..........................................................................
4-2 Front Panel ..................................................................................................
4-2-1 LCD display................................................................................................
4-2-2 Keyboard...................................................................................................
4-3 Power Supply................................................................................................
Function Setting and
5.
5-1 Function Setting ............................................................................................
................................................................................................ 9
7-1 weighing ......................................................................................................
7-3 check weighing..............................................................................................
7-4 Simple Counting.............................................................................................
7-5 Accumulation, Accumulation Display and Accumulation Clearing..............................
7-6 Printer initialization by the indicator operation........................................................
7-7 Input commands............................................................................................
8-1 Diagram........................................................................................................
Manual_JWL_V2
(II)
CONTENTS
Description of Parameter Values
....................................................................
...
......................................................
JWL
1
1
1
1
2
3
3
4
5
5
6
10
10
11
12
12
13
13
14
14
0
Advertisement
Table of Contents

Related Manuals for Jadever JWL Series


Summary of Contents for Jadever JWL Series
-
Page 1: Table Of Contents
(II) CONTENTS ………………………………….……………………………………………….. 1 1. Introduction …………………………………….…………………………………………….. 2. Precautions 3. Before Using the Product 3-1 Unpacking and Checking………………………………………………………………………. 3-2 Installing Components ………………………………………..……………………………….. 3-3 Leveling the Scale………………………………………………..…………………………….. 4. Product Introduction 4-1 Specifications & General Features …………………………………........4-2 Front Panel …….………………………………………………………………………………. 4-2-1 LCD display…………………………………………………………………………………… 4-2-2 Keyboard………………………………………………………………………………………... -
Page 2: Introduction
(II) 1. Introduction This manual contains installation and operation instructions for the JWL Series weighing indicator. Please read the manual completely before installation and operation. 2. Precautions Place the scale on a flat and stable surface (Refer to Section 3-3). -
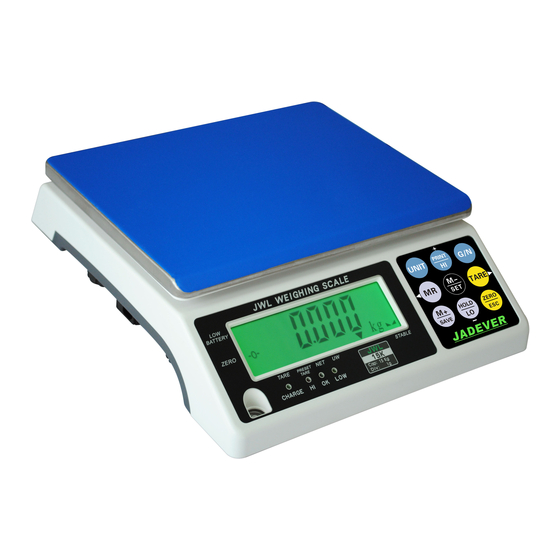
Page 3: Product Introduction
(II) 4. Product Introduction 1. level indicator 7. On/off switch 2. Front panel 8. Two-stage switch 3. Bottom housing 9. Power socket 4. RS-232 interface 10. Transport protection screw 5. Plastic weighing pan 11. Plug buckle 6. Stainless steel weighing pan 4-1 Specifications &... -
Page 4: Lcd Display
(II) General Features Auto shut off, built-in rechargeable batteries or AC alternative Multiple functions: tare, preset tare, simple counting, check weighing, accumulation and display for every deal. Large bright backlit LCD with prominent 29mm high digits and LED backlight Software filtering design and adjustable weighing displaying speed according to different environments. -
Page 5: Keyboard
(II) Green---battery is fully charged HI lamp ON The weight on the weighing pan is greater than the upper limit. OK lamp ON The weight on the weighing pan is between upper and lower limits. LOW lamp ON The weight on the weighing pan is smaller than lower limit. Units of measure Stable indication 4-2-2 Keyboard... -
Page 6: Power Supply
(II) 3. Delete the present accumulation record for the sake of wrong accumulation operation under the accumulation mode. 1. Adds the indicated weight into accumulation memory 2. During editing, save and return to the higher option 1. Memory recall 2. Select the former parameter in the same level 3. -
Page 7: Description Of Parameter Values
(II) M-/SET 3. Press to enter the parameter setting. TARE/ 4. Press to shift between the function parameters M+/SAVE 5. Press to save and return. ZERO/ESC 6. Press to exit without saving. 5-2 Description of Parameter Values 1. P00: Offset value Displays the offset value and the keypad testing can be conducted 2. - Page 8 (II) available, that is you could add article after hold the first value. HOLD/LO/- HoLd – 4: Press key to hold. Press any key to release Sub menu for Hold 3: INF (default: infinity) /10 /20 /50 /100 /200 /500 /1000 2000 /5000 /10000 /20000 /50000 H=current hold value, R=hold value range, d= division, W= actual weight Keep to hold the value when |W-H|<=R*d, or the scale will exit the hold function.
- Page 9 Note: Special setting is needed by distributor if you want to print in Chinese. = Work with the function of “Use Serial Keys” in Windows in outputting the data to Excel. Reference user manual: http://www.jadever.com.cn/Download.aspx = the U.KEY Connector function to work with PC directly.
-
Page 10: Calibration
(II) RTC setting: M-/SET When the window shows “on”, press to enter RTC setting and the window shows the TARE/ M-/SET year. Press to choose date and time. Press to enter setting. TARE/ +/PRINT/HI Press to shift key leftward or rightward; Press HOLD/LO/- M+/SAVE to change the value. -
Page 11: Operation
(II) TARE 4. Put the corresponding weight on the weighing pan, and then press to complete the first point calibration. “ ”appears at the left bottom. Note: After the first point calibration, the window can display the weight value. If no need for the other point calibration, move to step 6 to finish the calibration procedure. -
Page 12: Check Weighing
(II) HOLD/LO/- M+/SAVE to change the value. Press to save and return to weighing mode. Put the load on the container, the scale will automatically deduct the value of the container from the total value. NOTE: Press Key to display gross and net weight by turns. TARE/ ZERO/ESC 4) Clear the load on the container, and press... -
Page 13: Simple Counting
(II) over or equal 20d, the HI lamp will light up. 7-4 Simple Counting UNIT 1. Press key to select the unit “PCS”. G/N, 2. Press key the ex-factory default sample quantity (10 pcs) is displayed. +/PRINT/HI HOLD/LO/- 3. Use key to choose the sampling amount. -
Page 14: Printer Initialization By The Indicator Operation
(II) TARE/ to check the total accumulation and each accumulation event in detail. The number of weighments is indicated by Auxiliary display at the left bottom. XX=Total accumulation; XX=certain accumulation Accumulation Clear To clear accumulation data (total accumulation data or one of the accumulation events), press key M-/SET while the data is displayed. -
Page 15: Diagram
(II) If external interface is needed, please select the proper three-in-one board first, which integrates RTC (time display), RS-232 and relay (weight checking) functional module onto one circuit board. Only after this board is adopted, the three functions can be realized. 8-1 RS-232 Diagram Single Option 1) RS232+RTC+Relay+ (SH-24,BP545D , Godex and ZEBRA) printer... -
Page 16: Appendix 1: Printing Format (Optional)
(II) -------------------------------------------- Exceeds the display range ERR6 Delete the exceeding weighments Accumulated number weighments exceeds ERR7 display range The tare value should be over zero and less Exceed tare or pre-tare range ERR9 than or equal to full load. Place the right weights( the calibration value Wrong calibration weights ERR10 ≤... - Page 17 (II) ST,GS,+ 100.00kg ST GW + 100.00 kg US,GS,+ 100.00kg US,NT,- 200.00kg prt-05 ST,NT,- 200.00kg ST: stable; UT: unstable; NW: net weight; GW: gross weight ST,+ 100.00kg UT GW + 100.00 kg prt-06 ST,- 100.00kg UT GW + 100.00 kg "ST,"...
-
Page 18: Appendix 2:U.key Connector
(II) 2004.11.25 prt-01 12:28:26 1. 000 kg 2012.04.26 13:05:33 G.W.: 100.00 kg prt-02 T.W.: 0.00 kg N.W.: 100.00 kg 2010.01.01 06:31:54 When appear under (01) 1.765 kg display of accumulation, (02) 1.760 kg press key PRINT to the print (03) 1.760 kg out. - Page 19 (II) connector is compatible with windows2000/xp/Vista/win7/win8/Linux/Android system, and the weighing data will show on the position where the mouse cursor in. With one USB port, you could connect scale to computer easily. 2.Precaution 2.1.Close the input method program before connecting. 2.2.Ensure the decimal point digit is same as the parameter setting of scale, if use EXCEL file in computer.
- Page 20 (II) 4.2. ERP System:...
Need help?
Do you have a question about the JWL Series and is the answer not in the manual?
Questions and answers