Advertisement
Quick Links
INSTALLATION INSTRUCTIONS
WARNING: NEVER EXCEED YOUR VEHICLE MANUFACTURER'S RECOMMENDED TOWING CAPACITY
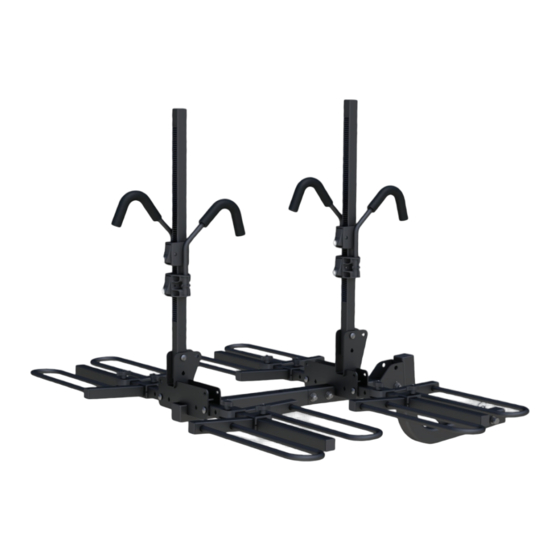
TRAY-STYLE BIKE RACK
PARTS LIST
Item#
Qty
Description
1
1
Main body rack arms
2
1
Extension rack arms
3
1
Hitch mounting shank
4
4
Support arm
5
4
Support arm
6
2
Locking arm, short (SL,SR)
7
2
Locking arm, long (LL, LR)
8
6
Pan head screw, M6 - 10mm
9
2
Spacer
10
1
Clip
11
1
Anti-rattle bolt set, 1/2" - 96mm
12
1
Shank bolt set, 1/2" - 76mm
13
2
Extension bolt set, 1/2" - 60mm
14
1
Metric wrench
15
1
Allen wrench, M8
16
2
Key set
WARNINGS
This product is not intended for
off-road use, tandems or recumbents.
Do not install on a trailer or other towed vehicle.
Check tightness of all bolts periodically.
Never use bike rack with a hitch extender.
The provided anti-rattle bolt must be threaded
completely through the vehicle's receiver tube and
tightened to 75 ft. lbs. If not completely tightened,
the bike rack can shake, rattle, rock and vibrate.
This could potentially cause damage to the bikes.
1
2
PAGE 1 • 18087-INS-RD • 1.800.798.0813 • NEED ASSISTANCE?
4
5
3
8
9 10 11 12 13 14 15
• CURTMFG.COM
(SL, SR)
6
7
(LL, LR)
16
Advertisement

Subscribe to Our Youtube Channel
Related Manuals for curt 18087


Summary of Contents for curt 18087
- Page 1 Anti-rattle bolt set, 1/2" - 96mm Shank bolt set, 1/2" - 76mm Extension bolt set, 1/2" - 60mm Metric wrench Allen wrench, M8 Key set 9 10 11 12 13 14 15 • CURTMFG.COM PAGE 1 • 18087-INS-RD • 1.800.798.0813 • NEED ASSISTANCE?
- Page 2 (previously removed) and shank bolt (#12) as shown in Detail B. Tighten bolt using wrenches provided (#14, #15). See Detail C. Detail A Detail B Detail C Figure 1 CURTMFG.COM • NEED ASSISTANCE? • 1.800.798.0813 • 18087-INS-RD • PAGE 2...
- Page 3 Remove the outer arm pins & clips from main body rack (#1). See Figure 2, Detail D. Drop the side arms down to until they lay flat, see Figure 2. Re-insert the security pins & clips to secure in place, see Detail E. Figure 2 Detail D Detail E • CURTMFG.COM PAGE 3 • 18087-INS-RD • 1.800.798.0813 • NEED ASSISTANCE?
- Page 4 See Figure 3. Tighten the knobs as shown in Figure 4, Detail F. After the supports are tightened, insert pan head screw (#8) into the end of each arm as shown in Figure 4, Detail G. Figure 3 Detail F Figure 4 Detail G CURTMFG.COM • NEED ASSISTANCE? • 1.800.798.0813 • 18087-INS-RD • PAGE 4...
- Page 5 After the locking arms are installed, insert pan head screw and lock washer (#8) into the end of the center post as shown in Figure 5, Detail I. Detail I Detail H Detail H Figure 5 • CURTMFG.COM PAGE 5 • 18087-INS-RD • 1.800.798.0813 • NEED ASSISTANCE?
-
Page 6: Installation
If not completely tightened, the bike rack can shake, rattle, rock and vibrate. This could potentially cause damage to the bikes. Detail J Figure 6 Detail K Detail L CURTMFG.COM • NEED ASSISTANCE? • 1.800.798.0813 • 18087-INS-RD • PAGE 6... - Page 7 Insert shank of extension rack (#2) into the open shank of the main body rack (#1). Secure using both extension bolt sets (#13). See Figure 7, Detail M. Detail M 7 (SR) 6 (SL) Figure 7 • CURTMFG.COM PAGE 7 • 18087-INS-RD • 1.800.798.0813 • NEED ASSISTANCE?
- Page 8 Load the heaviest bike onto rack set closest to the vehicle. Raise the long lock arm (#7) to get the bike cross beam underneath it. Once bike is in place, lower the locking arm down onto the crossbar. See Figure 8, Detail N. Figure 8 Detail N CURTMFG.COM • NEED ASSISTANCE? • 1.800.798.0813 • 18087-INS-RD • PAGE 8...
- Page 9 See Figure 9, Detail O. Tilt the carrier down until it is supported by the security pins. See Figure 9. Figure 9 Detail O • CURTMFG.COM PAGE 9 • 18087-INS-RD • 1.800.798.0813 • NEED ASSISTANCE?
- Page 10 Remove the outer arm pins & clips from the base's face plates. See Figure 10, Detail P. Raise side arms up and replace the pins to secure into place. See Detail Q. Figure 10 Detail P Detail Q CURTMFG.COM • NEED ASSISTANCE? • 1.800.798.0813 • 18087-INS-RD • PAGE 10...
- Page 11 With the arms down and secure, you can now remove the security pins from the base of the bike rack and lift the whole rack up until it is parallel to your vehicle. Replace the security pins to hold in place. See Detail S. Figure 11 Detail R Detail S • CURTMFG.COM PAGE 11 • 18087-INS-RD • 1.800.798.0813 • NEED ASSISTANCE?
Need help?
Do you have a question about the 18087 and is the answer not in the manual?
Questions and answers