Advertisement
Available languages
Available languages
Table of Contents
- 1 Maximum Recommended Weight Loads
- 2 General Information
- 3 Parts and Hardware List
- 4 Assembly Instructions
- 5 Mounting the Monitor Bracket to a Television with a Flat Back
- 6 Care and Maintenance
- 7 Further Advice about Furniture Care
- 8 Quality Guarantee
- 9 Instrucciones de Ensamble
- 10 Mantenimiento y Cuidados
- Download this manual
If you have any questions regarding assembly or if parts are missing, DO NOT return this item to the
store where it was purchased. Please call our customer service number and have your instructions
and parts list ready to provide the model name, part name or factory number:
Pacific Standard Time: 8:30 a.m. - 4:30 p.m., Monday - Friday
Or visit our web site 24 hours a day, 7 days a week for product assistance at
THIS INSTRUCTION BOOKLET CONTAINS IMPORTANT SAFETY INFORMATION.
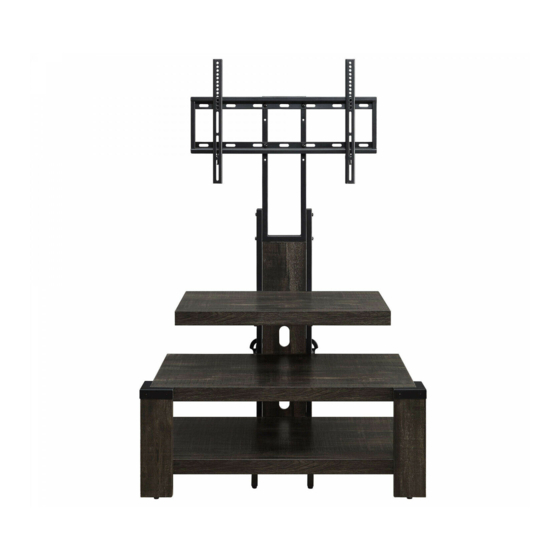
46" Flat Panel TV Stand
Stock # PROL-37
ADULT ASSEMBLY REQUIRED
www.whalenstyle.com
Or e-mail your request to parts@whalenfurniture.com
PLEASE READ AND KEEP FOR FUTURE REFERENCE.
Date 2017-06-30 Rev. 0001-B Factory: FOCIDI
866-942-5362
LOT NUMBER:
DATE PURCHASED: / /
Advertisement
Table of Contents

Related Manuals for Whalen PROL-37


Summary of Contents for Whalen PROL-37
- Page 1 LOT NUMBER: DATE PURCHASED: / / 46" Flat Panel TV Stand Stock # PROL-37 ADULT ASSEMBLY REQUIRED If you have any questions regarding assembly or if parts are missing, DO NOT return this item to the store where it was purchased. Please call our customer service number and have your instructions...
- Page 2 M A X I M U M R E C O M M E N D E D W E I G H T L O A D S MANUFACTURER: Whalen Furniture Manufacturing CATALOG: 46" Flat Panel TV Stand (PROL-37) MADE IN CHINA FITS UP TO MOST 55”...
- Page 3 Parts and Hardware List Please read completely through the instructions and verify that all listed parts and hardware are present before beginning assembly. A- Left Side Frame (Qty. 1) B- Right Side Frame (Qty. 1) C- Back Top Frame (Qty. 1) D- Back Bottom Stretcher E- Bottom Back Support F- Top Shelf...
- Page 4 Parts and Hardware List (1) 5/8” Bolt (2) 1-5/8” Bolt (3) 2-1/4” Bolt (Qty. 4+1 extra) (Qty. 24+1 extra) (Qty. 8+1 extra) (4) Hex Nut (5) Lock Washer (6) Flat Washer (Qty. 4+1 extra) (Qty. 32+1 extra) (Qty. 36+1 extra) (7) #4 x 10 mm Screw (Qty.
- Page 5 Assembly Instructions 1-5/8” Bolt Flat Washer Lock Washer (8 used in this step) (8 used in this step) (8 used in this step) ⑤ ⑥ ② NOTE: Please do not fully tighten all bolts until you finish assembling all parts. Once assembled, go back and fully tighten all bolts.
- Page 6 Assembly Instructions #4 x 10 mm Screw (4 used in this step) ⑦ 3. Pick up the Back Panel (I) and fit it between the front of Left and Right Side Frames (A and B). Insert and screw four Screws (7) through the corner brackets to secure the Back Panel in place. Tighten the screws with a Phillips screwdriver.
- Page 7 Assembly Instructions 1-5/8” Bolt Flat Washer Lock Washer (4 used in this step) (4 used in this step) (4 used in this step) ⑤ ⑥ ② 4. Lay the previous unit down on a level and protective surface as shown. 5.
- Page 8 Assembly Instructions 1-5/8” Bolt Flat Washer Lock Washer (4 used in this step) (4 used in this step) (4 used in this step) ⑤ ⑥ ② 6. Align and attach the Middle Shelf (G) to the middle rails of Left and Right Side Frames (A and B) with four 1-5/8”...
- Page 9 Assembly Instructions Flat Washer Lock Washer 2-1/4” Bolt (4 used in this step) (4 used in this step) (4 used in this step) ⑤ ③ ⑥ 7. Attach the Bottom Shelf (H) to the bottom rails of Left and Right Side Frames (A and B) with four 2-1/4”...
- Page 10 Assembly Instructions 1-5/8” Bolt Flat Washer Lock Washer (8 used in this step) (8 used in this step) (8 used in this step) ⑤ ⑥ ② 8. Attach the Front Legs (J and K) to the lower shelves (G and H) with eight 1-5/8” Bolts (2) and eight Washers (5 and 6).
- Page 11 Assembly Instructions 9. Secure screw 2 Bottom Back Supports (E) into the threaded sockets on the back rail of the Bottom Shelf (H).
- Page 12 Assembly Instructions 2-1/4” Bolt (4 used in this step) ③ Hex Nut Flat Washer Lock Washer (4 used in this step) (8 used in this step) (4 used in this step) ④ ⑤ ⑥ 10. Stand the unit upright. 11. Attach the Mounting Frame (L) to the Back Top Frame (C) with four 2-1/4” Bolts (3) and Washers and then secure with the Hex Nuts (4).
- Page 13 Mounting the Monitor Bracket to a television with a flat back NOTE: For televisions with a curved or recessed back, proceed directly to step #14. 12. Determine the correct diameter of the bolt your TV requires by hand threading them into the threaded inserts on the back of the TV.
- Page 14 Mounting the Monitor Bracket to a television with a curved / recess back 14. Determine the correct diameter of the bolt your TV requires by hand threading them into the threaded insert on the back of the TV. If you encounter any resistance, stop immediately. If you are unable to find the correct bolt consult a local hardware store.
- Page 15 Assembly Instructions 16. Once the Monitor Brackets (M) are attached onto the back of television, ask for assistance to lift the television up to attach the Monitor Brackets onto the Mounting Frame (L). Set the hooks on Monitor Brackets over the Mounting Frame then lower them onto the bars of the Mounting Frame. Loosen the Safety Bolt pre-attached on the Monitor Brackets to ensure an easy fit at the bottom hooks.
- Page 16 Assembly Instructions Cable Wheel 5/8” Bolt (2 used in this step) (4 used in this step) ① 17. Attach 2 Cable Wheels (N) to the backside of the assembled unit with the 5/8” Bolts (1). Tighten the bolts with the provided Hex wrench. 18.
- Page 17 Assembly Instructions Tools required: Hex wrench (provided), Phillips screwdriver, Mallet, Power Drill, and 3/8” Drill Bit. 19. Adjust the pre-attached Floor Levelers at the bottom of console to level the unit as shown. 20. Carefully move the console and position it at the desired location against a wall. Now, follow the instructions printed on the plastic bag containing Tipping Restraint Hardware to mount the Tip-over Restraint to the console and the wall.
-
Page 18: Care And Maintenance
Should this product be defective in workmanship or materials or fail under normal use, we will repair or replace it for up to one (1) year from date of purchase. Every Whalen Furniture product is designed to meet your highest expectations. We guarantee that you will immediately see the value of our fine furniture. - Page 19 LOTE NÚMERO: FECHA DE COMPRA: / / Consola para TV de pantalla plana de 46" Serie # PROL-37 ENSAMBLE REQUERIDO POR ADULTO Si tiene alguna pregunta acerca del ensamble o si alguna parte está faltante, no retorne este producto a la tienda en donde lo compró.
- Page 20 P E S O S M Á X I M O S R E C O M E N D A D O S FABRICANTE: Whalen Furniture Manufacturing CATALOGO: Consola para TV de pantalla plana de 46" (PROL-37) HECHO EN CHINA PARA LA MAYORÍA DE LAS TELEVISIONES...
- Page 21 Lista de Partes y Artículos de Ferretería Por favor lea completamente las instrucciones y verifique que estén todas las partes antes de iniciar el ensamble. A- Marco izquierdo (Cant. 1) B- Marco derecho (Cant. 1) C- Marco posterior superior (Cant. 1) D- Soporte posterior inferior E- Soporte inferior posterior F- Repisa superior...
- Page 22 Lista de partes y material de ferretería (1) Tornillo de 5/8” (2) Tornillo de 1-5/8” (3) Tornillo de 2-1/4” (Cant. 4+1 extra) (Cant. 24+1 extra) (Cant. 8+1 extra) (4) Tuerca hexagonal (5) Arandela de presión (6) Arandela plana (Cant. 4+1 extra) (Cant.
- Page 23 Instrucciones de Ensamble Tornillo de 1-5/8” Arandela plana Arandela de presión (8 usados en este paso) (8 usados en este paso) (8 usados en este paso) ⑤ ⑥ ② NOTA: Por favor no apriete completamente todos los tornillos, hasta que termine con el ensamble de las partes, después asegure completamente todos los tornillos, ésto lo hará...
- Page 24 Instrucciones de Ensamble Tornillo #4 x 10 mm (4 usados en este paso) ⑦ 3. Levante el panel posterior (I) y encajarlo entre los marcos izquierdo y derecho laterales (A y B). Insertar y atornillar 4 tornillos (7) a través de los soportes de esquina para fijar el panel en su lugar. Apriete los tornillos con un destornillador estrella.
- Page 25 Instrucciones de Ensamble Tornillo de 1-5/8” Arandela plana Arandela de presión (4 usados en este paso) (4 usados en este paso) (4 usados en este paso) ⑤ ⑥ ② 4. Coloque la unidad anterior hacia abajo sobre una superficie plana y protectora como se muestra. 5.
- Page 26 Instrucciones de Ensamble Tornillo de 1-5/8” Arandela plana Arandela de presión (4 usados en este paso) (4 usados en este paso) (4 usados en este paso) ⑤ ⑥ ② 6. Alinear y adjuntar la repisa media (G) a los rieles medios de los marcos izquierdo y derecho (A y B) con 4 tornillos de 1-5/8”...
- Page 27 Instrucciones de Ensamble Arandela plana Arandela de presión Tornillo de 2-1/4” (4 usados en este paso) (4 usados en este paso) (4 usados en este paso) ⑤ ③ ⑥ 7. Adjuntar la repisa inferior (H) a los rieles inferiores de los marcos laterales izquierdo y derecho (A y B) con 4 tornillos de 2-1/4"...
- Page 28 Instrucciones de Ensamble Tornillo de 1-5/8” Arandela plana Arandela de presión (8 usados en este paso) (8 usados en este paso) (8 usados en este paso) ⑤ ⑥ ② 8. Adjuntar las patas frontales (J y K) a las repisas inferiores (G y H) con 8 tornillos de 1-5/8” (2) y 8 arandelas (5 y 6).
- Page 29 Instrucciones de Ensamble 9. Colocar 2 soportes inferiores posteriores (E) en los agujeros roscados en el riel posterior de la repisa inferior (H).
- Page 30 Instrucciones de Ensamble Tornillo de 2-1/4” (4 usados en este paso) ③ Arandela plana Tuerca Arandela de presión hexagonal (4 usados en este paso) (4 usados en este paso) (8 usados en este paso) ⑤ ④ ⑥ 10. Poner la unidad en posición vertical. Montar el marco de montaje (L) al marco superior posterior (C) con cuatro tornillos de 2-1/4”...
- Page 31 Montaje del soporte de monitor a una television con respaldo plano NOTA: Para televisiones con respaldos curvos o desnivel proceda directamente al paso #14. 12. Determine el diámetro correcto de tornillos que utilizará en su televisión atornillando con sus manos para asegurar que entren bien, si encuentra resistencia detenganse inmediatamente.
- Page 32 Montaje del soporte de monitor a una television con respaldo curveado/desnivel 14. Determine el diámetro correcto de tornillos que utilizará en su televisión atornillando con sus manos para asegurar que entren bien, si encuentra resistencia detenganse inmediatamente. Si no encuentra el tornillo adecuado dirígase a su tienda de ferretera local para consultarles.
- Page 33 Instrucciones de Ensamble 16. Una vez que los soportes de monitor (M) están unidos en la parte posterior de la televisión, pedir ayuda para levantar el televisor hasta fijar los soportes de monitor en el marco de montaje (L). Ajuste los ganchos en los soportes de monitor sobre el marco de montaje y luego bajarlos a las barras de la estructura de montaje.
- Page 34 Instrucciones de Ensamble Guía de ruedas Tornillo de 5/8” (2 usados en este paso) (4 usados en este paso) ① 17. Coloque las 2 guías para cable (N) a la parte trasera de la unidad ensamblada con los tornillos de 5/8" (1).
- Page 35 Instrucciones de Ensamble Herramienta requerida: Llave hexagonal (proveida), desarmador estrella, mazo, taladro, broca de 3/8 de pulgada (9,5 mm). 19. Ajustar los niveladores de piso pre-adjuntados en la parte inferior de la consola para nivelar la unidad. Como se muestra. 20.
- Page 36 Si esté producto tiene algun defecto de ensamble o material, o si tiene alguna falla en uso normal, nosotros lo repararemos o lo re-emplazaremos hasta por un año a partir de la fecha de compra. Todo producto de Whalen Furniture es diseñado para alcanzar sus espectativas más altas. Nosotros le garantizamos que inmediatamente podrá...
Need help?
Do you have a question about the PROL-37 and is the answer not in the manual?
Questions and answers