Table of Contents
Advertisement
TM
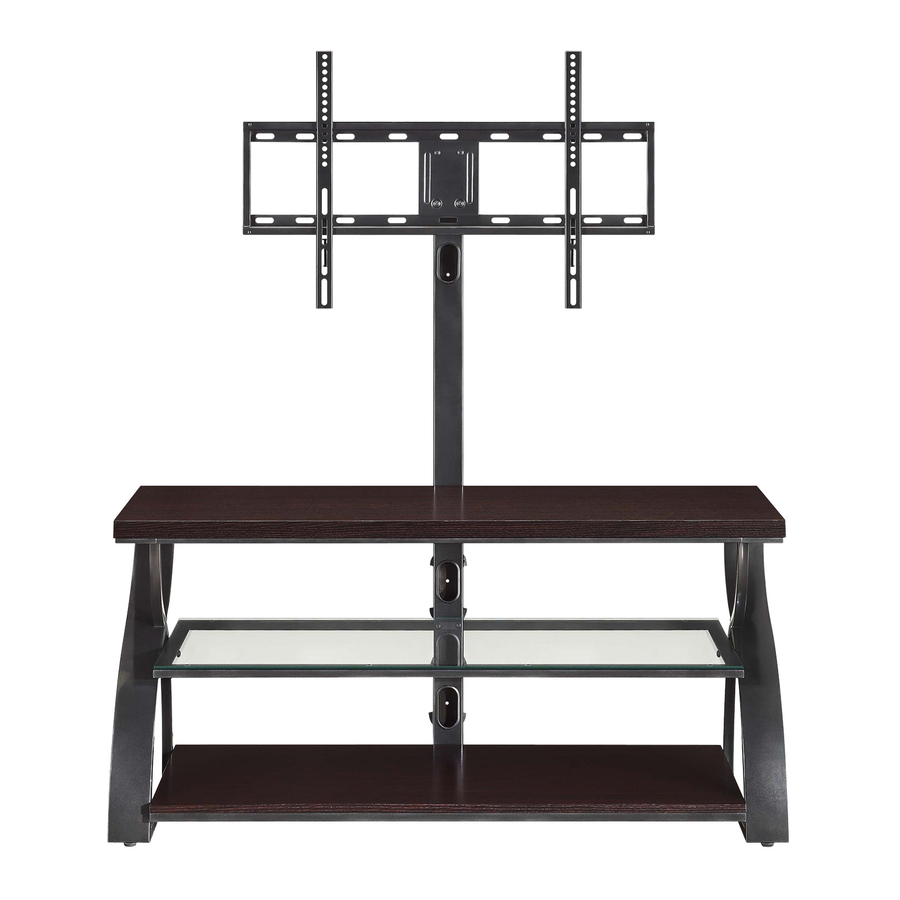
3-in-1
TV Stand
Model # XLXEC54-CC
U.S. Patent 8,561,551
This item is designed to be a 3-in-1 configuration. Please choose the option that best suits your
needs. DO NOT discard any of the hardware or parts that you will not use on your chosen option.
This will allow you to use this TV stand in different configurations at a later date, if desired.
ADULT ASSEMBLY REQUIRED
If you have any questions regarding assembly or if parts are missing, DO NOT return this item to
the store where it was purchased. Please call our toll-free customer service number and have
your instructions and parts list ready to provide the model name, part name or factory number:
Pacific Standard Time: 8:30 a.m. - 4:30 p.m., Monday - Friday
Or visit our web site 24 hours a day, 7 days a week for product assistance at
THIS INSTRUCTION BOOKLET CONTAINS IMPORTANT SAFETY INFORMATION.
PLEASE READ AND KEEP FOR FUTURE REFERENCE.
Whalen Furniture Manufacturing
www.whalenfurniture.com
Or e-mail your request to parts@whalenfurniture.com
Date 2014-10-09 Rev. 1 Factory: FOCIDI
TV
1-866-942-5362
Page 1
LOT NUMBER:
DATE PURCHASED: /
TV
Factory No. 10944
/
Advertisement
Table of Contents

Related Manuals for Whalen 3-in-1 TV Stand


Summary of Contents for Whalen 3-in-1 TV Stand
- Page 1 Or visit our web site 24 hours a day, 7 days a week for product assistance at www.whalenfurniture.com Or e-mail your request to parts@whalenfurniture.com THIS INSTRUCTION BOOKLET CONTAINS IMPORTANT SAFETY INFORMATION. PLEASE READ AND KEEP FOR FUTURE REFERENCE. Whalen Furniture Manufacturing Page 1 Factory No. 10944 Date 2014-10-09 Rev. 1 Factory: FOCIDI...
- Page 2 Model # XLXEC54-CC M A X I M U M R E C O M M E N D E D W E I G H T L O A D S MANUFACTURER: Whalen Furniture Manufacturing CATALOG: 3-in-1 TV Stand (XLXEC54-CC)
- Page 3 L- Cable Wheel (2) (1) 1/2” Bolt (2) 3/4” Bolt (3) 1” Bolt (4) 1-3/4” Bolt (4+1 extra) (14+1 extra) (12+1 extra) (4+1 extra) 1-866-942-5362 Please call for replacement parts or assistance: Whalen Furniture Manufacturing Page 3 Factory No. 10944...
- Page 4 Large Spacer (4) Small Spacer (4) M4/M5 Flat Washer (8) M6/M8 Flat Washer (4) Tools required: Allen wrench (provided) and Phillips screwdriver (not provided). 1-866-942-5362 Please call for replacement parts or assistance: Whalen Furniture Manufacturing Page 4 Factory No. 10944...
- Page 5 2. Locate the Lower Spine (D) and set the back face down on a scratch-free surface, as shown. 3. Fasten the Middle Shelf Frame (B) to the Spine (D) using two 1-3/4” Bolts (4). As shown. 1-866-942-5362 Please call for replacement parts or assistance: Whalen Furniture Manufacturing Page 5 Factory No. 10944...
- Page 6 Make sure the wood panel will face up when the unit is turned upright. 5. Repeat last step to attach the Bottom Shelf with Metal Frame (C) to the Lower Spine (D). 1-866-942-5362 Please call for replacement parts or assistance: Whalen Furniture Manufacturing Page 6 Factory No. 10944...
- Page 7 Left Leg (F). As shown. DO NOT tighten the bolt. 8. Repeat the same procedure to attach the Right Leg (G) on the opposite end. 1-866-942-5362 Please call for replacement parts or assistance: Whalen Furniture Manufacturing Page 7 Factory No. 10944...
- Page 8 Washers (5 and 6) through the drilled holes of the top rail of legs and screw into place. 10. Go back and tighten all bolts with the provided Allen wrench. Then stand the unit upright. 1-866-942-5362 Please call for replacement parts or assistance: Whalen Furniture Manufacturing Page 8 Factory No. 10944...
- Page 9 Allen wrench. NOTE: You can use the Cable Wheels to help keep your entertainment center’s cables and cords organized. 1-866-942-5362 Please call for replacement parts or assistance: Whalen Furniture Manufacturing Page 9 Factory No. 10944...
- Page 10 13. Evenly place the Glass Bumpers (10) on the Middle Shelf Frame (B), as shown above. 14. Place the Glass Shelf (H) onto the Glass Bumpers (10). Push the glass all the way back against the Spine. 1-866-942-5362 Please call for replacement parts or assistance: Whalen Furniture Manufacturing Page 10 Factory No. 10944...
- Page 11 NOTE: When you place the TV on the stand, make sure that the base of the TV is behind the Acrylic Stopper (11). This will help prevent the TV from sliding off your stand if your stand is accidently bumped or tipped. 1-866-942-5362 Please call for replacement parts or assistance: Whalen Furniture Manufacturing Page 11 Factory No. 10944...
- Page 12 18. The console is now ready for use. Be sure to position your Flat Panel TV in center of console. NOTE: For Universal Wall Mount, proceed to PAGE #20. 1-866-942-5362 Please call for replacement parts or assistance: Whalen Furniture Manufacturing Page 12 Factory No. 10944...
- Page 13 19. Insert the bottom section of the Upper Spine (E) onto the Lower Spine (D) and secure it in place with four 3/4” Bolts (2) and four Washers (5 and 6). Tighten the bolts with the enclosed Allen wrench. 1-866-942-5362 Please call for replacement parts or assistance: Whalen Furniture Manufacturing Page 13 Factory No. 10944...
- Page 14 NOTE: The Spine can provide two height options for your TV set. Refer to your TV size and adjust the Swiveling Bracket at the desired height for optimum viewing. 1-866-942-5362 Please call for replacement parts or assistance: Whalen Furniture Manufacturing Page 14 Factory No. 10944...
- Page 15 21. Hold and attach the flat side of the Mounting Frame (J) onto the Swiveling Bracket (I) with four 1/2” Bolts (1) and four Washers (5 and 6). Make sure that the recess holes on the Mounting Frame are at the bottom. 1-866-942-5362 Please call for replacement parts or assistance: Whalen Furniture Manufacturing Page 15 Factory No. 10944...
- Page 16 NOTE: Lean the TV up against a wall or other solid surface when attaching the Monitor Brackets. DO NOT place the TV face down on the glass as this may cause permanent damage. 1-866-942-5362 Please call for replacement parts or assistance: Whalen Furniture Manufacturing Page 16 Factory No. 10944...
- Page 17 NOTE: Lean the TV up against a wall or other solid surface when attaching the Monitor Brackets. DO NOT place the TV face down on the glass as this may cause permanent damage. 1-866-942-5362 Please call for replacement parts or assistance: Whalen Furniture Manufacturing Page 17 Factory No. 10944...
- Page 18 27. Center the television and tighten both Lock Bolts with a long Phillips screwdriver until they hit the underside of the Mounting Frame (J) to secure it in place. 1-866-942-5362 Please call for replacement parts or assistance: Whalen Furniture Manufacturing Page 18 Factory No. 10944...
- Page 19 NOTA: Debe instalar el herraje de restricción de movimiento con la unidad en uso para evitar cualquier accidente o daño a la unidad. 30. The console is now ready for use. Swivel the TV left-or-right for optimum viewing control. 1-866-942-5362 Please call for replacement parts or assistance: Whalen Furniture Manufacturing Page 19 Factory No. 10944...
- Page 20 5/8 inch in thickness. Failure to heed this caution may result property damage and/or personal injury. 1-866-942-5362 Please call for replacement parts or assistance: Whalen Furniture Manufacturing Page 20 Factory No. 10944...
- Page 21 Mounting Frame (J) to wall with Lag Bolts (8) and the Washers (9) at the drill points. Tighten bolts firmly, but be careful not to over-tighten. 1-866-942-5362 Please call for replacement parts or assistance: Whalen Furniture Manufacturing Page 21 Factory No. 10944...
- Page 22 39. Place the assembled console under your TV. Finally, connect the A/V and power cables to your TV. You are now ready to enjoy your wall-mounted Flat Panel TV. 1-866-942-5362 Please call for replacement parts or assistance: Whalen Furniture Manufacturing Page 22 Factory No. 10944...
-
Page 23: Care And Maintenance
Should this product be defective in workmanship or materials or fail under normal use, we will repair or replace it for up to one (1) year from date of purchase. Every Whalen Furniture product is designed to meet your highest expectations. We guarantee that you will immediately see the value of our fine furniture.
Need help?
Do you have a question about the 3-in-1 TV Stand and is the answer not in the manual?
Questions and answers
I purchased a mount and the screws didn't fit my tv. I purchased them but need directions for samsung
To install a Whalen 3-in-1 TV Stand mount compatible with a Samsung TV, follow these steps:
1. Check the Parts: Ensure all hardware, washers, bolts, and monitor brackets are included. Sort them by size and check for completeness.
2. Prepare the Area: Assemble on a sturdy, level, and protective surface to avoid damage.
3. Attach Monitor Brackets:
- Determine the correct bolt size by hand-threading into the Samsung TV’s back panel. Stop if you feel resistance.
- Use the selected bolts, washers, and monitor brackets. Ensure brackets are centered and level.
- Use a Phillips screwdriver and do not overtighten.
- Lean the TV against a solid surface while attaching. Do not place the screen face down on glass.
4. Mount to Stand:
- Attach the brackets to the spine of the stand.
- Ensure the TV rests fully on the supporting surface without overhanging edges.
- All weight should be supported by the back spine, similar to wall mounting.
5. Final Steps:
- Tighten all bolts securely after full assembly.
- Install the tip restraint hardware to prevent tipping.
- It is recommended to have a helper during assembly, though it can be done by one person.
Use a torque wrench or Torx screwdriver if needed to speed up the process.
This answer is automatically generated
I BELIEVE WAL MART GOT THE WRONG UNIT AS THE PICTURE DOESN'T MATCH THE PIECES GO TOGETHER. wE WANTED THE TABLE TOP CONSOLE AND THE GLASS DOESN'T EVEN FIT.