Advertisement
Quick Links
WPLED52 INSTALLATION INSTRUCTIONS
Thank you for buying RAB lighting fixtures. Our goal is to design the best quality products to get the job done right. We'd like to hear your comments.
Call the Marketing Department at 888-RAB-1000 or email: marketing@rabweb.com
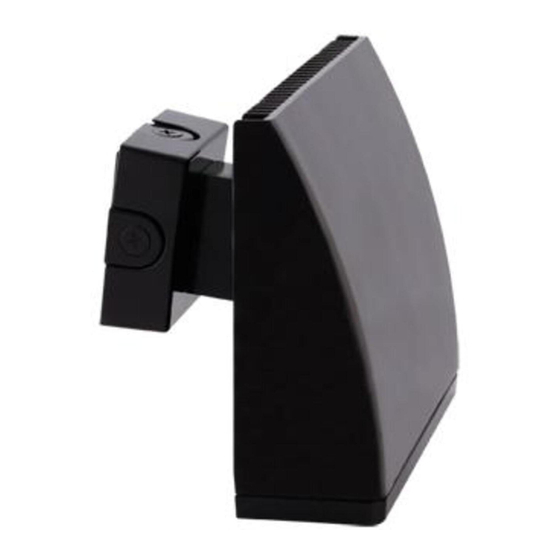
WPLED52
Standard (15 Deg)
IMPORTANT
READ CAREFULLY BEFORE INSTALLING FIXTURE. RETAIN THESE INSTRUCTIONS FOR FUTURE REFERENCE.
RAB fixtures must be wired in accordance with the National Electrical Code and all applicable local codes. Proper grounding
is required for safety. THIS PRODUCT MUST BE INSTALLED IN ACCORDANCE WITH THE APPLICABLE INSTALLATION CODE BY A
PERSON FAMILIAR WITH THE CONSTRUCTION AND OPERATION OF THE PRODUCT AND THE HAZARDS INVOLVED.
WARNING: Make certain power is OFF before installing or maintaining fixture. No user serviceable parts inside.
MOUNTING TO A WALL
1. Orient box so that "TOP" is on top.
2. Secure Wall Mounting Box to a sturdy wall. Use
appropriate mounting hardware such as lag bolts and
anchors with washers suitable for the mounting surface.
3. Feed supply wires through Wall Mounting Box. Check
that Gasket is fully sealed.
4. Bring fixture up to the Wall Mounting Box and slide the
stainless steel Tether from the fixture into the Key Hole
Slot for hands free wiring.
5. Wire the fixture using suitable wire connectors.
6. Place wired fixture over the Wall Mounting Box and
tighten the Top Screws. Now tighten the Lower Screws.
7. Tighten Close Up Plugs and apply weatherproof silicone
sealant to all unused conduit entry points. Also use
sealant between the wall and Wall Mount Box.
Lower Screws
WPLEDC52
Cutoff (7.5 Deg)
Top Screws
Gasket
Tether
Wall Feed
Close Up
Plugs (4)
Wall Mount
Box
WPLEDFC52
Full Cutoff (0 Deg)
Hardware
(not supplied)
Conduit Feed
Key Hole Slot
4.57"
2.4"
1.09"
3.0"
.79"
Advertisement

Related Manuals for RAB Lighting WPLED52


Summary of Contents for RAB Lighting WPLED52
- Page 1 WPLED52 INSTALLATION INSTRUCTIONS Thank you for buying RAB lighting fixtures. Our goal is to design the best quality products to get the job done right. We’d like to hear your comments. Call the Marketing Department at 888-RAB-1000 or email: marketing@rabweb.com...
- Page 2 WPLED52 INSTALLATION INSTRUCTIONS Thank you for buying RAB lighting fixtures. Our goal is to design the best quality products to get the job done right. We’d like to hear your comments. Call the Marketing Department at 888-RAB-1000 or email: marketing@rabweb.com...
- Page 3 WPLED52 INSTALLATION INSTRUCTIONS Thank you for buying RAB lighting fixtures. Our goal is to design the best quality products to get the job done right. We’d like to hear your comments. Call the Marketing Department at 888-RAB-1000 or email: marketing@rabweb.com...
Need help?
Do you have a question about the WPLED52 and is the answer not in the manual?
Questions and answers