Table of Contents
Advertisement
Quick Links
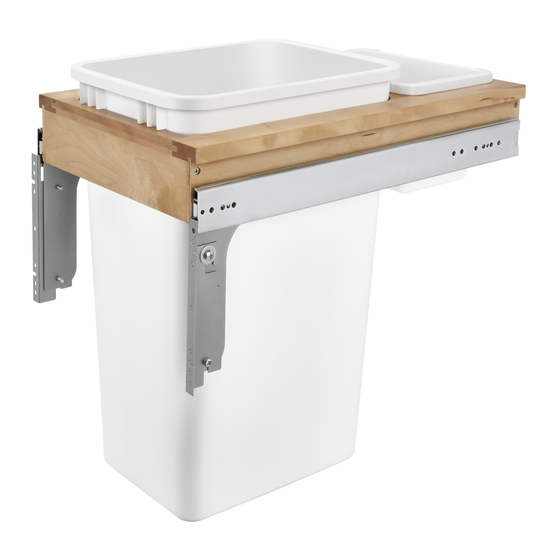
Step 1: Remove cabinet member of both slides.
Paso 1: Quite el gabinete componente que se encuentra en ambos rieles.
Étape 1: Retirer la pièce du caisson des 2 coulisses.
Step 2: Attach cabinet member of slides flush with front of
cabinet and the center of the slide 14 1/4" ( for
4WCTM-12DM1-343-FL, 15DM2-343-FL, 18DM2-419-FL,
27-4-597-FL) and 20 1/8" (for the 1550DM1-343-FL, and
1850DM2-419FL) above floor. Use #8 x 5/8" low profile
trusshead screws (included).
Paso 2: Sujete el gabinete componente a los rieles alineado
con el frente del gabinete y el centro del riel 14 1/4" (por el
4WCTM-12DM1-343-FL, 15DM2-343-FL, 18DM2-419-FL ó
27-4-597-FL y 20 1/8" ( por el 1550DM1-343-FL, y
1850DM2-419FL). Utilice #8 por 5/8" tornillos del trusshead
del perfil bajo (incluidos).
Etape 2: Attacher la pièce du caisson des coulisses à ras avec
la façade du caisson et le centre de la coulisse à 361.95mm
(14 1/4") (pour les 4WCTM-12DM1-343-FL, 15DM2-343-FL,
18DM2-419-FL, ou 27-4-597-FL) et 511.17 mm (20 1/8") (pour
les 1550DM1-343-FL, et 1850DM2-419FL). Employez #8 par
Furring
5/8" ; vis de trusshead de profil bas (incluses).
Strips
Step 3: Install wood unit into cabinet, engaging product
member slides into cabinet member slides push unit until it
locks in place.
Paso 3: Instale la pieza de madera en el armario de forma
que las deslizaderas en el producto se entren en las deslizad-
eras que están en el
armario y empuje hasta que cierren.
Étape 3: Installer l'ensemble en bois dans l'armoire en
engageant les glissières du produit dans celles de l'armoire.
Pousser sur l'ensemble jusqu'à ce qu'il s'enclenche.
1
/
"
2
Front View
I-WCTM-FL
STEP 4:
Measure from inside
cabinet wall to inside
face frame (A) distance
should be measured
the same at rear of
cabinet (B).
STEP 5:
Position the slide with front
bracket on the face frame
opening and move it forward
until the self register stop hits the
inside of the face frame opening.
Bottom of slide should be 13 1/2"
from cabinet floor. Install screw in
slotted mounting hole, do not
tighten. Extend the slide rear mounting bracket until it
contacts the rear Furring strip. Bottom of slide should be
13 1/2" from cabinet floor. Rear mounting bracket should
be the same distance from the side cabinet wall at rear of
slide as it is up front. Drive mounting screw in center
horizontal slot of rear mounting bracket, tighten.
Tighten screw in front bracket.
STEP 6:
Install wood unit (with slides attached) into cabinet,
engaging product member slides into cabinet member
slides, push
1
14
/
"
4
unit until it
1
13
/
"
locks in place.
2
Now you are
ready to
mount the
door.
STEP 7:
See door mounting instructions on inside.
INSTALLATION INSTRUCTIONS
for Top Mount Pull-Out Waste Containers - Frameless Cabinets
INSTRUCCIONES DE INSTALACIÓN
Para Contenedores de Basura Corredizos de Montaje
Superior – Gabinetes sin Marco
NOTICE D'INSTALLATION
For Top Mount Pull-Out Waste Containers - Frameless Cabinet
For models, Para los modelos, Pour les modèles:
4WCTM-12DM1-343-FL, 1550DM1-343-FL,
15DM2-343-FL, 18DM2-419-FL, 1850DM2-419FL,
27-4-597-FL
Product Member
Top View
Face Frame
(A)
Cabinet Member
Slides
(B)
Furring Strips
14 1/4" or
20 1/8"
Self
Register
Stop
Cabinet Member
06-08
Advertisement
Table of Contents

Subscribe to Our Youtube Channel
Related Manuals for Rev-A-Shelf 1550DM1-343-FL


Summary of Contents for Rev-A-Shelf 1550DM1-343-FL
-
Page 1: Installation Instructions
4WCTM-12DM1-343-FL, 15DM2-343-FL, 18DM2-419-FL ó Bottom of slide should be 13 1/2" 27-4-597-FL y 20 1/8” ( por el 1550DM1-343-FL, y from cabinet floor. Install screw in 1850DM2-419FL). Utilice #8 por 5/8” tornillos del trusshead del perfil bajo (incluidos). - Page 2 INSTALLATION INSTRUCTIONS illustration 4 INSTALLATION INSTRUCTIONS STEP 5: Step 5: Remove Door Brackets from product members For Top Mount Waste Container Door Remove Door Brackets from INSTALLATION INSTRUCTIONS and screw to inside of cabinet door with #6 x 1/2” flat head illustration 4 product members and screw to for Top Mount Waste Container Door Mounting Brackets...
Need help?
Do you have a question about the 1550DM1-343-FL and is the answer not in the manual?
Questions and answers