Advertisement
Page 1
General safety instructions
Page 2
Installation instructions
Page 3
Page 4
Programming instructions and specifications
Page 5
Page 6
Connecting the external switch cable to the Air-Saver
Page 7
Maintenance and troubleshooting
To ensure safe and enduring performance of this product, you must comply strictly with the instructions enclosed herein. Non-compliance
with instructions or improper handling of the product will void your warranty! This product is designed for use exclusively with types of
fluids or gasses as stated in its documentation. Usage of this product in conditions not specified in the product documentation or contrary to
the instructions hereby provided is considered IMPROPER. The manufacturer will not be held liable for any damages resulting from
improper use of the product.
-
Observe valid and generally accepted safety rules when planning, installing and using this product.
-
Take proper measures to prevent unintentional operation of the product or damage to it.
-
Do not attempt to disassemble this product or lines in the system while they are under pressure.
-
Always turn off the voltage supply before working on the system.
Switch off the voltage supply before
installation or maintenance is carried out!
Air-Saver
Version: 0403
INDEX
SAFETY and PROPER USAGE
ATTENTION
SAFETY
Depressurise the system before installation or
maintenance is carried out!
1
Advertisement
Table of Contents

Related Manuals for Jorc Air-Saver 1"


Summary of Contents for Jorc Air-Saver 1"
- Page 1 Air-Saver Version: 0403 INDEX Page 1 General safety instructions Page 2 Installation instructions Page 3 Programming instructions Page 4 Programming instructions and specifications Page 5 Connecting the external switch cable to the Air-Saver Page 6 Connecting the external switch cable to the Air-Saver Page 7 Maintenance and troubleshooting SAFETY and PROPER USAGE...
- Page 2 INSTALLATION IMPORTANT NOTICE Before installing this product make sure it complies with your request and that it suits your application! CONNECTING THE UNIT TO YOUR PIPELINE · Make sure that no solid matter (e.g. sealing compound residue) gets into the valve during the installation. ·...
-
Page 3: Programming Instructions
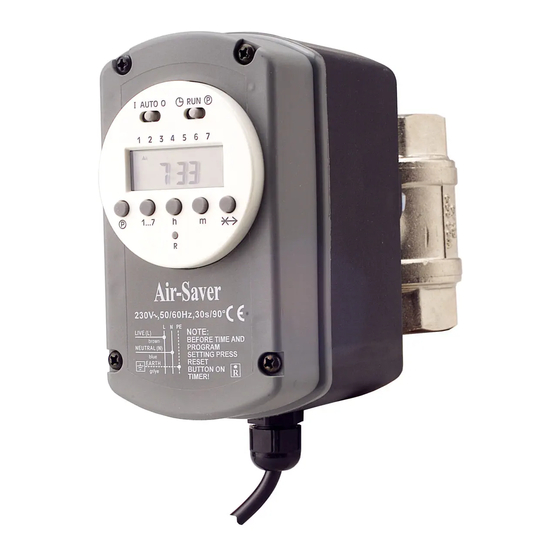
PROGRAMMING INSTRUCTIONS Before you start programming the unit, move the mode selector switch (2) in to position and shortly press the RESET (7) button to clear the existing program. SETTING THE ACTUAL TIME AND DAY After pressing the RESET (7) button, the display will look like this All preprogrammed settings will be deleted. -
Page 4: Technical Specifications
USEFULL FEATURES You can manually open and close the valve by pushing the actuator towards the ballvalve and turning it left or right 90º (a visual check on the valves position can be done by checking the colour of the indicator: RED = OPEN NONE or BLUE = CLOSED (See figure 1) (ONLY ON THE 1”... - Page 5 OPTION: CONNECTING THE EXTERNAL SWITCHCABLE TURN OFF ELECTRICAL SUPPLY Unscrew the 4 screws to open the top cover Identify the remote switching cable sides Connect the RED remote cable with the RED Slide the remote switching cable through cable of point 3 the cable gland Connect the BLUE remote cable with the Slide the RED cable back into its place...
- Page 6 Connect the BLACK remote cable with the Hide the cable under the other cables GREY cable of point 4 Slide the BLACK/GREY cables back into its Slide the BROWN remote cable onto point 5 place mark with the number 4 Tighten the 4 screws and the cable gland A complete look at the cable set-up...
-
Page 7: Troubleshooting
MAINTENANCE Check battery in clock module (is the clock displaying the correct time?) TROUBLESHOOTING ? ? ? ? ? ? ? ? Check supply voltage Check pressure - Check whether the valve has been rotated manually! This could interfere with the programmed OPEN and CLOSE times, i.e. the OPEN times could become the CLOSE times and visa versa.
Need help?
Do you have a question about the Air-Saver 1" and is the answer not in the manual?
Questions and answers