Table of Contents
Advertisement
Quick Links
Installation Instructions
Original Instructions
FactoryTalk Historian Machine Edition Module
Catalog Number 1756-HIST2G Series B
Use this document as a guide to install the FactoryTalk® Historian ME Module. This document describes hardware installation only.
For configuration information, refer to the FactoryTalk Historian ME Configuration Guide available on the FactoryTalk Historian ME
Client Tools DVD.
The following table lists the contents of this document and where to find specific information.
Topic
See page
4
4
5
5
5
5
6
6
8
8
10
11
12
12
13
14
14
15
15
16
16
17
Advertisement
Table of Contents

Related Manuals for Rockwell Automation Allen-Bradley FactoryTalk Historian ME


Summary of Contents for Rockwell Automation Allen-Bradley FactoryTalk Historian ME
-
Page 1: Table Of Contents
Installation Instructions Original Instructions FactoryTalk Historian Machine Edition Module Catalog Number 1756-HIST2G Series B Use this document as a guide to install the FactoryTalk® Historian ME Module. This document describes hardware installation only. For configuration information, refer to the FactoryTalk Historian ME Configuration Guide available on the FactoryTalk Historian ME Client Tools DVD. - Page 2 FactoryTalk Historian Machine Edition Module, Installation Instructions Summary of Changes Topic See page Equipment with lithium battery connections updated Technical specifications updated Install the module in the chassis updated Four-character LED display messages updated Ethernet port LED information updated Rockwell Automation Publication 1756-IN106C-EN-P-January 2018...
- Page 3 Activiteiten zoals het installeren, afstellen, in gebruik stellen, gebruiken, monteren, demonteren en het uitvoeren van onderhoud mogen uitsluitend worden uitgevoerd door hiervoor opgeleid personeel en in overeenstemming met de geldende praktijkregels. Indien de apparatuur wordt gebruikt op een wijze die niet is gespecificeerd door de fabrikant, dan bestaat het gevaar dat de beveiliging van de apparatuur niet goed werkt. Rockwell Automation Publication 1756-IN106C-EN-P-January 2018...
-
Page 4: Environment And Enclosure
Do not touch connectors or pins on component boards. Do not touch circuit components inside the equipment. Use a static-safe workstation, if available. Store the equipment in appropriate static-safe packaging when not in use. Rockwell Automation Publication 1756-IN106C-EN-P-January 2018... -
Page 5: North American Hazardous Location Approval
WARNING: If you connect or disconnect the communications cable with power applied to this module or any device on the network, an electrical arc can occur. This could cause an explosion in hazardous location installations. Be sure that power is removed or the area is nonhazardous before proceeding. Rockwell Automation Publication 1756-IN106C-EN-P-January 2018... -
Page 6: Technical Specifications
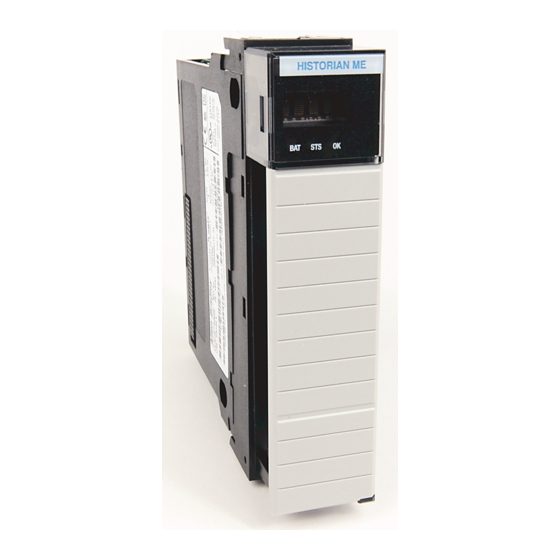
Ethernet cabling and installation according to IEC 61918 and IEC 61784-5-2 Replacement battery Panasonic BR1225A North American temp code Identify the module components Use the following figures to identify the external features of the Historian module. Rockwell Automation Publication 1756-IN106C-EN-P-January 2018... - Page 7 The Historian module as seen from the front view with the four-character LED display, LED indicators (BAT, STS, OK), and Ethernet port locations identified. The Historian module side view The Historian module as seen from the side view with the backplane location identified. Rockwell Automation Publication 1756-IN106C-EN-P-January 2018...
-
Page 8: Prepare The Chassis For The Module Installation
The figure below shows chassis slot numbering in a 4-slot chassis. Slot 0 is the first slot and is always the leftmost slot in the rack (the first slot to the right of the power supply). Rockwell Automation Publication 1756-IN106C-EN-P-January 2018... - Page 9 A red paper tab covers the side of the battery that faces the backplane when the module is installed in a chassis. Before installing the module, remove the battery paper tab by pulling it off. Rockwell Automation Publication 1756-IN106C-EN-P-January 2018...
-
Page 10: Install The Module In The Chassis
1. Align the circuit board with the top and bottom guides in the chassis. 2. Slide the module into the chassis. Make sure the module backplane connector properly connects to the chassis. 3. Make sure the module is aligned with the power supply or other installed modules. Rockwell Automation Publication 1756-IN106C-EN-P-January 2018... -
Page 11: Remove Or Replace The Module
2. Slide the module out of the chassis. IMPORTANT If you are replacing an existing module with an identical one, and you want to resume identical system operation, you must install the new module in the same slot. Rockwell Automation Publication 1756-IN106C-EN-P-January 2018... -
Page 12: Install Or Remove The Module Under Power
IMPORTANT It is recommended to connect the module to the network via a 100 MB or 1GB Ethernet switch, which reduces collisions and lost packets, and increases network bandwidth. For detailed Ethernet connection information, refer to the ControlLogix Ethernet/IP Bridge Module Installation Instructions. Rockwell Automation Publication 1756-IN106C-EN-P-January 2018... -
Page 13: Switch On The Chassis
Switch on the chassis To switch on the chassis 1. Locate the power switch inside the power supply. 2. Set the switch to the ON position as shown. Power will be applied to the chassis. Rockwell Automation Publication 1756-IN106C-EN-P-January 2018... -
Page 14: Check The Power Supply And The Module Status
The LED indicators determine if the power supply and module are operating properly. There are the following LED indicators on the front panel of the Historian ME module: Status LED lights (page 15). Four-character LED display messages (page 15). Rockwell Automation Publication 1756-IN106C-EN-P-January 2018... -
Page 15: Status Led Lights
After the "LAN OK" displays, the IP address displays. Ethernet port LAN LOST Displays for several seconds if the Ethernet port fails to acquire the IP address. After “LAN LOST” displays, the MAC address displays. Rockwell Automation Publication 1756-IN106C-EN-P-January 2018... -
Page 16: Application Status
The "Storage full" status displays if Data Storage reaches 75% capacity (default value for the second threshold). Otherwise, the Data Storage status is empty. Ethernet port LED information The Ethernet port LED on the 10/100/1000 BASET connector supports IEEE 802.3. The following table summarizes the Ethernet port LED functions. Rockwell Automation Publication 1756-IN106C-EN-P-January 2018... -
Page 17: Replace The Battery
IMPORTANT There are metal guides that hold the battery holder in place. Do not attempt to remove the metal guides. 2. Remove the old battery from the holder. Rockwell Automation Publication 1756-IN106C-EN-P-January 2018... - Page 18 4. Reinstall the battery holder in the back of the module. TIP Install first the narrower part of the holder into the metal guides. 5. Push the battery holder all the way into the back of the module. Rockwell Automation Publication 1756-IN106C-EN-P-January 2018...
- Page 19 Provides declarations of conformity, certificates, and other certification details. https://www.rockwellautomation.com/global/certification/overview.page You can view or download publications at https://www.rockwellautomation.com/global/literature-library/overview.page. To order paper copies of technical documentation, contact your local Allen-Bradley distributor or Rockwell Automation sales representative. Rockwell Automation Publication 1756-IN106C-EN-P-January 2018...
- Page 20 Are We Doing? form at http://literature.rockwellautomation.com/idc/groups/literature/documents/du/ra-du002_-en-e.pdf. Rockwell Automation maintains current product environmental information on its website at http://www.rockwellautomation.com/rockwellautomation/about-us/sustainability-ethics/product-environmental-compliance.page. Allen-Bradley, FactoryTalk, Rockwell Automation, and Rockwell Software are trademarks of Rockwell Automation, Inc. Trademarks not belonging to Rockwell Automation are property of their respective companies.
Need help?
Do you have a question about the Allen-Bradley FactoryTalk Historian ME and is the answer not in the manual?
Questions and answers