Table of Contents
Advertisement
Quick Links
Advertisement
Table of Contents

Related Manuals for SHOWTEC Showdesk 16


Summary of Contents for SHOWTEC Showdesk 16
- Page 1 Showdesk 16 ORDERCODE 50367...
- Page 2 For more information: iwant@showtec.info You can get some of the best quality, best priced products on the market from Showtec. So next time, turn to Showtec for more great equipment. Always get the best -- with Showtec ! Thank you!
-
Page 3: Table Of Contents
Showtec Showtec Showdesk 16 Product Guide ™ Warning..…...................………………………………………….. Safety-instructions………………………………………………………………………………………….…. Operating Determinations……………………………………………………………………………………. Description..…................……….………………………………… Features………………………………………………………………………………….………………….…. Overview…………………………………………………………………………………………………..…… Installation................…...…………………………………….…… Installation............………………………………………..…………………… Set Up and Operation..............……..……………………………….… Operation………….................……………………………………… Quick Programming........................Slider Programming........................- Audio Effect Programming......................Run a Program........................... MIDI Operation........................... Main Function Button........................... Maintenance...................………..………….…….……………... Troubleshooting................………………….………………….…. Product Specifications..............……………….…….…………………. -
Page 4: Warning
WARNING CAUTION! Keep this device away from rain and moisture! FOR YOUR OWN SAFETY, PLEASE READ THIS USER MANUAL CAREFULLY BEFORE YOUR INITIAL START-UP! SAFETY INSTRUCTIONS Every person involved with the installation, operation and maintenance of this device have to: be qualified follow the instructions of this manual CAUTION! Be careful with your operations. - Page 5 • If your Showtec device fails to work properly, discontinue use immediately. Drain all fog liquid from the tank, pack the unit securely (preferably in the original packing material), and return it to your Showtec dealer for service.
-
Page 6: Description
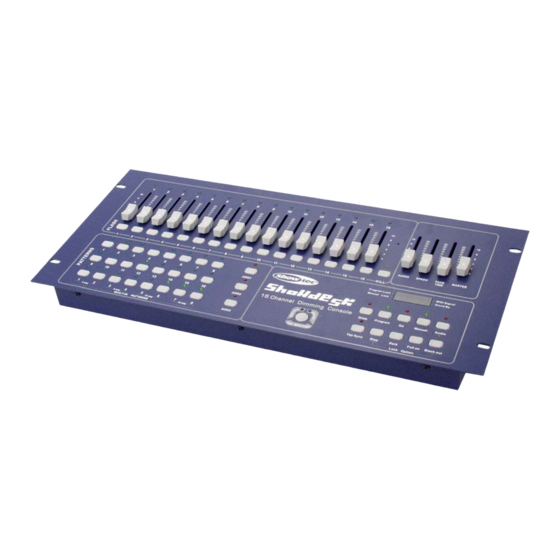
Description of the device Features Showdesk 16 is a Digital Dimmerpack from Showtec. • 16 DMX Channels • 8 built-in program banks (patterns) • 16 recordable program banks (110 steps per program) • 16 Fader channels and 16 Flash buttons •... - Page 7 Front Panel 1) Channel LED: These 16 LEDs show the current intensity of each of the console control channels. 2) Channel-Slider: These 16 sliders and/or program the intensities of channels 1-16. 3) Flash-Taste: These 16 buttons are used to give an individual channel a full intensity and also used for quick pattern programming.
-
Page 8: Installation
Installation Installation Showdesk 16 Remove all packing materials from the Showdesk 16. Check that all foam and plastic padding is removed. Screw the equipment into a 19" rack. Connect all cables. Always disconnect from electric mains power supply before cleaning or servicing. -
Page 9: Set Up And Operation
Set Up and Operation Before plugging the unit in, always make sure that the power supply matches the product specification voltage. Do not attempt to operate a 120V specification product on 230V power, or vice versa. Quick-Programming Press Program Button until its LED lights up. Note: If the LED does not light Program Button is set in Lock State (see Lock Function on page 13) 2) Select a Pattern Button you desire to program and tap it. -
Page 10: Slider Programming
Repeat step 3 and 4 until all desired steps are include in the chase. Tap the Blackout Button to exit Program Mode. Note: Every Pattern Button records no more than 100 steps. Slider-Programming Static Scenes or Chase Sequences with varying levels may be programmed into any of Pattern Buttons using. -
Page 11: Audio Effect Programming
Move the channel level slider to the desired level for this step. Press Program Button and this step will be automatically programmed into memory. Repeat step 3 and step 4 until all your desired steps are completely programmed. Tap Blackout Button to exit. Note: Quick programming and slider programming can be combined to use. - Page 12 Tap the Program Button until its LED lights. If the LED does not light, the memory lock is on. Select channels to be affected by audio by moving the corresponding channel sliders to the maximum, and move other channel slider to minimum. Tap the Audio Button to program the audio intensity into memory.
- Page 13 Run a Pattern at audio effect Tap the Audio Button to enter Audio Mode. Activate a chase by tapping a pattern button. Move the Audio Slider slowly up until the desired effect is reached. MIDI IN&OUT SET Turn off input power. Press and hold Built-in Buttons 5, 6, 7, and 8 at one time. Do not release and turn on input power.
-
Page 14: Main Function Button
Main Function Button Pattern-Button There are total 24 programs in which 16 are programmable and the other 8 are built-in chase. A tap of any of the pattern button will light the LED above the button and causes the scene or chase stored in memory to fade at the set fade rate. - Page 15 Go-Button The Go Button causes all channels to fade to the present level represented by the setting of the Channel Slider. The lighting level will be added to a scene and any other active scenes or functions with the greatest level having precedence.
- Page 16 Add-Mode By pressing the Add button, the Add mode is activated. When the Add mode is turned on, multiple patterns of the row will be on at a time. Add mode consists of Single and Mix modes. Single mode: Press the appropriate Add button until the above LED flashes; the Single mode is now active. Tap the desired Pattern buttons in the row, the patterns will chase in sequence from left to right.
-
Page 17: Maintenance
2. Check the external fuse, connections and power from the wall. 3. If all of the above appears to be O.K., plug the unit in again. 4. If nothing happens after 30 seconds, unplug the device. 5. Return the machine to your Showtec dealer. -
Page 18: Product Specifications
Product Specification Model: Showtec Showdesk 16 Power Input: DC 12V-20V 500 mA Min. Fuse: F1A 250 V 5 x 20 mm Dimensions: 19” / 5 HE ; 482x222x62 mm (LxWxH) Weight: 4,4 kg Design and product specifications are subject to change without prior notice.
Need help?
Do you have a question about the Showdesk 16 and is the answer not in the manual?
Questions and answers