
Related Manuals for Belling BCT60INTP


Summary of Contents for Belling BCT60INTP
- Page 1 BCT60INTP 60cm SmartWheel Induction Cooktop with Teppanyaki Zone INSTRUCTION MANUAL PLEASE READ THE INSTRUCTION MANUAL CAREFULLY BEFORE USING THE UNIT. www.belling.com.au | www.belling.co.nz...
-
Page 2: Table Of Contents
CONTENTS PRODUCT/INSTALLER DETAILS WARNINGS AND PRECAUTIONS PRODUCT OVERVIEW PRODUCT INFORMATION OPERATION TO START COOKING FINISHED COOKING BOOST FUNCTION SMART ZONE FUNCTION KEEP WARM FUNCTION PAUSE FUNCTION TEPPANYAKI FUNCTION FLEXI-ZONE FUNCTION LOCKING THE CONTROLS USING THE TIMER COOKING GUIDELINES CARE AND CLEANING HINTS AND TIPS ERROR FAILURE DISPLAY INSTALLATION... -
Page 3: Product/Installer Details
PRODUCT / INSTALLER DETAILS For future reference we suggest that you staple a copy of your purchase receipt here and complete the below so the information is always at hand. Product Details Model number: Description: Serial number: (Located on the product rating label) Purchase Details Date of purchase: Place of purchase:... - Page 4 CONGRATULATIONS Dear Customer, Congratulations on the purchase of your new product from Belling. We recommend you please take some time to read the instruction manual thoroughly to familiarise yourself with the functionality and operations to ensure optimum performance of your new appliance.
-
Page 5: Warnings And Precautions
WARNINGS & PRECAUTIONS PLEASE READ THE FOLLOWING INSTRUCTIONS CAREFULLY BEFORE USING THE APPLIANCE. Installation Electrical Shock Hazard • Disconnect the appliance from the mains electricity supply before carrying out any work or maintenance on it. • Connection to a properly earthed wiring system is essential and mandatory. •... - Page 6 WARNINGS & PRECAUTIONS Operation and maintenance Electrical Shock Hazard • Do not cook on a broken or cracked cooktop. If the cooktop surface is broken or cracked, switch the appliance off immediately at the mains power supply (wall switch) and contact a qualified technician.
- Page 7 • Do not store items of interest to children in cabinets above the appliance. Children climbing on the cooktop could be seriously injured. • Do not leave children alone or unattended in the area where the appliance is in use. •...
- Page 8 • The appliance is not intended to be operated by means of an external timer or separate remote-control system. CAUTION: The cooking process has to be supervised. A short term cooking process has to be supervised continuously. • Power cord can’t be accessed after installation. IMPORTANT To maintain the efficiency and safety of your appliance, we recommend you to always use original spare parts and authorised service agents.
-
Page 9: Product Overview
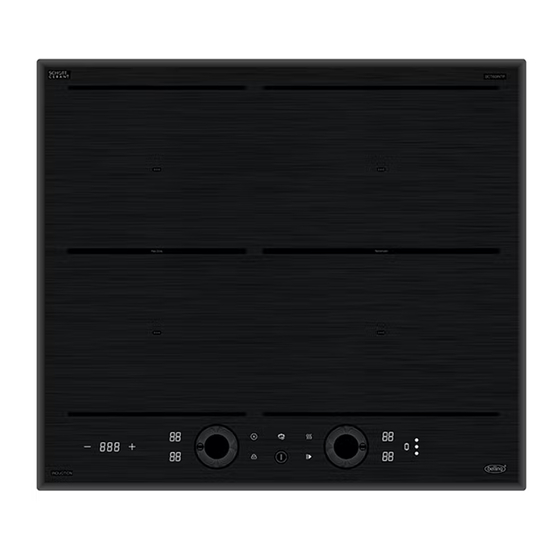
4. Front right zone - 280x200mm, max.2000/3000W zone 5. Left flexible zone - 220x400mm, max. 3000/3600W zone 6. Right flexible zone - 280x400mm, BCT60INTP max. 3000/4000W zone 7. Control panel The Control Panel BCT60INTP 1. ON/OFF key 4. Child lock key 7. -
Page 10: Product Information
PRODUCT INFORMATION A Word on Induction Cooking Induction cooking is a safe, advanced, efficient, and economical cooking technology. It works by electromagnetic vibrations generating heat directly in the pan, rather than indirectly through heating the glass surface. The glass becomes hot only because the pan eventually warms it up. - Page 11 PRODUCT INFORMATION Choosing the right Cookware (cont.) • If you do not have a magnet: 1. Put some water in the pan you want to check. 2. Follow the steps under ‘To start cooking’. 3. If does not flash in the display and the water is heating, the pan is suitable. •...
-
Page 12: Operation
OPERATION To start cooking 1. Touch the ON/OFF key. All the indicators show “– “ 2. Place a suitable pan on the cooking zone that you wish to use. Make sure the bottom of the pan and the surface of the cooking zone are clean and dry. Confirmed: 3. -
Page 13: Finished Cooking
OPERATION OPERATION Confirmed: When you have finished cooking 1. Select the heating zone that you wish to switch off 2. Turn the cooking zone off by gently touching the SmartWheel control in an anti-clockwise direction Confirmed: until the display shows “0”. 3. -
Page 14: Smart Zone Function
OPERATION OPERATION Cancel Boost function 1. Touch the heating zone selection key for the zone that has the Boost function. Once pressed the key will flash indicating that the temperature setting can be adjusted. 2. Gently touch the SmartWheel control in an anti-clockwise direction to the level you want to use. -
Page 15: Keep Warm Function
OPERATION OPERATION Cancel Smart Zone function 1. Ensure the cooktop power has been switch on. 2. Touch the Smart Zone function key to cancel the Smart Zone function, the indicator “ ” will dim in brightness. Using the Keep Warm function The Keep Warm function is a useful addition to your cooktop. -
Page 16: Pause Function
OPERATION OPERATION Using the Pause function The Pause function is ideal for using if you need to temporarily leave the cooktop unattended during cooking but do not wish to turn any cooking zone off completely. By using the Pause function the zones will temporarily be switched off , once the Pause is switched off then the cooking zones will revert back to the initial temperature setting. -
Page 17: Flexi-Zone Function
OPERATION OPERATION Using the Flexi-Zone function • This model may be used as two flexible zones or four individual zones depending on the cooking needs in each situation. • A Flexi-Zone is made of two independent inductors that can be controlled separately. When it is working, only the zone covered by the cookware is activated. -
Page 18: Locking The Controls
OPERATION Locking the Controls • You can lock the controls to prevent unintended use (for example children accidentally turning the cooking zones on). • When the controls are locked, all the keys except the ON/OFF key are disabled. To lock the controls Touch the keylock key. -
Page 19: Using The Timer
OPERATION Using the Timer You can use the timer in two different ways: • You can use it as a minute minder. The minute minder works as a standard timer and can be used independently of any cooking zone. • You can use it as cut-off timer. The cut-off timer will turn off one or more cooking zones when the timer finishes. - Page 20 OPERATION Using the timer to switch off one or more cooking zones 1. To use the timer to switch off the cooking zone after cooking, have the cooking zone on and in cook mode. 2. While the heating zone is still blinking touch the timer key, “- 0:00 +”...
- Page 21 OPERATION If the timer is set on more than one zone: Confi 1. When you set timer for several cooking zones, red dots of the relevant cooking zones are indicated. The timer display shows the min. timer. The dot of the corresponding zone will flash.
-
Page 22: Cooking Guidelines
COOKING GUIDELINES Take care when frying as the oil and fat heat up very quickly, particularly if you’re using Boost. At extremely high temperatures oil and fat will ignite spontaneously and this presents a serious fire risk. Cooking Tips • When food comes to the boil, reduce the power setting. •... - Page 23 COOKING GUIDELINES For stir-frying 1. Choose a ceramic compatible flat-based wok or a large frying pan. 2. Have all the ingredients and equipment ready. Stir-frying should be quick. If cooking large quantities, cook the food in several smaller batches. 3. Preheat the pan briefly and add two tablespoons of oil. 4.
-
Page 24: Care And Cleaning
CARE AND CLEANING What? How? Important! Everyday soiling on 1. Switch the power to the cooktop off. • When the power to the glass (fingerprints, 2. Apply a cooktop cleaner while the cooktop is switched off, marks, stains left by glass is still warm (but not hot!) there will be no ‘hot surface’... -
Page 25: Hints And Tips
HINTS AND TIPS Problem Possible causes What to do The cooktop cannot No power. Make sure the cooktop is Be turned on. connected to the power supply and that it is switched on. Check whether there is a power outage in your home or area. If you’ve checked everything and the problem persists, call a qualified technician. -
Page 26: Error Failure Display
ERROR FAILURE DISPLAY If an abnormality comes up, the induction hob will enter the protective state automatically and display corresponding protective codes: Problem Possible causes What to do E4/E5 Temperature sensor failure Please contact the supplier. E7/E8 Temperature sensor of the IGBT Please contact the supplier. -
Page 27: Installation
• Cut out the work surface according to the sizes shown in table below. Warning: The work surface material must use the impregnated wood or other insulated material. L(mm) W(mm) H(mm) D(mm) A(mm) B(mm) X(mm) BCT60INTP 50 min. - Page 28 INSTALLATION WARNING: In all circumstances, make sure the cooktop is well ventilated and the air intakes and outlets are not blocked. DO NOT install the cooktop if glass is cracked or any other damaged noticeable. The safety distance between the cooktop and the cupboard above the cooktop should be at least 760mm.
- Page 29 INSTALLATION When you have installed the hob, make sure that • The power supply cable is not accessible through cupboard doors or drawers. • There is adequate flow of air from outside the cabinetry to the base of the hob. •...
- Page 30 INSTALLATION Cautions The cooktop MUST BE installed by qualified personnel or technicians. Please never conduct the operation by yourself. • The cooktop shall not be mounted close to cooling equipment, dishwashers and rotary dryers. There will be a dedicated power source for the cooktop. •...
- Page 31 INSTALLATION DISPOSAL Do not dispose this product as unsorted municipal waste. Collection of such waste separately for special treatment is necessary. This appliance is labeled in compliance with European directive 2002/96/EC for Waste Electrical and Electronic Equipment (WEEE). By ensuring that this appliance is disposed of correctly, you will help prevent any possible damage to the environment and to human health, which might otherwise be caused if it were disposed of in the wrong way.
-
Page 32: Technical & Reference Data
TECHNICAL & REFERENCE DATA Induction Hob BCT60INTP Cooking Zones 4 Zones Supply Voltage 220-240V~ 50 or 60Hz Installed Electric Power 7200W Product Size D×W×H (mm) 590×520×58 Building-in Dimensions A×B (mm) 560×490 Weight and Dimensions are approximate. Because we continually strive to improve our products we may change specifications and designs without prior notice.
Need help?
Do you have a question about the BCT60INTP and is the answer not in the manual?
Questions and answers