
Related Manuals for Belling BCT60CER


Summary of Contents for Belling BCT60CER
- Page 1 BCT60CER Ceramic Cooktop INSTRUCTION MANUAL PLEASE READ THE INSTRUCTION MANUAL CAREFULLY BEFORE USING THE UNIT. www.belling.com.au | www.belling.co.nz...
-
Page 2: Table Of Contents
CONTENTS WARNINGS AND PRECAUTIONS PRODUCT OVERVIEW PRODUCT INFORMATION OPERATION TO START COOKING FINISHED COOKING DUAL ZONE FUNCTION LOCKING CONTROLS USING THE TIMER COOKING GUIDLINES CARE AND CLEANING HINTS AND TIPS INSTALLATION TECHNICAL & REFERENCE DATA WARRANTY... - Page 3 PRODUCT / INSTALLER DETAILS For future reference we suggest that you staple a copy of your purchase receipt here and complete the below so the information is always at hand. Product Details Model number: Description: Serial number: (Located on the product rating label) Purchase Details Date of purchase: Place of purchase:...
- Page 4 CONGRATULATIONS Dear Customer, Congratulations on the purchase of your new product from Belling. We recommend you please take some time to read the instruction manual thoroughly to familiarise yourself with the functionality and operations to ensure optimum performance of your new appliance.
-
Page 5: Warnings And Precautions
WARNINGS & PRECAUTIONS PLEASE READ THE FOLLOWING INSTRUCTIONS CAREFULLY BEFORE USING THE APPLIANCE. Installation Electrical Shock Hazard • Disconnect the appliance from the mains electricity supply before carrying out any work or maintenance on it. • Connection to a properly earthed wiring system is essential and mandatory. •... - Page 6 WARNINGS & PRECAUTIONS Operation and maintenance Electrical Shock Hazard • Do not cook on a broken or cracked cooktop. If the cooktop surface is broken or cracked, switch the appliance off immediately at the mains power supply (wall switch) and contact a qualified technician.
- Page 7 WARNINGS & PRECAUTIONS • Do not store items of interest to children in cabinets above the appliance. Children climbing on the cooktop could be seriously injured. • Do not leave children alone or unattended in the area where the appliance is in use. •...
- Page 8 WARNINGS & PRECAUTIONS • The appliance is not intended to be operated by means of an external timer or separate remote-control system. CAUTION: The cooking process has to be supervised. A short term cooking process has to be supervised continuously. •...
-
Page 9: Product Overview
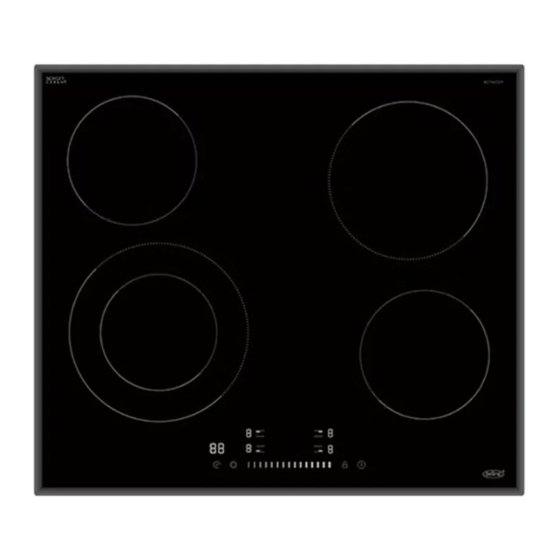
1200W 3. Rear right zone - 190mm max 1800W 4. Front right zone - 155mm max 1200W 5. Control panel BCT60CER The Control Panel 1. ON/OFF key 2. Slide touch control 3. Timer key 4. Child lock key 5. Heating zone selection keys 6. -
Page 10: Product Information
PRODUCT INFORMATION Before using your New Hob • Read this guide, taking special note of the ‘Safety Warnings’ section. • Remove any protective film that may still be on your ceramic hob. Using the Touch Controls • The controls respond to touch, so you don’t need to apply any pressure. •... - Page 11 PRODUCT INFORMATION Make sure that the base of your pan is smooth, sits flat against the glass, and is the same size as the cooking zone. Always centre your pan on the cooking zone. Always lift pans off the ceramic hob – do not slide, or they may scratch the glass.
-
Page 12: Operation
OPERATION To start cooking 1. Touch the ON/OFF key. All the indicators show “– “ 2. Place a suitable pan on the cooking zone that you wish to use. Make sure the bottom of the pan and the surface of the cooking zone are clean and dry. 3. -
Page 13: Finished Cooking
OPERATION OPERATION When you have finished cooking 1. Select the heating zone that you wish to switch off 2. Turn the cooking zone off by scrolling down to”0” on the “Slider” control. Make sure the display shows”0”. 3. Turn the whole cooktop off by touching the ON/OFF key. - Page 14 OPERATION Locking the Controls (Child Lock) • You can lock the controls to prevent unintended use (for example children accidentally turning the cooking zones on). • When the controls are locked, all the controls except the ON/OFF key are disabled. To lock the controls Touch the lock key.
-
Page 15: Using The Timer
OPERATION Using the Timer You can use the timer in two different ways: • You can use it as a minute minder. In this case, the timer will not turn any cooking zone off when the set time has expired. •... - Page 16 OPERATION 6. When the time is set, it will begin to count down immediately. The display will show the remaining time. 7. When the set time has expired, the timer will sound 30 seconds and the timer indicator shows “- - “ when the setting time finished. Using the timer to switch off one or more cooking zones 1.
- Page 17 OPERATION 6. When the time is set, it will begin to count down immediately. The display will show the remaining time. Note: There will be a red dot in the right bottom corner of power level indication indicating which zone has been selected. 7.
-
Page 18: Cooking Guidlines
COOKING GUIDELINES Take care when frying as the oil and fat heat up very quickly, particularly if you’re using Boost. At extremely high temperatures oil and fat will ignite spontaneously and this presents a serious fire risk. Cooking Tips • When food comes to the boil, reduce the power setting. •... - Page 19 COOKING GUIDELINES For stir-frying 1. Choose a ceramic compatible flat-based wok or a large frying pan. 2. Have all the ingredients and equipment ready. Stir-frying should be quick. If cooking large quantities, cook the food in several smaller batches. 3. Preheat the pan briefly and add two tablespoons of oil. 4.
-
Page 20: Care And Cleaning
CARE AND CLEANING What? How? Important! Everyday soiling on 1. Switch the power to the cooktop off. • When the power to the glass (fingerprints, 2. Apply a cooktop cleaner while the cooktop is switched off, marks, stains left by glass is still warm (but not hot!) there will be no ‘hot surface’... -
Page 21: Hints And Tips
HINTS AND TIPS Problem Possible causes What to do The cooktop won’t No power. Make sure the cooktop is turn on. connected to the power supply and that it is switched on. Check whether there is a power outage in your home or area. If you’ve checked everything and the problem persists, call a qualified technician. -
Page 22: Installation
D(mm) A(mm) B(mm) X(mm) BCT60CER 50 mini Ensure the hob is well ventilated and the air inlet and outlet are not blocked. Ensure the hob is in good working order. Install Rangehoods and Exhaust Fans in accordance to the manufacturer’s instructions. - Page 23 INSTALLATION A(mm) B(mm) C(mm) 50 mini 20 mini Air intake Air exit 5mm Before you install the hob, make sure that • The work surface is square and level, and no structural members interfere with space requirements. • The work surface is made of a suitable heat-resistant material. •...
- Page 24 INSTALLATION • You consult local building authorities and by-laws if in doubt regarding installation • You use heat-resistant and easy-to-clean finishes (such as ceramic tiles) for the wall surfaces surrounding the hob. When you have installed the hob, make sure that •...
- Page 25 INSTALLATION Cautions • The hob must be installed by technicians. Please never conduct the operation by yourself. • The hob shall not be mounted to cooling equipment, dishwashers and rotary dryers. • The hob shall be installed in a way that ensures correct ventilation and clearances.
- Page 26 INSTALLATION DISPOSAL Do not dispose this product as unsorted municipal waste. Collection of such waste separately for special treatment is necessary. This appliance is labeled in compliance with European directive 2002/96/EC for Waste Electrical and Electronic Equipment (WEEE). By ensuring that this appliance is disposed of correctly, you will help prevent any possible damage to the environment and to human health, which might otherwise be caused if it were disposed of in the wrong way.
-
Page 27: Technical & Reference Data
TECHNICAL & REFERENCE DATA Ceramic Hob BCT60CER Cooking Zones 4 Zones Supply Voltage 220-240V~ 50 or 60Hz Installed Electric Power 6400W Product Size D×W×H (mm) 590×520×50 Building-in Dimensions A×B (mm) 565×495... - Page 28 NOTES ______________________________________________________ ______________________________________________________ ______________________________________________________ ______________________________________________________ ______________________________________________________ ______________________________________________________ ______________________________________________________ ______________________________________________________ ______________________________________________________ ______________________________________________________ ______________________________________________________ ______________________________________________________ ______________________________________________________ ______________________________________________________ ______________________________________________________ ______________________________________________________ ______________________________________________________ ______________________________________________________ ...
-
Page 29: Warranty
Subject to the exclusions below, we warrant that the product will not have any electrical or mechanical breakdowns within: a) In the case of Belling products used for personal, domestic or household purposes, a period of 3 years (AU) / 2 years (NZ) from the date the product is purchased as a brand-new product from a retailer located in Australia / New Zealand. - Page 30 WARRANTY exposure to abnormally corrosive conditions, events independent of human control which occurred after the goods left the control of Glen Dimplex; c) The repair relates to the replacement of consumable parts such as fuses and bulbs or any other parts of the product which require routine replacement;...
- Page 31 WARRANTY 5. Warranty claims If you make a valid claim under this warranty and none of the exclusions set out in section 2 apply, we will, at our election, either repair the product or replace the product with a product of identical specification (or where the product is superseded or no longer in stock, with a product of as close a specification as possible).
- Page 32 READ THE INSTRUCTION BOOKLET BEFORE INSTALLING AND USING THE APPLIANCE The manufacturer will not be responsible for any damage to property or to persons caused by incorrect installation or improper use of the appliance. The manufacturer is not responsible for any inaccuracies, due to printing or transcription errors, contained in this manual.
Need help?
Do you have a question about the BCT60CER and is the answer not in the manual?
Questions and answers