Advertisement
Quick Links
Advertisement

Related Manuals for Nexus 21 Transcend Pro


Summary of Contents for Nexus 21 Transcend Pro
- Page 1 Transcend Pro Installation Instructions...
- Page 3 Fax: (480) 951-6879 Revised: 09/14/18 Below is a parts list describing all of the items included with the Transcend Pro. You may also wish to refer to the dimensional diagram shown on “Supplemental Page A” (at the end of this document).
- Page 4 Parts List, continued Cables • Motor Cable 1m (2) – Black cable with white, six-pin plugs. Use this cable to connect the Actuator to the Control Box. • Power Cable – Connects Control Box to power outlet. Three feet long. •...
- Page 5 Nexus 21 disclaims any liability for modifications, improper installations, or installations over the specified weight range. Nexus 21 will not be liable for any damages arising out of the use of, or inability to use, Nexus 21 products. Nexus 21 bears no responsibility for incidental or consequential damages. This includes, but is not limited to, any labor charges for the servicing of Nexus 21 products performed by anyone other than Nexus 21.
- Page 6 Instructions for setting the Mount System travel limit are on Page 19. TIP: Planning to integrate the Mount with your UNIVERSAL REMOTE CONTROL? The RF version of the Nexus 21 controls won’t do it. Switch to IR. These are the parts included with RF controls: Backup Switch...
-
Page 7: Table Of Contents
Table of Contents Connecting the Mount Assembling the Mount Installing the Mount Attaching the TV to the Mount TV Level Adjustment How to Set the Tilt How to Set a Lower Limit Cable Management Information Maintenance & Contact Closure Information... -
Page 8: Connecting The Mount
CSI Control Kit or RF Control Kit Step 1: Connect the Motor Cables to the Pigtail on each Actuator for the Transcend Pro. Step 2: Connect the Motor Cables to Ports 1 & 2 which are located on the front and back face of the Control Box. - Page 9 Step 3: If the system came with RF Controls, connect the Wired Backup Switch and RF Receiver to Ports A1 & A2 on the Control Box. If your system came with the CSI Kit, connect just the IR Receiver to Port A1 on the Control Box. CSI Kit RF Kit Connect the Power Cable to Port AC on...
-
Page 10: Assembling The Mount
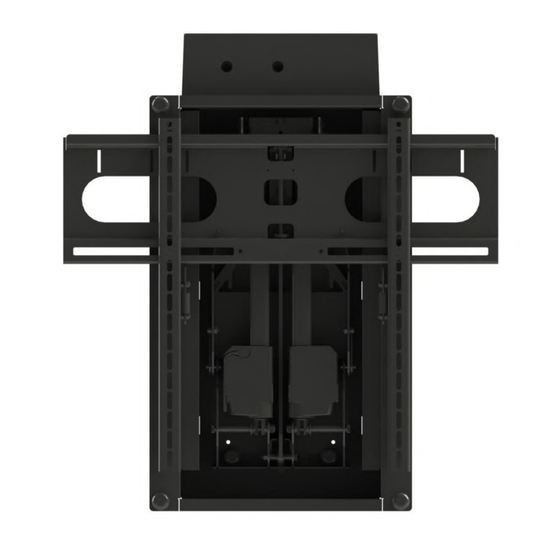
Assembling the Mount For these steps you will need the following parts: • Swivel Pivot Bolt • Swivel Pivot Nut • (2) Swivel Pivot Washers • (2) 5 x 35mm BHMS Screws • (4) #10 x 0.25” Phillips Screws Swivel Pivot Bolt Step 7: Attach the Screen Back Plate to the Mount using the Swivel Pivot Bolt, Swivel Pivot Nut, and (2) Washers using the diagram shown to the right. - Page 11 Step 10: Place the Control Box with all of its connections into the Control Box enclosure and fasten it to the enclosure using (2) BHMS Screws. Step 11: Place the Enclosure into the top slot of the Transcend Pro and Fasten it to the recess box using (4) Phillips Screws.
- Page 12 Step 12: Remove the Cable Management Covers on the interior sides of the Recess Box. Step 13: Place all the cables into their respective areas and replace the Cable Management Covers. Step 14: Reconnect the Motor Cables to each Actuator. Step 15: Press the Up button to run the mount to the top most position then disconnect it from power.
-
Page 13: Installing The Mount
Using the shelf depth [D] locate the cell in (Table 2) to determine the [H] (Minimum Clearance) Note: The Transcend Pro must always be able to lower its full travel with no obstructions. Note: Mocking the TV up on the mount prior to installation will allow you to determine where the TV will rest relative to the bottom of the mount. - Page 14 Step 18: Place the top end of the Transcend Pro into the cutout in the wall, push it up, then push the bottom half of the mount into place. Note: Be sure to pull the necessary power supply up to the knockout in the bottom of the Recess Box.
- Page 15 Step 21: Partially fasten the Mount to the Wall using (4) Lag Bolts, (4) Washers, and (4) Lag Bolt Cover Washers. Step 22: Level the Mount off of the Screen Back Plate, ensure it is level relative to the mantel or floor, then completely fasten Lag Bolts.
-
Page 16: Attaching The Tv To The Mount
Attaching the TV to the Mount For these steps you will need the following parts: • Vertical Mounting Bars • Large Assorted Hardware Pack Step 24: Attach the Vertical Mounting Bars as high as possible on the Back of the TV Note: This will ensure the mount has the most possible downward travel and is fully concealed when... - Page 17 Step 26: Press the Down button on the Wired Backup Switch to lower the Mount, press the Up button to stop it once it reaches the out most position. Step 27: Hang and center the TV on the Screen Back Plate, then release the spring-loaded Screen Locks to secure the TV in place.
-
Page 18: Tv Level Adjustment
TV Level Adjustment Step 1: Disengage the Spring-Loaded Screen Lock. Step 2: Loosen or Tighten the Bolt on the Top of either Vertical Mounting Bar, to raise of lower that side of the TV. Note: Maximum adjustment of +/- 0.5 Degrees. Step 3: Re-engage the Spring-Loaded Screen Lock. -
Page 19: How To Set The Tilt
How to Set the Tilt The has +/- 1 degree of Tilt in the Top Position, and +1/-2 Degrees in the Bottom and Out Positions. Below are the steps on how to set the Tilt for each position of the mount. Top Tilt Adjustment Step 1: Fasten the Lock Nuts to each of the Screws completely. -
Page 20: How To Set A Lower Limit
How to Set a Lower Limit Only the Lower Limit can be set on the Transcend Pro, however it must be able to fully travel with no obstructions below it. This is because the Mount resets in the lowest position and will be unable to reset if it is obstructed. - Page 21 Cable Management • Wires from the TV can be routed down along the Center Linkage Arm then zip tied to it. Ensure enough slack remains so that the wires can freely move when the mount is operated. • Once all Cable Management is finished, check the full range of motion again to ensure no pinching or rubbing occurs on cables, zip ties, components, etc.
- Page 22 Maintenance To ensure the mount functions for the duration of its life. Please follow these steps once every 3 months: 1. Lubricate all joints every 3 months. More lubrication may be required for outdoor installations. 2. Visually check all bolts every 3 months to ensure no unordinary noise or function occurs.
- Page 23 Contact Closure Information Our systems are able to be integrated via Contact Closure through the use of a 3-Wire RJ45 Cable. Use the following information for wiring the to your Control System. Green is UP (Pin 3) is DOWN (Pin 5) Blue is GROUND (Pin 8) You will need (2) Normally Open Relays, one for UP and one for DOWN.
- Page 25 866-500-5438...
Need help?
Do you have a question about the Transcend Pro and is the answer not in the manual?
Questions and answers