Summary of Contents for B&D Controll-A-Door Smart SDO-7
Page 1
Controll-A-Door ® Smart SDO-7 & Secure SDO-6 Sectional Door Openers Doc # 161052_02 These instructions are intended for professional garage door Part # 86297 installers. All references are taken from inside looking out. Released 05/08/19...
Controll-A-Door - Installation instructions ® Contents Installation Instructions Home Owner Instructions 1. Installation Safety Warnings! 17. Home Owner Safety Warnings! 2. Before you Begin 18. Opener Safety & Security 3. Tools Required 18.1 Your Door CAN NOT be used: 18.2 Your Door CAN be used when: 4.
Controll-A-Door - Installation instructions ® 1. Installation Safety Warnings! This automatic garage door opener is designed and tested to offer safe service provided it is installed and operated in strict accordance with the following safety warnings. Failure to comply with the following instructions may result in death, serious personal injury or property damage.
Controll-A-Door - Installation instructions ® 2. Before you Begin 2.1 Examine the conditions in the garage: a. Look at the ceiling: i. Is it plastered? The opener is mounted to a perforated angle which MUST be securely fastened to a structural support.
Controll-A-Door - Installation instructions ® 4. Kit Contents 1 x SDO drive unit 1 x Door bracket PLUS 1 x Wall mount transmitter 3 x Pin Snap SSP 8 ZNU 31080 2 x Track Bracket 2 x Transmitters 2 x Hex Head screw M8x25 1 x Pre-Assembled 1 x Bent arm door attachment 1 x Pin 0890...
Controll-A-Door - Installation instructions ® 6. Fit the Opener 6.1Secure C-Rail to Opener: a. Remove the Opener from the box, taking care of antenna (if fitted). b. Locate and insert the shaft of drive unit into the C-Rail’s sprocket. c. Fix the two track brackets with four (4) M4 x 8 screws supplied in accessory pack.
Controll-A-Door - Installation instructions ® 8. Perforated Angle (Not supplied) 8.1 Attach Perforated Angle or equivalent a. Measure across the ceiling from the centre point 3177mm (+/- 150mm) to find a supporting beam. b. Create a perforated angle which best suits your site. Use a hack saw to cut the L shape metal strips. Secure the perforated angle to a supporting beam using diagrams shown below.
Controll-A-Door - Installation instructions ® 10. Optional Safety Beam Kit 10.1 Safety Beams The Safety Beam Kit provides additional safety by preventing the door closing when the beam is blocked by a car, child etc. When the Safety Beam Kit is installed the Auto-close feature can be enabled if required.
Controll-A-Door - Installation instructions ® 12. Setting Limits If a tracklock is being installed with the opener, make sure the tracklock plate is not secured in position until limits are set. Refer to tracklock manual. 12.1 Set the Limit Positions and adjust drive speed: When setting the Close limit, ensure the position is when the door makes first contact with the ground.
Controll-A-Door - Installation instructions ® 13. Safety Testing 13.1 Test the Close Cycle CAUTION: Take care when completing a a. Press the OPEN button or transmitter button to open the safety test. Failure to follow this warning door (If the door starts closing, press the transmitter button to can result in serious personal injury stop the door, then press transmitter again to open).
Controll-A-Door - Installation instructions ® 14. Auto-Close Auto-Close mode is a function that automatically closes the door after a pre-set time. Safety beams must be installed in order to run the Auto-Close function. There are two types of Auto-Close available: i.
Controll-A-Door - Installation instructions ® 15. Coding a Transmitter BUTTON 15.1 Storing the Transmitter Code TRANSMITTER The opener can only operated from remote control FUNCTION transmitters that have been programmed into its memory. Up to 64 codes can be stored in the Open / Stop / Close HOLD memory.
Controll-A-Door - Installation instructions ® 16. Smart Phone Control (SDO-7 only) This device allows for operation of the door when not in line-of-sight of the door and opener. The door may operate unexpectedly, therefore do not allow anything to stay in or near the path of the door.
Controll-A-Door - Installation instructions ® 17. Home Owner Safety Warnings! This automatic garage door opener is designed and tested to offer safe service provided it is installed and operated in strict accordance with the following safety warnings. Failure to comply with the following instructions may result in death, serious personal injury or property damage.
Controll-A-Door - Installation instructions ® 18. Opener Safety & Security WARNING! When operating manual release (while the door is 18.1 Your Door CAN NOT be used by the opener when: open) the door may fall rapidly due a. There is a locking device installed. to weak or broken springs, or due to b.
Controll-A-Door - Installation instructions ® 20. User Operating Controls Button Function 1. DOWN ARROW (Blue) Closes the door 2. DOWN ARROW LED (Blue) Illuminates when the door is closed and flashes when the door is obstructed on close or stopped. 3.
Controll-A-Door - Installation instructions ® 21. Maintenance 21.1 Door Maintenance WARNING! Failure to maintain your A poorly maintained door could cause fatal / serious injuries or garage door may void the warranty on damage to property. your garage door opener. •...
Controll-A-Door - Installation instructions ® 22. Troubleshooting Symptom Possible cause Remedy The opener does Garage door in poor condition e.g. Check the door’s operation not work from the springs may be broken transmitter The opener does not have power Plug a device of similar voltage (e.g. a hairdryer) into the power point and check that it is OK The battery in the transmitter is flat Replace the battery...
Page 19
Controll-A-Door - Installation instructions ® 22. Troubleshooting Main Light = Service / Warning Indicator: Requirements for a service and user warnings are indicated after operation by the main light repeatable flasing OFF a number of times followed by a pause. The below table identifys the issues and remedies. Flashes Issue Remedy PE is preventing door from moving...
Controll-A-Door - Installation instructions ® 23. Appendix A - Status Indication during Operating Mode. LEDs Light Status Indicates BLUE GREEN YELLOW PURPLE solid Open DOOR OPEN rapid Open with Autoclose timer running CLOSED LEDS flashing flashing Opening / Obstructed on Open solid Closed flashing...
Controll-A-Door - Installation instructions ® B - Adjustment Mode Instructions a. Press the MODE button repetitively until the GEAR LED starts flashing. b. Referring to the table below, select the desired parameter using the OPEN and CLOSE buttons and observing the number of flashes on the GEAR LED.
Controll-A-Door - Installation instructions ® E - Setting Limits via Transmitter a. Switch power on and the BLUE LED on the CLOSE button Button 1 will start to flash to indicate that the opener is ready (inch Open) Button 2 to set the Close travel limit (Set) b.
Controll-A-Door - Installation instructions ® G - Setting up Tilt Door Prior to limit set up, the opener can be set to J-Type Tilt Profile. This process allows the opener to pre-set to J-Type settings where the limit is not greater than 1500mm. If J-Type is selected, the speed is customised and cannot be changed. a.
Controll-A-Door - Installation instructions ® 24. Warranty This Warranty is given by B&D Doors a division of B&D Australia Pty Ltd (ABN 25 010 473 971), 34-36 Marigold St, Revesby 2212, 13 62 63, enquires@bnd.com.au. PLEASE NOTE: • This Warranty is in addition to any statutory, non-excludable guarantees or warranty rights and remedies under the law. See section 5 below. •...
Need help?
Do you have a question about the Controll-A-Door Smart SDO-7 and is the answer not in the manual?
Questions and answers
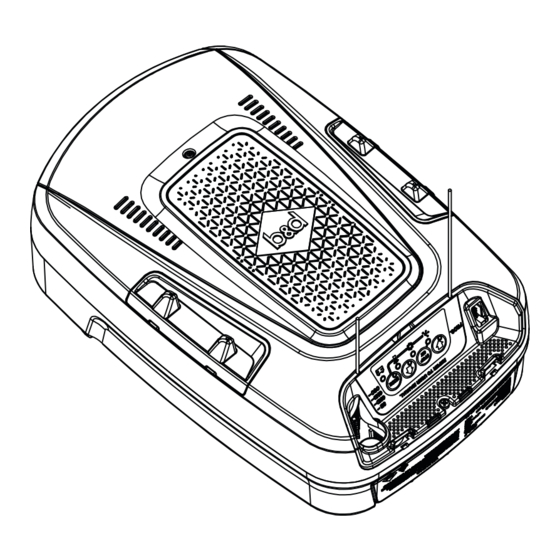
the light inside the SD07 is not working, how do I replace it?
To replace the light inside the B&D Smart SDO-7, change the LED if the courtesy light does not work. The issue may be due to a failed LED.
This answer is automatically generated