Table of Contents
Advertisement
Quick Links
Advertisement
Table of Contents

Subscribe to Our Youtube Channel
Related Manuals for Rossmax X9


Summary of Contents for Rossmax X9
- Page 1 Model: Blood Pressure Monitor www.rossmax.com...
-
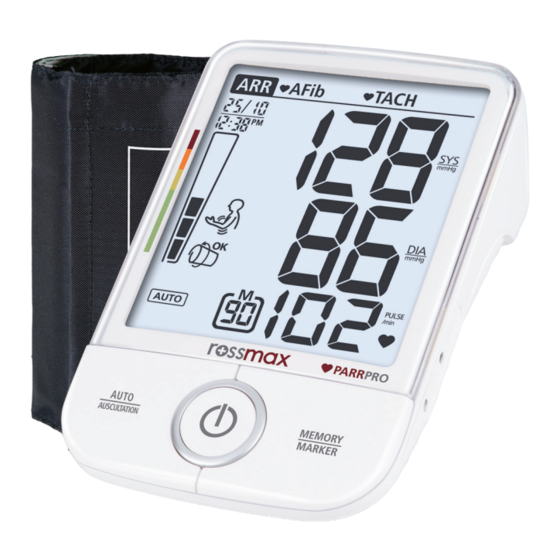
Page 2: Parr(Pulse Arrhythmia) Technology
No matter, this device on infants or neonates. X9 is protected against manufacturing defects by an whether you intent to safeguard yourself from an undetected AFib state, or you meas- established International Warranty Program. - Page 3 Tachycardia Detection (TACH) The PARR technology is able to detect and display combined pulse arrhythmia findings. Display Results A fast heart rate of higher than 100 beats per minute (bpm) in adults. Unless being caused by physical or mental stress, a tachycardia may be an indicator for both cardiac Normal finding (e.g.
-
Page 4: Name/Function Of Each Part
2. Atrial Fibrillation Detection (AFib) records is recommended. Please download the blood pressure log at our website www. 3. Premature Contraction Detection (PC) rossmax.com. 4. Tachycardia Detection (TACH) Blood Pressure Standard World Health Organization (WHO) : 1999 5. Bradycardia Detection (BRAD) 6. -
Page 5: Movement Detection
Loose Cuff Detection Using the AC Adaptor (Optional) If the cuff was applied too loosely, it may cause unreliable measurement results or 1. Connect the AC adaptor with the AC adaptor measurements can fail to start. The “Loose Cuff Detection” can help to determine if jack on the right side of the unit. -
Page 6: Applying The Cuff
1. Select cuff according to arm size (Fig. ). Position the artery mark (Ø) over the main artery (on the inside of your arm) (Fig. ). Note: Locate the main artery by pressing with 2 fingers approximately 2 cm above the Rossmax Arm circumference Cuff size bend of your elbow on the inside of your left arm. -
Page 7: Measurement Procedures
3. After all symbols appear, the display will show a blinking “0”. The monitor is ready to AUSCULTATION Mode: measure and will automatically inflate the cuff slowly to start measurement. with Stethoscope 4. Auto Mode • In Auto mode, “Auto” mark appears on the display. •... -
Page 8: Time Adjustment
You may pur- users suffered from stroke, or for unconscious users. chase a special designed USB cable in order to connect Rossmax’s blood pressure 8. This unit is able to detect common arrhythmia (atrial or ventricular premature beats or monitor and your PC. -
Page 9: Specifications
The X9 is intended for use in the electromagnetic environment specified below. The customer or the user of the X9 should assure that 26. Do not use the tubing and/or AC adaptor for any other purpose than those specified, is used in such and environment. -
Page 10: Warranty Card
Portable and mobile RF communications equipment should be used no closer to any part of the X9 includ- ing cables, than the recommended separation distance 3 Vrms: 3 Vrms: calculated from the equation applicable to the frequency 0,15 MHz – 80 MHz 0,15 MHz –...
Need help?
Do you have a question about the X9 and is the answer not in the manual?
Questions and answers