Table of Contents
Advertisement
MULTI-FUNCTION DETECTOR
MULTI-FUNCTION DETECTOR
Operation and Safety Notes
WIELOFUNKCYJNY DETEKTOR
Wskazówki dotyczące obsługi i bezpieczeństwa
MULTIFUNKCIÓS DETEKTOR
Kezelési és biztonsági utalások
MULTIFUNKCIJSKI DETEKTOR
Navodila za upravljanje in varnostna opozorila
MULTIFUNKČNÍ DETEKTOR
Pokyny pro obsluhu a bezpečnostní pokyny
MULTIFUNKČNÝ DETEKTOR
Pokyny pre obsluhu a bezpečnostné pokyny
MULTIFUNKTIONSDETEKTOR
Bedienungs- und Sicherheitshinweise
IAN 40111
Advertisement
Table of Contents

Subscribe to Our Youtube Channel
Related Manuals for Powerfix Profi 40111


Summary of Contents for Powerfix Profi 40111
- Page 1 Wskazówki dotyczące obsługi i bezpieczeństwa MULTIFUNKCIÓS DETEKTOR Kezelési és biztonsági utalások MULTIFUNKCIJSKI DETEKTOR Navodila za upravljanje in varnostna opozorila MULTIFUNKČNÍ DETEKTOR Pokyny pro obsluhu a bezpečnostní pokyny MULTIFUNKČNÝ DETEKTOR Pokyny pre obsluhu a bezpečnostné pokyny MULTIFUNKTIONSDETEKTOR Bedienungs- und Sicherheitshinweise IAN 40111...
- Page 2 Operation and Safety Notes Page Wskazówki dotyczące obsługi i bezpieczeństwa Strona Kezelési és biztonsági utalások Oldal Navodila za upravljanje in varnostna opozorila Stran Pokyny pro obsluhu a bezpečnostní pokyny Strana Pokyny pre obsluhu a bezpečnostné pokyny Strana 104 DE / AT / CH Bedienungs- und Sicherheitshinweise Seite...
-
Page 9: Table Of Contents
Intended use .......... Page 10 Description of parts ......Page 10 Technical data ........Page 11 Scope of delivery ....... Page 11 Safety instructions General safety information ......Page 11 Information regarding inaccurate measurement results ....Page 14 Safety instructions for batteries ....Page 15 Preparing for use Inserting / replacing the battery .... -
Page 10: Intended Use
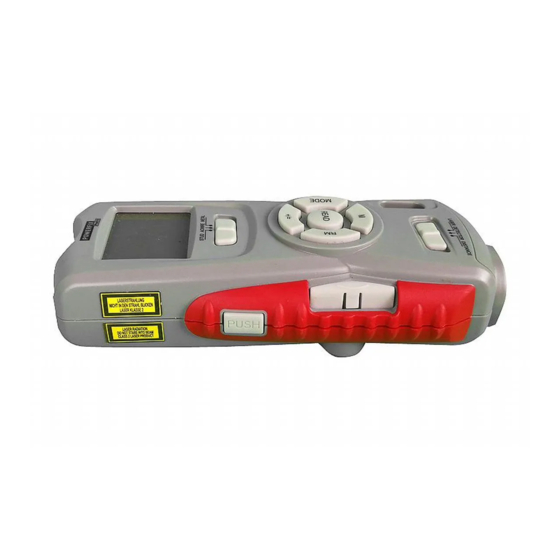
Multi-Function Detector Intended use This device is intended for the detection of metal, wood and live wires. The instrument is not intended for commercial use. Description of parts Measurement point Display Material switch STUD / AC WIRE / METAL (wood/AC wire/metal) MODE button Stud button READ button... -
Page 11: Technical Data
Technical data Ultrasonic distance measurement Detects: Wood, AC wires, metal Laser class: Max. power output (P ): < 1 mW Wave length: 635 - 660 nm Power supply: 9 V block battery LASER RADIATION DO NOT STARE INTO BEAM CLASS 2 LASER PRODUCT Scope of delivery 1 Multi-purpose detector 1 9 V block battery... - Page 12 instruction concerning use of the appliance in a safe way and understand the hazards in- volved. Children shall not play with the appli- ance. Cleaning and user maintenance shall not be made by children without supervision. Do not expose the product to –...
- Page 13 are dangerous and can get into the eyes. This could result in serious eye injuries. The product is not a toy and should be kept out of the reach of children. One misapplica- tion can lead to irreparable eye damage. Only use the device in areas of application for which it was designed! The device may neither be manipulated nor...
-
Page 14: Information Regarding Inaccurate Measurement Results
Information regarding inaccurate measurement results Please note that inaccurate measurement results can be obtained under certain condi- tions. The following conditions can cause inaccurate measurement results: – very thick walls – weak battery – deep-lying wires or pipes – shielded AC wires –... -
Page 15: Safety Instructions For Batteries
Safety instructions for batteries DANGER TO LIFE! Batteries are not intended for children. Do not leave batteries lying around. They could potentially be swallowed by children or pets. In the event a battery is swallowed seek immediate medical attention. EXPLOSION HAZARD! Never recharge, short-circuit and / or open batteries. -
Page 16: Preparing For Use
Remove the battery if the product is not going to be used for an extended period. When inserting the battery ensure the correct polarity! This is shown inside the battery com- partment. Otherwise the battery can explode. Insert the battery with care. Otherwise the product can be damaged. -
Page 17: Use
Note: When the battery symbol appears in the display , replace the battery. With a weak battery you may receive an inaccurate or false measurement result. Measuring distances 1. Slide the function switch to the position „DISTANCE“. The display is turned on. 2. -
Page 18: Addition Of Distances
Measure a distance as described in the section „Measuring distances“. As an example, „2m“ will appear on the display. In order to set the measuring unit of foot, proceed as described in step 1 to 3: 1. Press the MODE button and keep it pressed. -
Page 19: Measuring Surface Areas
4. Press the + / = button again. The new meas- urement is added to the old in the lower row. 5. Repeat steps 3 to 4 to add further measure- ments. 6. Press the MODE button to leave the addition mode. -
Page 20: Measuring Volumes
3. Press the MODE button . The appliance is now ready for the second measurement. 4. Measure the next surface area. 5. Press the + / = button . The message „+“ appears in the display. 6. Press the RM button . -
Page 21: Addition Of Volumes
5. Press the READ button to measure the height. The measured height appears in the upper row of the display. The results of the volume calculation appear in the lower row. Addition of volumes 1. Measure a volume as described in the section „Measuring volumes“. -
Page 22: Detection Of Various Objects
Detection of various objects The detection of hidden objects is the same in all three modi (STUD, AC WIRE, METAL). Please note: Test the device before initial use on a metal pipe or AC wire whose position you know exactly. 1. -
Page 23: Detection Of Wooden Objects
Detection of wooden objects 1. For the detection of wooden objects, proceed as described in the section „Detection of vari- ous objects“. 2. If you have found something with the multi- purpose detector, mark it. 3. To be sure that the found object is made of wood, slide the function switch to the position „METAL“. -
Page 24: Troubleshooting
2. Slide the two stud buttons firmly down- 5 11 wards. The nails lightly penetrate the wall to prevent the multi-detector from falling. Note: Exercise care with the studs. These are sharp and can cause injury. Do not use the stud button on stone or metal wall, but only on walls with a soft surface. -
Page 25: Cleaning And Care
Cleaning and care Under no circumstances should you use liquids or detergents, as these will damage the device. Only clean the outside of the appliance with a soft, slightly damp cloth. Disposal The packaging is made entirely of recyclable materials which you can dispose of at your local recycling facilities. -
Page 26: Warranty
Never dispose of batteries in your household waste. They may contain toxic heavy metals and are subject to hazardous waste regulations. The chemical symbols of the heavy metals are: Cd = cadmium, Hg = mercury, Pb = lead. Therefore dispose of used batteries through your local collection site. - Page 27 The warranty applies to faults in material or man- ufacture. This warranty does not cover product parts subject to normal wear, thus possibly con- sidered consumables (e.g. batteries) or for dam- age to fragile parts, e.g. switches, rechargeable batteries or glass parts.
Need help?
Do you have a question about the 40111 and is the answer not in the manual?
Questions and answers