
Related Manuals for MSA Firehawk Responder Series


Summary of Contents for MSA Firehawk Responder Series
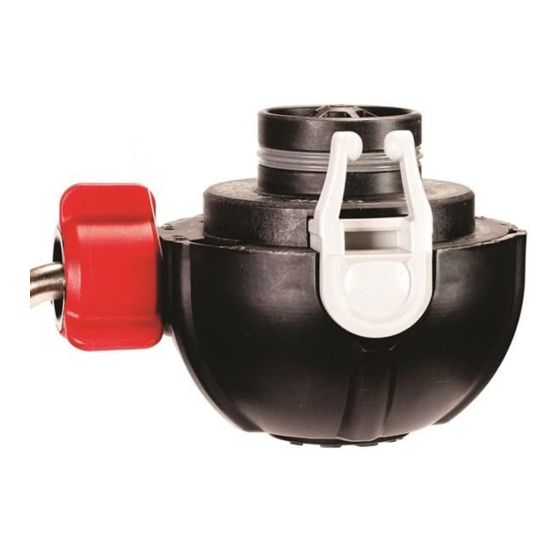
- Page 1 Firehawk® Responder® Second Stage Regulator MAINTENANCE AND REPAIR TAL 016 (L) Rev. 3 © MSA 2010 Prnt. Spec. 10000005389(I) Mat. 10096394 Doc. 10096394...
- Page 2 FIREHAWK RESPONDER SECOND STAGE REGULATOR Replacement Kits and Overhaul Kit Parts List Description Item Description Firehawk Responder Second Stage Regulator Replacement Kits 10047664 Cover 10082527 Firehawk Responder Regulator 10092041 Diaphragm Spring 10087295 Valve Assembly 10047528 Spring Cap 10087301 Housing Assembly 10044026 Tetraplex CBRN Shield 10093810...
- Page 3 FIREHAWK RESPONDER SECOND STAGE REGULATOR Christo Lube Christo Lube Christo Lube Christo Lube Loctite 271 Christo Lube Christo Lube TAL 016 (L) Rev. 3 - 10096394...
-
Page 4: Table Of Contents
FIREHAWK RESPONDER SECOND STAGE REGULATOR Table of Contents Disassembly..............4 Adjustment of Valve Fork if Above the Maximum ..8 Regulator Cover and Spring ...........4 Adjustment of Valve Fork if Below the Minimum ...8 Diaphragm ..............4 Reassembly...............9 Bypass Assembly ............5 Seal Ring.................9 Bypass Screen..............6 Regulator Housing and Buttons ........9 Valve Assembly...............6... -
Page 5: Bypass Assembly
FIREHAWK RESPONDER SECOND STAGE REGULATOR 4. Secure the bypass knob in a vise. Note: Use rubber pads or electrical tape on the vise to protect the bypass knob. 2. Roll the edge of the diaphragm off the lip of the regulator housing. a. -
Page 6: Bypass Screen
FIREHAWK RESPONDER SECOND STAGE REGULATOR 8. Use the o-ring removal tool to remove the o-ring. Be careful not 3. Remove the old screen to scratch the bypass and discard. stem. Discard the o-ring. Note: Do not puncture the screen. The o-ring removal tool can be used to rotate the screen counterclockwise until it’s loose. -
Page 7: Seal Ring
FIREHAWK RESPONDER SECOND STAGE REGULATOR INSPECTION OF THE VALVE FORK FOR PROPER HEIGHT Inspect and adjust valve fork height with the valve fork b. Pull firmly on the pointing toward you. The valve fork assembly must move buttons to remove up and down freely. -
Page 8: Acceptable Valve Fork Heights
FIREHAWK RESPONDER SECOND STAGE REGULATOR 4. The top of the valve fork must be within the acceptable range. Acceptable Valve Fork Heights Above maximum height – Top of fork above top of acceptable range. Nominal height – Top of fork level with center of acceptable range. -
Page 9: Reassembly
FIREHAWK RESPONDER SECOND STAGE REGULATOR 2. Turn the adjustment wheel counterclockwise to raise the fork. Note: Install the thinner o-ring (P/N 10023509) to the base of the post. Ribs Ribs Locking Locking 3. Slide the valve housing back into place. Ensure that the locking tab engages the adjusting wheel. -
Page 10: Bypass Screen
FIREHAWK RESPONDER SECOND STAGE REGULATOR 2. Push the valve into the regulator housing. 5. Remove the protective tape or paper. Installing the Bypass Screen Bypass Screen P/N 10082485 O-Ring P/N 632736 6. Carefully screw the nipple into the hose union. 1. - Page 11 FIREHAWK RESPONDER SECOND STAGE REGULATOR 2. Install the bypass insert. a. Install a new o-ring (P/N 697453). 3. Carefully install the bypass assembly. b. Protect the o-ring by covering the thread with tape or thin pieces of paper. Note: To prevent damage to the o-ring, use extra U-Clip caution when installing the...
-
Page 12: Diaphragm
FIREHAWK RESPONDER SECOND STAGE REGULATOR Note: Replace the Spring Cap (P/N 10047528) and Tetraplex CBRN Shield (P/N 10044026) per overhaul frequency. (See FireHawk® M7 ir Mask Maintenance and Repair, Introduction (P/N 10093079) for required overhaul frequency.) e. Reinstall the u-clip. Note: While installing the shield, the valve fork must be in the UP position. - Page 13 FIREHAWK RESPONDER SECOND STAGE REGULATOR 2. Push regulator cover and spring onto regulator housing until it locks. Double-check proper engagement by pulling on the regulator cover. Ensure that the regulator cover is securely attached to the regulator housing. Failure to follow this warning may result in serious personal injury or death.
Need help?
Do you have a question about the Firehawk Responder Series and is the answer not in the manual?
Questions and answers