
Related Manuals for Viega 6161.52


Summary of Contents for Viega 6161.52
- Page 1 Multiplex Trio drain/overflow functional unit Instructions for Use for water inlet through the overflow unit Model Year built: 6161.52 from 06/2015 en_INT...
- Page 2 Multiplex Trio drain/overflow functional unit 2 from 20...
-
Page 3: Table Of Contents
Table of contents Table of contents About these instructions for use Target groups Labelling of notes About this translated version Product information Intended use 2.1.1 Areas of use Product description 2.2.1 Overview 2.2.2 Technical data Accessories Handling Assembly information 3.1.1 Mounting conditions 3.1.2 Installation dimensions... -
Page 4: About These Instructions For Use
This restriction does not extend to possible operating instructions. The installation of Viega products must take place in accordance with the general rules of engineering and the Viega instructions for use. -
Page 5: About This Translated Version
About these instructions for use About this translated version This instruction for use contains important information about the choice of product or system, assembly and commissioning as well as intended use and, if required, maintenance measures. The information about the products, their properties and application technology are based on the current standards in Europe (e. -
Page 6: Product Information
The drain / overflow is suitable for standard bathtubs with the drain on the head end. Detailed information regarding all bathtub models and the corre- sponding Viega drains / overflows can be found in the catalogue or on the Internet. An equipment set with rotatable rosette and valve cone must be pur- chased separately. -
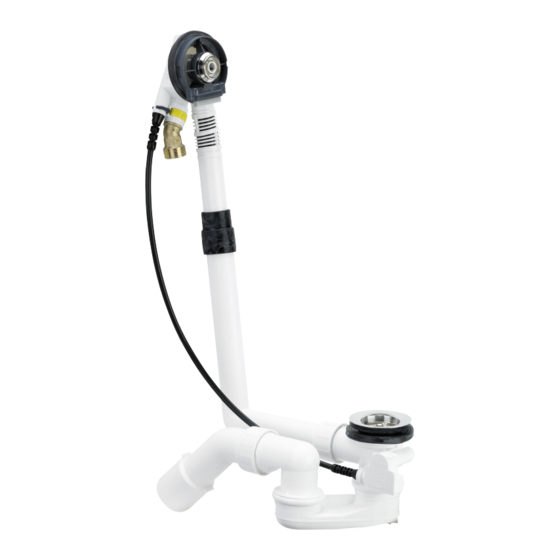
Page 7: Technical Data
Product information 14 15 11 10 Fig. 1: Component overview fixing screw valve top double seal drain elbow union nut sliding ring seal odour trap overflow pipe 10 - Bowden cable 11 - sleeve 12 - inlet adapter 13 - overflow unit 14 - profile seal 15 - additional seal (for steel bathtubs) 16 - supply flange... -
Page 8: Accessories
Product information Inlet capacity (at 0.25 MPa 20 l/min (2.5 bar)) Diameter of bathtub drain hole 52 mm DN (nominal diameter) drain sup- 40 / 50 mm port Length of Bowden cable 560 mm Length 100–260 mm Height 180–400 mm Ä... - Page 9 Product information Equipment set Multiplex Trio Visign MT3: Model 6161.13 Equipment set Multiplex Trio Visign MT5: Model 6161.01 Optional accessories Equipment set with water level increase The water level of the overflow can be increased by 5 cm with the equipment set.
- Page 10 Product information Multiplex extension set It is possible to extend the odour trap below the bathtub in the case of bathtubs with a very thick floor. The extension set, model 6161.7, is available for such cases. Multiplex Trio drain/overflow functional unit 10 from 20...
-
Page 11: Handling
Handling 3 Handling Assembly information 3.1.1 Mounting conditions The following requirements exist for the mounting of the drain / over- flow: The bathtub is installed. The drainage line is installed all the way to the bathtub. The underside of the bathtub is accessible. Pipe interrupter Backflow situation: If a negative pressure situation should occur when the bathtub is filled, there is a possibility that bath water may flow back... -
Page 12: Installation Dimensions
Handling 3.1.2 Installation dimensions Fig. 3: Dimensional drawing The following values are valid for L (length) and H (height): L = 100–260 H = 180–400 3.1.3 Required tools and materials Tool The following tools are required for mounting: fine-toothed saw mounting aid (included in the scope of delivery) spanner (SW 26) Material... - Page 13 Handling Fit profile seal in the overflow unit. If the wall thickness a in steel bathtubs is less than 3 mm, insert addition seal for steel bathtubs between profile seal and bathtub. Push the rubber sleeve onto the overflow unit pipe until the lower edge is flush with the edge of the overflow pipe.
-
Page 14: Mounting The Drain
Handling 3.2.2 Mounting the drain Proceed as follows to mount the drain: Place the double seal onto the drain unit in such a way that the recess is positioned over the connecting pipe. Pull the edge of the double seal over the edge of the drain. Hold the drain with double seal onto the drain opening from below. -
Page 15: Connecting The Wastewater System
Handling Requirements: The overflow is mounted in the overflow opening. The drain is securely mounted on the base of the bathtub. NOTICE! Connections where the pipes are not inserted far enough into each other become leaky. For this reason, maintain a minimum insertion depth of 15 mm for every connection. -
Page 16: Connecting The Inlet
Handling Requirements: The overflow and drain units are installed on the bathtub. The connection between overflow and drain has been made. If the wastewater pipe only has a diameter of 40 mm, cut off drain elbow. Push union nut, sliding ring and seal onto the drain elbow. Screw the union nut on the drain unit. -
Page 17: Mounting Equipment Set
Handling Overflow and drain are connected. The connection to the waste water system has been made. Push union nut and clamping ring (parts of the connection set) onto the water-carrying pipe. Push the narrow end of the screw fitting (part of the connection set) into the pipe as far as it will go. -
Page 18: Leakage Test
Handling Turn rotatable rosette to check function and alignment. The opening of the valve cone should be 2–3 cm wide when opened. If necessary, regulate the width of the opening of the valve cone using the adjusting screw (see next step). Set the valve cone with the help of the adjusting screw and counter with union nut. -
Page 19: Control
Handling Remove the flange cover at the marked points. Remove flange cover. Control The drain / overflow are controlled via rotatable rosette on the overflow. Proceed as follows to open or close the drain: Turn rotatable rosette to the left. ð... -
Page 20: Maintenance
Handling Push the flow control backwards or forwards with your finger. The water flows closer or further away from the side of the bathtub depending on the direction set. Maintenance NOTICE! Risk of damage due to unsuitable cleaning agent. The following cleaning agents can damage chrome-plated surfaces and therefore may not be used: –...
Need help?
Do you have a question about the 6161.52 and is the answer not in the manual?
Questions and answers