
Related Manuals for AURES ODP 444


Summary of Contents for AURES ODP 444
- Page 1 MODEL : ODP 444 Receipt Printer User’s Manual All specifications are subject to change without notice...
- Page 2 This device complies with part 15 of the FCC Rules. Operation is subject to the following two conditions. 1) This device may not cause harmful interference, and 2) This device must accept any interference received, including interference that may cause undesired operation. Jeff Burroughs 15042 Parkway Loop, Building D, Tustin, CA 92780 | USA +714.669.3111...
- Page 3 Le Groupe Aures vous remercie de votre confiance. Téléchargez nos derniers drivers et utilitaires ainsi que nos conseils d’installation sur le site du Support Technique AURES : www.aures-support.fr The AURES Group thanks you for your loyalty. To download out most recent drivers and utilities and...
-
Page 4: Table Of Contents
Table of Contents 1. Parts Identifications 2. Setting up the printer 2.1 Unpacking 2.2 Connecting the cables 2.3 Loading the roll paper Cable cover 설치 및 분리 2.5 Jam Error 3. Control panel and other functions 3.1 Control panel 3.2 Error Indicating 4. -
Page 5: Parts Identifications
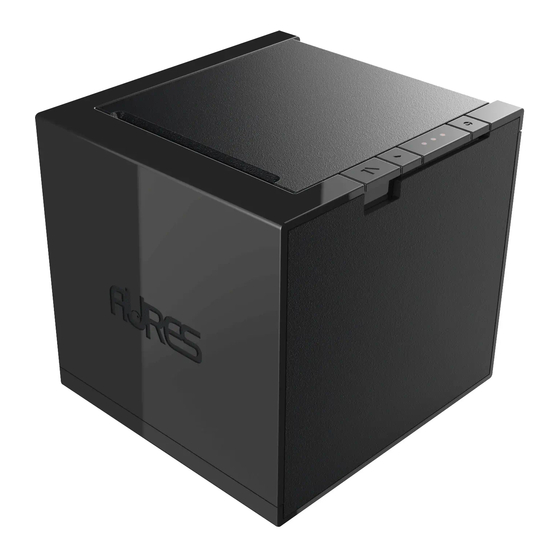
1. Parts Identifications POWER SWITCH Used to turn on/off power to the printer. CONTROL PANEL Features LED indicators to indicate printer status and switches to operate the printer. FEED BUTTON COVER OPEN PUSH BUTTON Push down this button to open the printer cover. PRINTER COVER Open this cover to load or replace a paper roll. -
Page 6: Setting Up The Printer
2. Setting Up the Printer 2-1. Unpacking Your printer box should include these items. If any items are damaged or missing, please contact your dealer for assistance. The Printer Roll Paper Adaptor Serial Cable 1 Serial Cable 2 USB Cable... -
Page 7: Connecting The Cables
2-2. Connecting the Cables All cables connect to the connector panel on the back of the printer which is shown below: ETHERNET SWITCH CASH DRAWER CONNECTOR ETHERNET CONNECTOR POWER CONNECTOR USB CONNECTOR SERIAL CONNECTOR Before connecting any of the cables, make sure that both the printer and the computer are turned off. - Page 8 2-2-1. Interface Connector <9 Pin Serial> <USB “B” Type> <Ethernet> 9Pin Serial Interface Signal Description Input Printer receive data line RS-232C level Output Printer transmit data line RS-232C level 4, 7 Output Printer handshake to host line RS-232C level System Ground Input Data Send Ready 1,8,9...
- Page 9 Ethernet Interface SIGNAL Data Out + Output Data + Data Out - Output Data - Data IN + Input Data + Data IN - Input Data - This equipment is indoor use and all the communication wirings are limited to inside of the building. 2-2-2.
-
Page 10: Loading The Roll Paper
2-3. Loading the Roll Paper Notes: Be sure to use paper rolls that meet the specifications. Do not use paper rolls that have the paper glued to the core because the printer cannot detect the paper end correctly. ♣Turn off power switch. 1. - Page 11 5. Note the correct direction that the paper comes off the roll: 6. Pull out a small amount of paper roll as shown. Then, close the cover. 7. Tear off the paper as shown.
- Page 12 2-4. Cable cover installation and removal ♣How to install Cable cover 1. Prepare the Printer and Cable cover. - Cable cover - - Printer - 2. Tighten the bottom hook of the Cable cover to the bottom hole of the printer as shown below.
-
Page 13: Cable Cover 설치 및 분리
♣How to remove Cable cover 1. While pressing the Cable cover open switch, remove the Cable cover in the direction of the arrow shown below. Cable cover open switch... -
Page 14: Jam Error
2-5. Jam Error When the cutter is jammed, please follow the steps below. Section 1 1. With printer on, press the cover open button to open the printer cover lightly. (Printer cover is not fully opened with the cutter protruding.) 2. - Page 15 ※ If section 1 does not solve the cutter jam, please follow section 2. Section 2 1. Turn off the power. 2. Insert the screwdriver into the hole while pressing the cover open button as shown in the figure. OPEN Hole 3.
- Page 16 4. Close the printer cover after removing the jammed paper. CLOSE 5. Turn On the Power.
-
Page 17: Control Panel And Other Functions
3. Control panel and other functions 3-1. Control panel You can control the basic paper feeding operations of the printer with the button on the control panel. The indicator lights let you to monitor the printer’ s status. POWER SWITCH CONTROL PANEL POWER ERROR... -
Page 18: Self Test
4. Self Test The self-test result indicated whether the printer is operating properly. Also with this, user can check following options or status of the printer. Control circuit Printer mechanism Printing quality ROM version Interface setting This test is independent of any other equipment or software. Running the self test 1. -
Page 19: Ascii Print
5. ASCII Print ASCII PRINT is printing a test page constructed ASCII code. You can able to check the printer works properly with this The ASCII PRINT test automatically ends and cuts the paper after printing the following: *** Completed *** The printer is ready to receive data as soon as it completes the ASCII PRINT. -
Page 20: Paper Reduce
6-2. Paper Reduce Reduce menu (Line space, Line feed, barcode[1D] height) was developed for paper saving. - Line space "Line space" means the amount of feed when you intentionally generate newlines. - Line feed "Line feed" means the amount of feed when there is an automatic line break. - Barcode Height “Barcode Height”... -
Page 21: Printer Setting
7. Printer Setting Change the printer settings. The options below can also be changed via the Memory Saver. PRINTER SETTING 1. SELECT BAUDRATE 2. SELECT CUTTING MODE 3. SELECT ERROR BEEP OPTION 7-1. Baudrate After entering the BAUDRATE MODE, the list which can select the BPS will be printed. Similar like Self Test, you can press the FEED button to select a BAUDRATE. -
Page 22: Hexadecimal Dump
8. Hexadecimal Dump This feature allows experienced users to see exactly what data is coming to the printer. This can be useful in finding software problems. When you go into the hex dump function, the printer prints all commands and other data in hexadecimal format along with a guide section to help you find specific commands. -
Page 23: Peripherals Connection
9. Peripherals Connection This product can communicate with other devices via Bluetooth or Wi-Fi communication and cable. ♣ NOTE The Standard model does not support Bluetooth, Wi-Fi, and NFC. (ODP444 Standard = USB + Serial + Ethernet) 9-1. Bluetooth Connection 1. -
Page 24: Nfc Connection
9-3. NFC Connection 1. The printer can be connected to devices equipped with NFC communication capabilities. 2. Use the NFC connection function supported by the device to connect to the printer. ♣ NOTE - NFC is only compatible with Bluetooth. -
Page 25: Printer Cleaning
10. Printer cleaning If the interior of the printer is dusty, printing quality can be lowered. In this case, follow the instructions below to clean the printer. ♣Note : 1. Make sure to turn the printer power off prior to cleaning 2. -
Page 26: Specifications
11. Specifications Printing Method Direct Thermal Printing Speed Max. 200 mm/sec 180 DPI Resolution 0.141mm x 0.141mm Dot Pitch Max. 72mm Printing Width Number of print columns. Font A - 42 columns / Font B - 56 columns Barcode UPC-A, UPC-E, EAN-8, EAN-13, Code 39, Code 93, Codebar, ITF, Code128 with subsets A/B/C and UCC Case Codes QR, PDF417, Datamatrix... - Page 27 Adaptor AC100~240V, 50/60Hz 24V / 1.75A 130 x 137 x 127 [W x D x H (mm)] Size 0.95kg Weight Temperature Operation 0 ~ 45℃ Storage -20 ~ 60℃ Humidity Operation 35 ~ 80% 10 ~ 90% Storage...
-
Page 28: Command List
12. Command List Command Function REMARKS Horizontal tab Print and line feed Print and carriage return Print and return to standard mode(in page mode) Cancel print data in page mode DLE EOT Real-time status transmission DLE ENQ Real-time request to printer DLE DC4 Generate pulse at real-time ESC FF... - Page 29 Command Function REMARKS ESC t Select character code table ESC { Turn upside-down printing mode on/off FS p Print NV bit image FS q Define NV bit image GS ! Select character size GS $ Set absolute vertical print position in page mode GS * Define downloaded bit image GS /...
- Page 30 ODP 444 Rev. D 09/19...
Need help?
Do you have a question about the ODP 444 and is the answer not in the manual?
Questions and answers