Table of Contents
Advertisement
Quick Links
EVERPURE
LVRO-75HE REVERSE OSMOSIS (RO) SYSTEM
®
INTRODUCTION
The LVRO-75HE Reverse Osmosis (RO) System is designed to provide up to two (2) years of membrane life. These systems are
NSF Certified to reduce a variety of contaminants, making them excellent filters for fountain beverage, frozen carbonated
beverage and drinking water applications.
INSPECTION
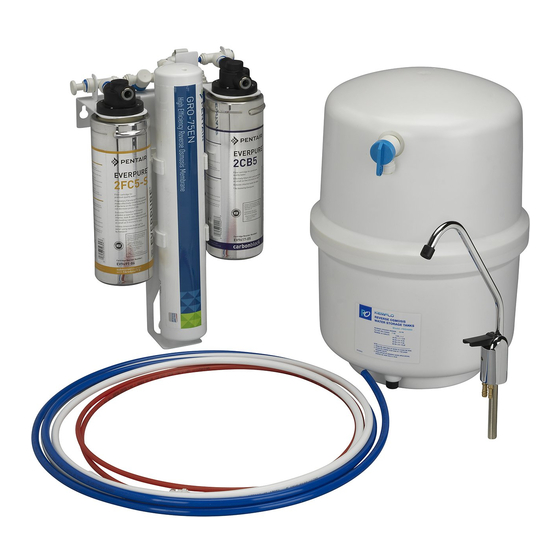
Before mounting the LVRO-75HE System, inspect the parts. Use the table and illustration provided to verify the parts
and quantities. If any parts are missing, contact Customer Service at 800.942.1153 (US only)/630.307.3000 or by email at
CSeverpure@pentair.com.
Parts
1. Head Assembly
2. RO Membrane GRO-75EN
3. 2FC5-S Filter Cartridge
4. 2CB5 Filter Cartridge
5. Tank Valve
6. Drain Saddle Valve
7. Water Supply Adapter
8. Storage Tank
9. Faucet Adapter
10. Change Indication Sticker
11. 3/8" Plastic Tubing (Blue)
12. 1/4" Plastic Tubing Assembly (Red)
13. Lead-Free Air Gap Drinking Water Faucet
14. Plug, 3/8" Quick-Connect
15. 3/8" Plastic Tubing (White)
16. Port Plug
FOODSERVICE
LVRO-75HE REVERSE OSMOSIS SYSTEM INSTALLATION AND OPERATION GUIDE
LVRO-75HE+F (With Faucet): EV9975-10
LVRO-75HE (Without Faucet): EV9975-00
14
3
2
4
12
11
15
1
5
13*
6
*Not in EV9975-00
7*
16
8
Advertisement
Table of Contents

Subscribe to Our Youtube Channel
Related Manuals for Pentair EVERPURE LVRO-75H Series


Summary of Contents for Pentair EVERPURE LVRO-75H Series
- Page 1 Before mounting the LVRO-75HE System, inspect the parts. Use the table and illustration provided to verify the parts and quantities. If any parts are missing, contact Customer Service at 800.942.1153 (US only)/630.307.3000 or by email at CSeverpure@pentair.com. Parts 1. Head Assembly 2.
-
Page 2: Selecting A Mounting Location
SELECTING A MOUNTING LOCATION Tools Required 1. Give consideration to the weight of the unit when operating, i.e. when filled with water. Operating weight of • Hand or Electric Drill • Phillips Screwdriver the LVRO-75HE RO System is: • Adjustable Wrenches (2) •... -
Page 3: Operating Specifications
OPERATING SPECIFICATIONS CAUTION: The LVRO-75HE RO System must be protected against freezing which can cause the filter WARNING: Before installing the system, make certain housing to crack, resulting in water leakage. your water supply complies with the following CAUTION: Turn off water supply to head without cartridge if operating specifications. - Page 4 FAUCET QUICK START Mounting Hole Dimensions Attach Reject Water Tubing 1-3/8" to 1-1/2" Dia 3/8" Red Tubing To Drain 2" Max 1/4" Red Tubing Elbow With sink goes Flow Control here Attach Quick-Connector to Faucet Attach Product Water Tubing 3/8" Blue Tubing Position Faucet...
-
Page 5: System Quick Start
SYSTEM QUICK START LVRO-75HE RO System Secure Manifold 10.2 lbs (4.62 kgs) Tubing Locations Connect Tubing to GRO-75EN Cartridge White 3/8" Tubing 1-3/4" Length Untreated Water In - 3/8" Blue 3/8" Tubing To Tank Blue 3/8" Tubing To Faucet LVRO-75HE REVERSE OSMOSIS SYSTEM INSTALLATION AND OPERATION GUIDE... - Page 6 Install GRO-75EN Cartridge Install Cartridges 3/16” 90° Assemble Tank LVRO-75HE REVERSE OSMOSIS SYSTEM INSTALLATION AND OPERATION GUIDE...
- Page 7 With Faucet - Connect To Drain With Faucet - Connect Tank Tubing White 3/8" Tubing Red 3/8" Blue 3/8" Tubing Tubing Blue 3/8" Tubing 5 to 7 PSI 35 lbs (0.34 to 0.48 Bar) (15.9 kgs) " Red 1/4 Tubing To Faucet LVRO-75HE REVERSE OSMOSIS SYSTEM INSTALLATION AND OPERATION GUIDE...
- Page 8 Without Faucet - Connect Drain and Tank Tubing To Application White 3/8" Tubing Blue 3/8" Tubing Blue 3/8" Tubing 5 to 7 PSI 35 lbs (0.34 to 0.48 Bar) (15.9 kgs) Red 1/4" Tubing to Drain LVRO-75HE REVERSE OSMOSIS SYSTEM INSTALLATION AND OPERATION GUIDE...
- Page 9 PUT SYSTEM INTO OPERATION QUICK START Flush 2FC5-S Cartridge Close to connect tubing Open for flush cycle Closed Drain Remove Plug Insert Tubing Closed 2FC5-S Open Red tubing Flush for 5 to faucet not minutes shown LVRO-75HE REVERSE OSMOSIS SYSTEM INSTALLATION AND OPERATION GUIDE...
- Page 10 Flush GRO-75EN and 2CB5 Cartridges Flush for 12 hours OPEN Close to remove tubing Open for flush cycle Drain Open Insert Plug Remove Tubing 2CB5 Open Red tubing to faucet not shown LVRO-75HE REVERSE OSMOSIS SYSTEM INSTALLATION AND OPERATION GUIDE...
- Page 11 Final Flush Close for 3 hours Open for 5 minutes Repeat 3 times Open Drain Open 2FC5-S 2CB5 Open Red tubing to faucet not shown LVRO-75HE REVERSE OSMOSIS SYSTEM INSTALLATION AND OPERATION GUIDE...
-
Page 12: Installation
HOW REVERSE OSMOSIS (RO) WORKS Selecting the Faucet Location NOTE: The drinking water faucet should be positioned with The LVRO-75HE RO System uses a semi-permeable function, convenience, and appearance in mind. An membrane to reduce dissolved salts, improving the taste and odor of your water. - Page 13 Mounting the Faucet 1. Loosen stem-nut on faucet, remove metal "C" disc (if attached). 2. Attach large diameter 3/8" (red) drain tube to barb fitting at the faucet base. This tube should be long enough to reach the drain clamp. 3.
- Page 14 Connecting the Faucet CAUTION: Water supply to the inlet of the LVRO-75HE RO System should have a separate shut-off valve. If it does not, a separate shut-off should be installed. 1. Locate the 3/8" blue tubing from the faucet. See Figure 5.
- Page 15 Connecting the Water Supply 6. Make sure the black rubber gasket is adhered to the inside of the drain clamp and place the drain clamp 1. Determine the length of 3/8" white plastic tubing needed assembly over the drilled hole. Look through the hole to connect the inlet on the left side of the filter with the and position the clamp so that the center of the clamp water supply.
-
Page 16: Installing The Cartridges
Cartridge #1: Everpure 2FC5-S Filter Cartridge CAUTION: DO NOT remove the quick-connect elbow fitting Cartridge #2: Pentair GRO-75EN RO Cartridge from the red tubing. This assembly contains Cartridge #3: Everpure 2CB5 Filter Cartridge a flow control that may become damaged if removed. -
Page 17: Putting The System Into Operation
Install the 2FC5-S Cartridge PUTTING THE SYSTEM INTO OPERATION CAUTION: Make certain head assembly is firmly attached Locate the 2FC5-S Cartridge and inspect the o-rings. They to wall to prevent it from falling and possibly should be clean and lightly lubricated with silicone grease. becoming damaged. -
Page 18: Changing The Cartridges
6. Open the faucet to turn on flow. Let the faucet run/drip Everpure 2CB5 Filter Cartridge - EV9617-05 for 12 hours, then close it. Pentair GRO-75EN RO Cartridge - 4002575 7. Allow three (3) hours for the tank to fill. Continue to periodically check the installation for leaks. After... - Page 19 NOTE: The following steps require placing bleach into the port of the RO cartridge. LVRO-75HE RO System. Pentair Everpure offers a 9. The tank valve and the manifold shut-off valve should be hollow cartridge, Everpure 2JT Flushing/Sanitizing open.
-
Page 20: Troubleshooting
Leaks at Quick-Connect Fittings 23. Install the new 2CB5 Cartridge in the last (right side) head. CAUTION: The 1/4" red tubing connected to the bottom 24. Open the faucet and the incoming water valve. Allow drain connection of the RO cartridge has a flow water to run for five (5) minutes to flush the 2CB5 restrictor installed. -
Page 21: Replacement Parts
A full tank weighs approximately 29.4 lbs (10.2 kgs) pounds. If performance has not improved, call Technical Support. REPLACEMENT PARTS Sudden Return of Taste and Odor Contact your local Pentair Everpure Dealer for filter If shortly after complete servicing, noticeable taste and odors ®... - Page 22 LVRO-75HE REVERSE OSMOSIS SYSTEM INSTALLATION AND OPERATION GUIDE...
-
Page 23: Limited Warranty
® of this warranty will be repaired or replaced (at PFS’s discretion) by your local dealer or Pentair Everpure technical service. You pay only freight from our factory and local dealer charges. Any item repaired or replaced pursuant to this warranty will be covered under the original warranty terms of the system. - Page 24 65.6768.5800 TEL • 65.6737.5149 FAX • CSEVERPURE@PENTAIR.COM EMAIL All Pentair trademarks and logos are owned by Pentair, Inc. or its affiliates. All other registered and unregistered trademarks and logos are the property of their respective owners. Because we are continuously improving our products and services, Pentair reserves the right to change specifications without prior notice.
Need help?
Do you have a question about the EVERPURE LVRO-75H Series and is the answer not in the manual?
Questions and answers