
Subscribe to Our Youtube Channel
Related Manuals for Kramer VS-62H


Summary of Contents for Kramer VS-62H
- Page 1 USER MANUAL MODEL: VS-62H 6x2 HDMI Matrix Switcher P/N: 2900-300170 Rev 4 www.kramerAV.com...
-
Page 2: Table Of Contents
Defining the VS-62H 6x2 HDMI Matrix Switcher Mounting VS-62H Connecting the VS-62H 6x2 HDMI Matrix Switcher Connecting a Serial Controller to the VS-62H via RS-232 Connecting to the VS-62H via Ethernet Connecting the Remote Contact-closure Switches Wiring the RJ 45 Connectors... -
Page 3: Introduction
Kramer Electronics Ltd. Introduction Welcome to Kramer Electronics! Since 1981, Kramer Electronics has been providing a world of unique, creative, and affordable solutions to the vast range of problems that confront the video, audio, presentation, and broadcasting professional on a daily basis. In recent years, we... - Page 4 European Advanced Recycling Network (EARN) and will cover any costs of treatment, recycling and recovery of waste Kramer Electronics branded equipment on arrival at the EARN facility. For details of Kramer’s recycling arrangements in your particular country go to our recycling pages at www.kramerav.com/support/recycling.
-
Page 5: Overview
RS-232 serial commands transmitted by a PC, touch screen system or other serial controller. • The Kramer RC-IR3 infrared, remote control transmitter. • A PC connected via a LAN to the Ethernet port on the VS-62H. • An optional, external, remote IR receiver (see Using the IR Transmitter on page 3). - Page 6 This distance can be extended to up to 60m when used with three extension cables (for example, P/N C-A35M/A35F-50). Before using the external IR receiver, be sure to arrange for your Kramer dealer to insert the internal IR connection cable (for example, P/N: 505-70434010-S) with the 3.5mm connector that fits into the REMOTE IR opening on the rear panel.
-
Page 7: Defining The Vs-62H 6X2 Hdmi Matrix Switcher
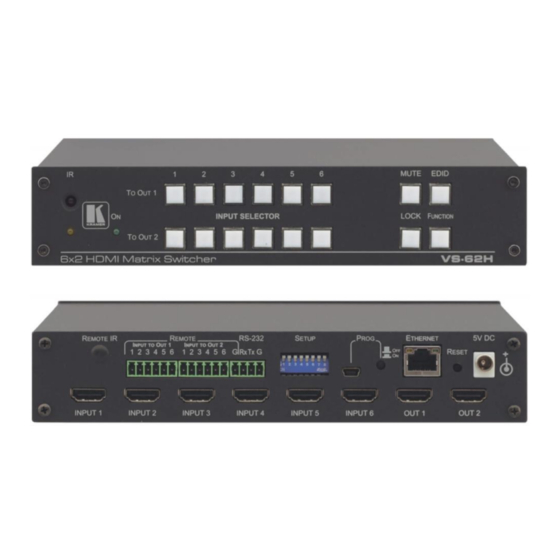
Kramer Electronics Ltd. Defining the VS-62H 6x2 HDMI Matrix Switcher Figure 1 defines the front panel of the VS-62H. Figure 1: VS-62H 6x2 HDMI Matrix Switcher Front Panel Feature Function IR LED Lights yellow when receiving an IR signal. IR Sensor Signal receiver for the infrared remote control transmitter. - Page 8 Kramer Electronics Ltd. Figure 2 defines the rear panel of the VS-62H. Figure 2: VS-62H 6x2 HDMI Matrix Switcher Rear Panel Feature Function REMOTE IR Opening Connect to an external IR receiver for controlling the device via an IR remote controller (see...
-
Page 9: Mounting Vs-62H
Kramer Electronics Ltd. Mounting VS-62H This section provides instructions for mounting VS-62H. Before installing, verify that the environment is within the recommended range: • Operation temperature – 0 to 40C (32 to 104F). • Storage temperature – -40 to +70C (-40 to +158F). -
Page 10: Connecting The Vs-62H 6X2 Hdmi Matrix Switcher
Connecting the VS-62H 6x2 HDMI Matrix Switcher Always switch off the power to each device before connecting it to your VS-62H. After connecting your VS-62H, connect its power and then switch on the power to each device. Figure 3: Connecting the VS-62H 6x2 HDMI Matrix Switcher... -
Page 11: Connecting A Serial Controller To The Vs-62H Via Rs-232
Kramer Electronics Ltd. Connecting a Serial Controller to the VS-62H via RS- To connect a serial controller to the VS-62H: From the RS-232 9-pin D-sub serial port on the serial controller connect: • Pin 2 to the TX pin on the VS-62H RS-232 terminal block. - Page 12 6. Select Use the following IP Address for static IP addressing and fill in the details as shown in Figure For TCP/IPv4 you can use any IP address in the range 192.168.1.1 to 192.168.1.255 (excluding 192.168.1.39) that is provided by your IT department. VS-62H – Connecting the VS-62H 6x2 HDMI Matrix Switcher...
-
Page 13: Connecting The Remote Contact-Closure Switches
Both the INPUT TO OUT 1 and INPUT TO OUT TWO terminal block connectors use the ground pin that is next to the RS-232 terminal block connector. Figure 7 illustrates the wiring of the switch connections to the terminal block. Figure 7: Remote Contact-closure Switch Connections VS-62H – Connecting the VS-62H 6x2 HDMI Matrix Switcher... -
Page 14: Wiring The Rj 45 Connectors
For HDBT cables, it is recommended that the cable ground shielding be connected/soldered to the connector shield. EIA /TIA 568B Wire Color Orange / White Orange Green / White Blue Blue / White Green Brown / White Brown VS-62H – Connecting the VS-62H 6x2 HDMI Matrix Switcher... -
Page 15: Principles Of Operation
If a manual selection is made when the device is in Automatic mode, the device enters Manual Override mode. The manually selected input remains selected as long as it is active. When a manually selected input becomes inactive, the device returns to Automatic mode. VS-62H – Principles of Operation... -
Page 16: Edid Operation
(lights, screen, and so on) Out1 Step in current input to Output 1 Out2 Step in current input to Output 2 VS-62H – Principles of Operation... -
Page 17: Operating The Vs-62H 6X2 Hdmi Matrix Switcher
3. From the To OUT 2 (bottom) row, press each of the Inputs into which you want to copy the EDID from Output 2. Each selected Input LED lights. 4. Press the EDID button. The button no longer lights and the EDID changes are saved. VS-62H – Operating the VS-62H 6x2 HDMI Matrix Switcher... -
Page 18: Muting And Unmuting The Outputs
1. Press and hold the Lock button. The front panel buttons are locked and the button lights. 2. Press and hold the Lock button again. The front panel buttons are unlocked and the button no longer lights. VS-62H – Operating the VS-62H 6x2 HDMI Matrix Switcher... -
Page 19: Generating A Test Pattern
To exit the test pattern generator: • Press the lit Function button. The test pattern generation ceases and the button no longer lights. Figure 8 shows the test patterns available. Figure 8: Available Test Patterns VS-62H – Operating the VS-62H 6x2 HDMI Matrix Switcher... -
Page 20: Configuring And Maintaining The Vs-62H
• Upgrading the firmware (see Upgrading the Firmware on page 19). Setting the DIP-switches The DIP-switches dictate the behavior of the VS-62H. All DIP-switches are off by default. Feature Description HDCP support on inputs On—Disable HDCP support on all inputs Off—Enable HDCP support which is defined... -
Page 21: Upgrading The Firmware
Kramer Electronics Ltd. Upgrading the Firmware VS-62H can be upgraded via any of the following: • Mini USB • RS-232 • Ethernet For instructions on upgrading the firmware see “K-Upload Software”. VS-62H – Configuring and Maintaining the VS-62H... -
Page 22: Operating The Vs-62H Remotely Via The Web Pages
• Device Setting (see Device Setting Page on page 26). • Firmware Update (see Firmware Upgrade Page on page 27). • About Us (see About Us Page on page 27). VS-62H – Operating the VS-62H Remotely via the Web Pages... -
Page 23: Routing Page
Figure 11: The Lock Button Routing Page VS-62H Routing page lets you perform operational actions, such as, switching inputs/outputs and selecting HDCP support. Figure 12: The Routing Page VS-62H – Operating the VS-62H Remotely via the Web Pages... - Page 24 Indicates whether or not the Input signal is HDCP protected Remote Device Control Click the button to display the control window for the remote device Button connected to this Input (see Controlling a Remote Transmitter on page 23) VS-62H – Operating the VS-62H Remotely via the Web Pages...
- Page 25 Note: These settings are per input and remain valid even if the remote SID-X3N is exchanged for another SID-X3N. Up to three of the Echo, Out 1 and Out 2 buttons can be active at the same time. VS-62H – Operating the VS-62H Remotely via the Web Pages...
- Page 26 2. Click the required Output to select it. The button changes color. 3. Click the required test pattern button. The button changes color and the selected test pattern is switched to the Output. VS-62H – Operating the VS-62H Remotely via the Web Pages...
-
Page 27: Edid Page
The “EDID was copied” success message is displayed and the EDID data are copied to the selected Input(s). 4. Click OK. To copy EDID data to an Input from an EDID data file: VS-62H – Operating the VS-62H Remotely via the Web Pages... -
Page 28: Device Setting Page
To modify serial or Ethernet communication parameters: 1. Adjust the parameters as required, either by entering the parameters directly or by using the drop-down list. 2. Click Set. The changes are saved. VS-62H – Operating the VS-62H Remotely via the Web Pages... -
Page 29: Firmware Upgrade Page
5. When the process is complete reboot the device. The firmware is upgraded. About Us Page VS-62H About Us page displays the Web page version and Kramer Electronics Ltd company details. Figure 20: The About Us Page VS-62H – Operating the VS-62H Remotely via the Web Pages... -
Page 30: Technical Specifications
21.5cm x 16.6cm x 4.4cm (8.46" x 6.54" x 1.73") W, D, H WEIGHT: 1.0kg (2.2lbs) approx. INCLUDED ACCESSORIES: Power adapter, IR transmitter OPTIONS: External remote IR receiver cable, RK-1 rack adapter Specifications are subject to change without notice at www.kramerav.com VS-62H – Technical Specifications... -
Page 31: Default Communication Parameters
Default Communication Parameters RS-232 Protocol 3000 Baud Rate: 115,200 Data Bits: Stop Bits: Parity: None Command Format: ASCII TCP/IP Parameters IP Address: 192.168.1.39 Netmask: 255.255.0.0 Gateway: 0.0.0.0 TCP Port #: 5000 UDP Port #: 50000 VS-62H – Default Communication Parameters... -
Page 32: Default Edid
Detailed timing #2..1920x1080i at 60Hz (16:9) Modeline...."1920x1080" 74.250 1920 2008 2052 2200 1080 1084 1094 1124 interlace +hsync +vsync Detailed timing #3..1920x1080i at 50Hz (16:9) Modeline...."1920x1080" 74.250 1920 2448 2492 2640 1080 1084 1094 1124 interlace +hsync +vsync VS-62H – Default EDID... - Page 33 Front left/right center.. No Rear left/right center... No Rear LFE....No CE vendor specific data (VSDB) IEEE registration number. 0x000C03 CEC physical address..1.0.0.0 Maximum TMDS clock..165MHz Raw data 00,FF,FF,FF,FF,FF,FF,00,2E,4D,00,02,01,00,00,00,18,14,01,03,81,46,27,78,0A,D5,7C,A3,57,49,9C,25, 11,48,4B,FF,FF,80,81,C0,81,00,95,00,81,40,81,80,90,40,B3,00,A9,40,01,1D,00,72,51,D0,1A,20,6E,28, 55,00,7E,88,42,00,00,1A,02,3A,80,18,71,38,2D,40,58,2C,45,00,C4,8E,21,00,00,1E,00,00,00,FC,00,56, 53,2D,34,32,48,4E,0A,20,20,00,00,00,00,00,00,FD,00,32,55,1F,5E,11,00,0A,20,20,20,20,20,20,01,7B, 02,03,1A,71,47,11,13,05,14,84,10,1F,23,0A,06,04,83,05,00,00,65,03,0C,00,10,00,8C,0A,D0,8A,20,E0, 2D,10,10,3E,96,00,58,C2,21,00,00,18,01,1D,80,18,71,1C,16,20,58,2C,25,00,C4,8E,21,00,00,9E,01,1D, 80,D0,72,1C,16,20,10,2C,25,80,C4,8E,21,00,00,9E,01,1D,00,72,51,D0,1E,20,6E,28,55,00,C4,8E,21,00, 00,1E,01,1D,00,BC,52,D0,1E,20,B8,28,55,40,C4,8E,21,00,00,1E,00,00,00,00,00,00,00,00,00,00,00,90 VS-62H – Default EDID...
-
Page 34: Protocol 3000
Kramer Electronics Ltd. Protocol 3000 Kramer devices can be operated using Kramer Protocol 3000 commands sent via serial or Ethernet ports. Understanding Protocol 3000 Protocol 3000 commands are a sequence of ASCII letters, structured according to the following. • Command format:... -
Page 35: Protocol 3000 Commands
Step-in request. In reply to the Step-in request, the Step-in master updates the button status by sending set to activate and configures the Step-in action. Other Step-in clients are set to mute. VS-62H – Protocol 3000... - Page 36 1 – indicates that EDID data is copied to this destination. safe_mode – 0 – device accepts the EDID as is without trying to adjust 1 – device tries to adjust the EDID (default value if no parameter is sent) VS-62H – Protocol 3000...
- Page 37 – Resolution parameters - by Custom name (self-explanatory), numeric value – Interlaced/progressive Interlaced according to On/Off (“ON”- I, “OFF” - – Input/Output Stage 0=Input 1=Output – Number of chosen stage Stage_id (1...max number of inputs/outputs) VS-62H – Protocol 3000...
- Page 38 – File size in bytes. A file file_size can take more space on device FEEDBACK memory Multi-line: file_id – Internal ID for file in file ~nn@DIR<CR><LF> system file_name TABfile_sizebytes,ID:file_id<CR><LF> free_size – Free space in bytes in TABfree_sizebytes.<CR><LF> device file system VS-62H – Protocol 3000...
- Page 39 6 – IN 6 HDCP not supported - 7 – IN 7 HDCP OFF. 8 – IN 8 – HDCP mode: mode HDCP support changes 0 – HDCP Off following detected sink - 1 – HDCP On MIRROR OUTPUT. VS-62H – Protocol 3000...
- Page 40 Length (data length + 2 for CRC) – (2 bytes in length) Data (data length -2 bytes) CRC – 2 bytes Packet ID Length Data 5. Response: ~NNNNOK<CR><LF> (Where NNNN is the received packet ID in ASCII hex digits.) VS-62H – Protocol 3000...
- Page 41 ASCII hex digits.) Lock/Unlock – On/Off LOCK-FP Lock the front panel. COMMAND Unlock front panel: 0 – Off unlocks EDID #LOCK-FPLock/Unlock<CR> #LOCK-FP0<CR> In NT-52N, this 1 – On locks EDID FEEDBACK command includes the ~nn@LOCK-FPLock/Unlock<CR><LF> PortNumber (1-2) parameter. VS-62H – Protocol 3000...
- Page 42 – 1 to number of system MTX-MODE? output_id LEGACY COMMAND. COMMAND #MTX-MODE?2<CR> Get auto-switch mode. #MTX-MODE?output_id<CR> outputs mode – FEEDBACK Not recommended for 0 – manual ~nn@MTX-MODEoutput_id,mode<CR><LF> new devices. 1 – auto priority 2 – auto last connected VS-62H – Protocol 3000...
- Page 43 Internet. Be aware of security problems. – Format: ip_address NET-IP Set IP address. COMMAND Set the IP address to 192.168.1.39: #NET-IPip_address<CR> xxx.xxx.xxx.xxx For proper settings #NET- FEEDBACK consult your network IP192.168.001.039<CR> ~nn@NET-IPip_address<CR><LF> administrator. VS-62H – Protocol 3000...
- Page 44 0 – Echo to controller 1 – Step-in out 1 2 – Step-in out 2 … – … N – Step-in out N Setting ‘1’ says that the corresponding action must be executed. VS-62H – Protocol 3000...
- Page 45 HDMI OUT 8: This command 2 – Audio #ROUTE1,8,2<CR> FEEDBACK replaces all other routing 3 – Data ~nn@ROUTElayer,dest,src<CR><LF> commands. 4 – IR 5 – USB dest * – ALL x – disconnect, otherwise destination id – Source id VS-62H – Protocol 3000...
- Page 46 ROUTE command. output_id – 1 to number of system VID-PATTERN Set test pattern on output. COMMAND Switch PATTERN 1 to OUT 3: #VID-PATTERNoutput_id,pattern_id<CR> outputs #VID-PATTERN3,1<CR> – 1 to number of pattern_id FEEDBACK system patterns ~nn@VID-PATTERNoutput_id,pattern_id<CR><LF> VS-62H – Protocol 3000...
- Page 47 47=1280x720p@119.88/120Hz 48=720x480p@119.88/120Hz 49=720x480p@119.88/120Hz 50=720(1440)x480i@119.88/120Hz 51=720(1440)x480i@119.88/120Hz 52=720x576p@200Hz 53=720x576p@200Hz 54=720(1440)x576i@200Hz 55=720(1440)x576i@200Hz 56=720x480p@239.76/240Hz 57=720x480p@239.76/240Hz 58=720(1440)x480i@239.76/240Hz 59=720(1440)x480i@239.76/240Hz 60=1280x720p@23.97Hz/24Hz 61=1280x720p@25Hz 62=1280x720p@29.97Hz/30Hz 63=1920x1080p@119.88/120Hz 64=1920x1080p@100Hz 65=800x600p@60Hz 66-100=(Reserved) 100=Custom resolution 1 101=Custom resolution 2 102=Custom resolution 3 103=Custom resolution 4 104=Custom resolution 5 105-254=(Reserved) VS-62H – Protocol 3000...
- Page 48 Get video on output status: status. #VMUTE?output_id_<CR> #VMUTE?2<CR> outputs – Video Mute flag FEEDBACK Video mute parameter 0 – Video enabled ~nn@VMUTEoutput_id,flag<CR><LF> 2 (blank picture) is not 1 – Video disabled supported. 2 – Blank picture VS-62H – Protocol 3000...
-
Page 49: Result And Error Codes
(Reserved) ERR_RESERVED_8 (Reserved) ERR_RESERVED_9 (Reserved) ERR_RESERVED_10 (Reserved) ERR_RESERVED_11 (Reserved) ERR_RESERVED_12 (Reserved) ERR_EDID_CORRUPTED EDID corrupted ERR_NON_LISTED Device specific errors File has the same CRC – no changed ERR_SAME_CRC ERR_WRONG_MODE Wrong operation mode ERR_NOT_CONFIGURED Device/chip was not initialized VS-62H – Protocol 3000... - Page 50 Electronics products, this product must be insured during shipment, with the insurance and shipping charges prepaid by you. If this product is returned uninsured, you assume all risks of loss or damage during shipment. Kramer Electronics will not be responsible for any costs related to the removal or re- installation of this product from or into any installation.
- Page 51 SAFETY WARNING Disconnect the unit from the power supply before opening and servicing For the latest information on our products and a list of Kramer distributors, visit our Web site where updates to this user manual may be found. We welcome your questions, comments, and feedback.
Need help?
Do you have a question about the VS-62H and is the answer not in the manual?
Questions and answers