
Subscribe to Our Youtube Channel
Related Manuals for Kramer VS-62DT


Summary of Contents for Kramer VS-62DT
- Page 1 USER MANUAL MODEL: VS-62DT 6x2 UHD Matrix Switcher HDMI to HDMI & HDBaseT with PoE P/N: 2900-300665 Rev 3 www.KramerAV.com...
-
Page 6: Table Of Contents
Recycling Kramer Products Overview Defining the VS-62DT 6x2 UHD Matrix Switcher Connecting the VS-62DT 6x2 UHD Matrix Switcher Connecting a Serial Controller to the VS-62DT via RS-232 Connecting to the VS-62DT via Ethernet Connecting the Remote Contact-Closure Switches Principles of Operation... - Page 7 Figures Figure 1: VS-62DT 6x2 UHD Matrix Switcher Figure 2: VS-62DT 6x2 UHD Matrix Switcher Figure 3: Connecting the VS-62DT 6x2 UHD Matrix Switcher Figure 4: Local Area Connection Properties Window Figure 5: Internet Protocol Version 4 Properties Window Figure 6: Internet Protocol Properties Window...
-
Page 8: Introduction
Room Connectivity; GROUP 10: Accessories and Rack Adapters; GROUP 11: Sierra Video Products; GROUP 12: Digital Signage; GROUP 13: Audio; and GROUP 14: Collaboration. Congratulations on purchasing your Kramer VS-62DT 6x2 UHD Matrix Switcher which is ideal for the following typical applications: •... -
Page 9: Getting Started
Avoid interference from neighboring electrical appliances that may adversely influence signal quality • Position your VS-62DT away from moisture, excessive sunlight and dust This equipment is to be used only inside a building. It may only be connected to other equipment that is installed inside a building... -
Page 10: Recycling Kramer Products
Kramer Electronics has made arrangements with the European Advanced Recycling Network (EARN) and will cover any costs of treatment, recycling and recovery of waste Kramer Electronics branded equipment on arrival at the EARN facility. For details of Kramer’s recycling arrangements in your particular country go to our recycling pages at www.kramerav.com/support/recycling/. -
Page 11: Overview
Advanced auto AV switching modes (last connected and priority switching) • Non-volatile EDID storage • Kramer reKlocking™ & Equalization Technology that rebuilds the digital signal to travel longer distances • A lock button to prevent unwanted tampering with the buttons on the front panel •... - Page 12 • Support for Kramer Protocol 3000 • Static or dynamic DHCP IP addressing • Flexible control options including front panel buttons, IR remote (included), RS−232, Ethernet, contact closure buttons, embedded Web server and step-in. • Mini-USB port for upgrading firmware...
-
Page 13: Defining The Vs-62Dt 6X2 Uhd Matrix Switcher
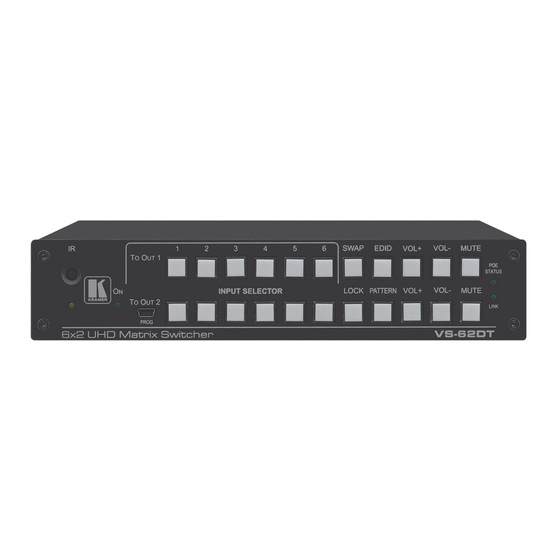
VOL- Button Press to decrease the volume on output 2 MUTE Button Press to toggle muting of output 2 audio LINK LED Lights when there is activity on the Ethernet connection VS-62DT - Defining the VS-62DT 6x2 UHD Matrix Switcher... -
Page 14: Figure 2: Vs-62Dt 6X2 Uhd Matrix Switcher
INPUT 1 to 6 HDMI Connectors Connect to up to 6 HDMI sources HDBT OUT 1 RJ-45 Connector Connects to an HDBT TP line OUT 2 HDMI Connector Connects to an HDMI acceptor VS-62DT - Defining the VS-62DT 6x2 UHD Matrix Switcher... -
Page 15: Connecting The Vs-62Dt 6X2 Uhd Matrix Switcher
Switcher Always switch off the power to each device before connecting it to your VS-62DT. After connecting your VS-62DT, connect its power and then switch on the power to each device. You do not have to connect all the inputs and outputs, connect only those that are required. -
Page 16: Connecting A Serial Controller To The Vs-62Dt Via Rs-232
Pin 5 to the GND pin on the VS-62DT RS-232 terminal block • Connecting to the VS-62DT via Ethernet You can connect to the VS-62DT via Ethernet using either of the following methods: • Directly to the PC using a crossover cable (see Section 5.2.1) - Page 17 5.2.1 Connecting the Ethernet Port Directly to a PC You can connect the Ethernet port of the VS-62DT directly to the Ethernet port on your PC using a crossover cable with RJ-45 connectors. This type of connection is recommended for identifying the VS-62DT with the factory configured default IP address.
-
Page 18: Figure 4: Local Area Connection Properties Window
6. Select Use the following IP Address for static IP addressing and fill in the details as shown in Figure For TCP/Ipv4 you can use any IP address in the range 192.168.1.1 to 192.168.1.255 (excluding 192.168.1.39) that is provided by your IT department. VS-62DT - Connecting the VS-62DT 6x2 UHD Matrix Switcher... -
Page 19: Connecting The Remote Contact-Closure Switches
5.2.2 Connecting the Ethernet Port via a Network Hub or Switch You can connect the Ethernet port of the VS-62DT to the Ethernet port on a network hub or using a straight-through cable with RJ-45 connectors. Connecting the Remote Contact-Closure Switches You can connect up to six remote, contact-closure switches per output to control the VS-62DT remotely. -
Page 20: Figure 7: Remote Contact-Closure Switch Connections
Figure 7 illustrates the wiring of the switch connections to the terminal block. Figure 7: Remote Contact-closure Switch Connections VS-62DT - Connecting the VS-62DT 6x2 UHD Matrix Switcher... -
Page 21: Principles Of Operation
• EDID operation (see Section 6.3) Automatic Signal Detection The VS-62DT can automatically detect the presence of a video signal on an input based on the presence of a video sync or clock signal. Input Switching Modes 6.2.1 Manual Mode In Manual switching mode, routing is performed according to the front panel button selection or according to the remote command selection. -
Page 22: Edid Operation
The EDID is non-volatile and the last valid EDID is used when the device is powered up. Step-in Functionality The VS-62DT can function as a step-in switcher when connected to a suitable HDMI transmitter, (for example, the SID-X3N), using the correct HDMI cable with HEC support. -
Page 23: Operating The Vs-62Dt 6X2 Uhd Matrix Switcher
Operating the VS-62DT 6x2 UHD Matrix Switcher This section describes operating the VS-62DT and consists of: • Switching an input to an output (see Section 7.1) Acquiring an EDID from an output (see Section 7.2) • • Controlling analog audio (see Section 7.3) -
Page 24: Controlling Analog Audio
Control analog audio using volume, mute and swap buttons. To change the volume on a selected analog audio output: • Press VOL+ to increase the volume. • Press VOL- to decrease the volume. VS-62DT - Operating the VS-62DT 6x2 UHD Matrix Switcher... -
Page 25: Locking And Unlocking The Front Panel Buttons
2. Press and hold the Lock button again. The front panel buttons are unlocked and the button no longer lights. Generating a Test Pattern For diagnostic purposes, the VS-62DT can generate a number of test patterns on the outputs. To generate a test pattern on the outputs: 1. -
Page 26: Figure 8: Available Test Patterns
Figure 8 shows the test patterns available. Figure 8: Available Test Patterns VS-62DT - Operating the VS-62DT 6x2 UHD Matrix Switcher... -
Page 27: Configuring And Maintaining The Vs-62Dt
Configuring and Maintaining the VS-62DT This section describes the configuration and maintenance of the VS-62DT and consists of: • Setting the DIP-switches (see Section 8.1) • Resetting the device to factory default settings (see Section 8.2) • Upgrading the firmware (see Section 8.3) -
Page 28: Resetting The Vs-62Dt To Factory Default Settings
3. While holding down the Reset button, power on the device. 4. Wait a few seconds and release the button. The device is reset to its factory settings. Upgrading the Firmware The VS-62DT can be upgraded via any of the following: • Mini USB •... -
Page 29: Operating The Vs-62Dt Remotely Via The Web Pages
Operating the VS-62DT Remotely via the Web Pages The VS-62DT can be operated remotely using the embedded Web pages. The Web pages are accessed using a Web browser and an Ethernet connection. Before attempting to connect: • Perform the procedures in Section •... -
Page 30: Figure 9: Entering Logon Credentials
Next, the Web Cache window appears. Figure 10: Web Cache Window 4. Clear the Web cache or check “Don’t show this message again” and click The opening (Video Switching) Web page appears: VS-62DT - Operating the VS-62DT Remotely via the Web Pages... -
Page 31: Selecting Input Signals
To toggle in and out of full screen mode, click Selecting Input Signals The Video Switching page enables you perform operational actions, such as, switching inputs/outputs and selecting HDCP support VS-62DT - Operating the VS-62DT Remotely via the Web Pages... -
Page 32: Figure 12: Video Switching Page
Remote Device Control remote device connected to this Input (see Button Section 9.2.2) Click the button to turn on or off the HDCP support for HDCP Content Button the input VS-62DT - Operating the VS-62DT Remotely via the Web Pages... -
Page 33: Figure 13: Remote Device Control Window
Compatible remote transmitters, (for example, the SID-X3N) that are connected to the VS-62DT can be controlled using the Web pages. Figure 13: Remote Device Control Window The VS-62DT enables programming the general purpose buttons on remote modules. The table shows the functionality defined for each button. The options are: •... -
Page 34: Figure 14: Test Pattern Tab
The six test pattern buttons are shown. Figure 14: Test Pattern Tab 2. Click the required test pattern button. The button changes color and the selected test pattern is switched to the Output. VS-62DT - Operating the VS-62DT Remotely via the Web Pages... -
Page 35: Adjusting Analog Audio Output
Click again to unmute Mute/ Unmute Button and the red “x” disappears. Click to toggle swapping output 1 to output 2 and output 2 to output 1 and vice versa. Swap Button VS-62DT - Operating the VS-62DT Remotely via the Web Pages... -
Page 36: Managing The Edid
Managing the EDID The VS-62DT EDID page lets you copy EDID data to one or more Inputs from an: • Output • Input • Default EDID • EDID data file Figure 15: EDID Management Page When the status of an EDID changes on the device (caused by outputs being exchanged), the display is not updated automatically. - Page 37 4. Click OK. To copy EDID data to an Input from an EDID data file: 1. Click the source Browse button. The Windows Browser opens. 2. Browse to the required file. VS-62DT - Operating the VS-62DT Remotely via the Web Pages...
-
Page 38: Figure 16: Edid Bytemap
Input(s). 6. Click OK. To see the EDID data file: • Click Bytemap in the lower right-hand corner. The EDID data appears in hexadecimal: Figure 16: EDID Bytemap VS-62DT - Operating the VS-62DT Remotely via the Web Pages... -
Page 39: Setting Authentication
CHANGE button Click CHANGE to save the new authentication details Setting Device Configurations The Device Settings page enables you to identify your VS-62DT: • Set the unit name and view the model type, firmware version, serial number and MAC address. -
Page 40: Figure 18: Device Settings Page
Figure 18: Device Settings Page Item Description Enter a descriptive, easy to identify name for the VS-62DT Unit Name Model Displays the model of the device Firmware version Displays the firmware version of the device Serial number Displays the serial number of the device... - Page 41 (see Section 9.3.2) 9.6.1 Loading and Saving Configurations The VS-62DT enables loading and saving device setting configurations. This is especially useful when setting up multiple VS-62DT devices. To load a configuration: 1. Click Load. The File Upload browser window appears.
-
Page 42: Upgrading The Firmware
The firmware file name is displayed in the Firmware Upgrade page. 4. Click Start Upgrade. The firmware file is loaded and a progress bar is displayed. Do not interrupt the process or the VS-62DT may be damaged. 5. When the process is complete reboot the device. The firmware is upgraded. -
Page 43: About Kramer
About Kramer The VS-62DT About Us page displays the web version and Kramer Electronics Ltd company contact details. Figure 20: About Kramer VS-62DT - Operating the VS-62DT Remotely via the Web Pages... -
Page 44: Wiring The Twisted Pair Rj-45 Connectors
Green / White Blue Blue / White Green Brown / White Brown Pair 1 4 and 5 Pair 2 1 and 2 Pair 3 3 and 6 Pair 4 7 and 8 VS-62DT - Wiring the Twisted Pair RJ-45 Connectors... -
Page 45: Technical Specifications
35.1cm x 21.2cm x 7.2cm (13.8" x 8.4" x 2.8") W, D, H SHIPPING WEIGHT: 1.67kg (3.7lbs) approx. INCLUDED ACCESSORIES: Power supply, IR remote control OPTIONS: RK-1 19” rack adapter Specifications are subject to change without notice at www.kramerav.com VS-62DT - Technical Specifications... -
Page 46: Default Communication Parameters
RS-232 Protocol 3000 Baud Rate: 115,200 (9600) Data Bits: Stop Bits: Parity: None Command Format: ASCII TCP/IP Parameters IP Address: 192.168.1.39 Subnet Mask: 255.255.225.0 Default Gateway: 192.168.1.254 UDP Port #: 50000 TCP Port #: 5000 VS-62DT - Default Communication Parameters... -
Page 47: Default Edid
1280 x 960p at 60Hz - VESA STD 1280 x 1024p at 60Hz - VESA STD 1400 x 1050p at 60Hz - VESA STD 1680 x 1050p at 60Hz - VESA STD 1600 x 1200p at 60Hz - VESA STD VS-62DT - Default EDID... - Page 48 Front left/right center.. No Rear left/right center... No Rear LFE....No CE vendor specific data (VSDB) IEEE registration number. 0x000C03 CEC physical address..1.0.0.0 Maximum TMDS clock..165MHz Raw data 00,FF,FF,FF,FF,FF,FF,00,2E,4D,00,02,01,00,00,00,18,14,01,03,81,46,27,78,0A,D5,7C,A3,57,49,9C,25, 11,48,4B,FF,FF,80,81,C0,81,00,95,00,81,40,81,80,90,40,B3,00,A9,40,01,1D,00,72,51,D0,1A,20,6E,28, 55,00,7E,88,42,00,00,1A,02,3A,80,18,71,38,2D,40,58,2C,45,00,C4,8E,21,00,00,1E,00,00,00,FC,00,56, 53,2D,34,32,48,4E,0A,20,20,00,00,00,00,00,00,FD,00,32,55,1F,5E,11,00,0A,20,20,20,20,20,20,01,7B, 02,03,1A,71,47,11,13,05,14,84,10,1F,23,0A,06,04,83,05,00,00,65,03,0C,00,10,00,8C,0A,D0,8A,20,E0, 2D,10,10,3E,96,00,58,C2,21,00,00,18,01,1D,80,18,71,1C,16,20,58,2C,25,00,C4,8E,21,00,00,9E,01,1D, 80,D0,72,1C,16,20,10,2C,25,80,C4,8E,21,00,00,9E,01,1D,00,72,51,D0,1E,20,6E,28,55,00,C4,8E,21,00, 00,1E,01,1D,00,BC,52,D0,1E,20,B8,28,55,40,C4,8E,21,00,00,1E,00,00,00,00,00,00,00,00,00,00,00,90 VS-62DT - Default EDID...
-
Page 49: Protocol 3000
Protocol 3000 The VS-62DT can be operated using the Kramer Protocol 3000 serial commands. The command framing varies according to how you interface with the VS-62DT. For example, a basic video input switching command that routes a layer 1 video signal to HDMI out 1 from HDMI input 2 (ROUTE 1,1,2), is entered as follows: •... -
Page 50: 14.1 Understanding Protocol 3000
You can enter commands directly using terminal communication software (e.g., Hercules) by connecting a PC to the serial or Ethernet port on the VS-62DT. To enter CR press the Enter key (LF is also sent but is ignored by the command parser). -
Page 51: 14.2 Kramer Protocol 3000 Syntax
Commands in the string do not execute until the closing character is entered. A separate response is sent for every command in the chain. 14.2 Kramer Protocol 3000 Syntax The Kramer Protocol 3000 syntax uses the following delimiters: CR = Carriage return (ASCII 13 = 0x0D) • •... - Page 52 Command_3 Parameter3_1,Parameter3_2,…|… • Device Message Format: Start Address (optional) Body Delimiter CR LF Device_id@ Message • Device Long Response – Echoing command: Start Address (optional) Body Delimiter CR LF Command SP [Param1 ,Param2 …] result Device_id@ VS-62DT - Protocol 3000...
-
Page 53: Kramer Protocol 3000 Commands
Switching/Routing Commands (see Section 15.3) • Communication Commands (see Section 15.4) • EDID Handling Commands (see Section 15.5) • Step-in commands (see Section 15.6) • Audio Commands (see Section 15.7) • Video Commands (see Section 15.8) VS-62DT - Kramer Protocol 3000 Commands... -
Page 54: System Commands - Mandatory
#␍ Get: Response ~nn@␠OK␍␊ Parameters Response Triggers Notes Validates the Protocol 3000 connection and gets the machine number Step-in master products use this command to identify the availability of a device K-Config Example “#”,0x0D VS-62DT - Kramer Protocol 3000 Commands... - Page 55 Notes This command deletes all user data from the device. The deletion can take some time. Your device may require powering off and powering on for the changes to take effect. K-Config Example “#FACTORY”,0x0D VS-62DT - Kramer Protocol 3000 Commands...
- Page 56 Response Triggers Notes This command identifies equipment connected to Step-in master products and notifies of identity changes to the connected equipment. The Matrix saves this data in memory to answer REMOTE-INFO requests K-Config Example “#MODEL?”,0x0D VS-62DT - Kramer Protocol 3000 Commands...
- Page 57 To avoid locking the port due to a USB bug in Windows, disconnect USB connections immediately after running this command. If the port was locked, disconnect and reconnect the cable to reopen the port. K-Config Example “#RESET”,0x0D VS-62DT - Kramer Protocol 3000 Commands...
- Page 58 Set: VERSION? Get: End User Public Description Syntax Set: Get: Get firmware version number #VERSION?␍ Response ~nn@VERSION␠firmware_version␍␊ Parameters firmware_version - XX.XX.XXXX where the digit groups are: major.minor.build version Response Triggers Notes K-Config Example “#VERSION?”,0x0D VS-62DT - Kramer Protocol 3000 Commands...
-
Page 59: System Commands
– for video layer: 1 (HDMI Out) mode - 0 (manual), 1 (priority switch), 2 (last connected switch) Response Triggers Notes K-Config Example Get the input audio switch mode for HDMI Out: “#AV-SW-MODE? 1,1”,0x0D VS-62DT - Kramer Protocol 3000 Commands... - Page 60 After every change in output HPD status form Off to On and all parameters (new EDID, etc.) are stable and valid (2) Notes K-Config Example Get the output HPD status of HDMI Out: “#DISPLAY? 1”,0x0D VS-62DT - Kramer Protocol 3000 Commands...
- Page 61 Set HDCP working mode on the device input: HDCP supported - HDCP_ON [default] HDCP not supported - HDCP OFF HDCP support changes following detected sink - MIRROR OUTPUT K-Config Example Disable HDCP mode on HDMI Input 2: “#HDCP-MOD 2,0”,0x0D VS-62DT - Kramer Protocol 3000 Commands...
- Page 62 (button press, device menu and similar) or HDCP mode changed Notes On output – sink status On input – signal status K-Config Example Get the HDCP input signal status of the source device connected to HDMI In 1: “#HDCP-STAT? 0,1”,0x0D VS-62DT - Kramer Protocol 3000 Commands...
- Page 63 Lock the port #LOCK-FP␠PortNumber,Lock/Unlock␍ Get the port lock state Get: #LOCK-FP?␠PortNumber␍ Response ~nn@PORT-TYPE␠PortNumber,Lock/Unlock␍␊ Parameters PortNumber – 1-2 (port number) Lock/Unlock – 0 (unlock), 1 (lock) Response Triggers Notes K-Config Example Lock the front panel: “#LOCK-FP 1”,0x0D VS-62DT - Kramer Protocol 3000 Commands...
- Page 64 ~nn@NAME-RST␠OK␍␊ Parameters Response Triggers Notes Factory default of machine (DNS) name is “KRAMER_” + 4 last digits of device serial number K-Config Example Set the DNS name of the device to “room-442”: “#NAME room-442”,0x0D VS-62DT - Kramer Protocol 3000 Commands...
- Page 65 After execution, a response is sent to the comm port from which the Get was received Response is sent after every change in input signal status ON to OFF, or OFF to ON Notes K-Config Example Get the input signal lock status of HDMI In 2: “#SIGNAL? 2”,0x0D VS-62DT - Kramer Protocol 3000 Commands...
-
Page 66: Switching/Routing Commands
After execution, a response is sent to all comm ports if MTX-MODE was set by any other external control device (button press, WEB, device menu and similar) Notes Not recommended for new devices K-Config Example Set the auto switch mode of HDMI Out to last connected input: “#MTX-MODE 1,2”,0x0D VS-62DT - Kramer Protocol 3000 Commands... - Page 67 - source id: 1 (Input 1)…6 (Input 6) Response Triggers Notes This command replaces all other routing commands K-Config Example Set the remote input switching of video to HDMI Out from HDMI In 2: “#ROUTE 1,1,2”,0x0D VS-62DT - Kramer Protocol 3000 Commands...
- Page 68 The SET command is for remote input switching on Step-in clients (essentially via by the Web) This is a legacy command. New Step-in modules support the ROUTE command K-Config Example Set the video switch state of INPUT 1 to HDBaseT: “#VID 1>1”,0x0D VS-62DT - Kramer Protocol 3000 Commands...
-
Page 69: Communication Commands
Get: Get Ethernet port protocol #ETH-PORT?␠portType␍ Response ~nn@ETH-PORT␠portType,ETHPort␍␊ Parameters portType - TCP/UDP ETHPort - TCP/UDP port number Response Triggers Notes K-Config Example Set the Ethernet port protocol for TCP to port 12457: “#ETH-PORT TCP,12457”,0x0D VS-62DT - Kramer Protocol 3000 Commands... - Page 70 “NAME”. You can also get an assigned IP by direct connection to USB or RS-232 protocol port if available For proper settings consult your network administrator K-Config Example Enable DHCP mode, if available: “#NET-DHCP 1”,0x0D VS-62DT - Kramer Protocol 3000 Commands...
- Page 71 A network gateway connects the device via another network and maybe over the Internet. Be careful of security problems. For proper settings consult your network administrator K-Config Example Set the gateway IP address to 192.168.0.1: “#NET-GATE 192.168.000.001”,0x0D VS-62DT - Kramer Protocol 3000 Commands...
- Page 72 NET-MAC? Get: End User Public Description Syntax Set: Get: Get MAC address #NET-MAC?␍ Response ~nn@NET-MAC␠mac_address␍␊ Parameters mac_address - Unique MAC address. Format: XX-XX-XX-XX-XX-XX where X is hex digit Response Triggers Notes K-Config Example “#NET-MAC?”,0x0D VS-62DT - Kramer Protocol 3000 Commands...
- Page 73 - format: xxx.xxx.xxx.xxx Response Triggers The subnet mask limits the Ethernet connection within the local network For proper settings consult your network administrator Notes K-Config Example Set the subnet mask to 255.255.0.0: “#NET-MASK 255.255.000.000”,0x0D VS-62DT - Kramer Protocol 3000 Commands...
-
Page 74: Edid Handling Commands
Copy the EDID data from the HDMI Out output (EDID source) to the HDMI In 1 input: “#CPEDID 1,1,0,0x1”,0x0D Copy the EDID data from the default EDID source to HDMI In 1 and PC In inputs: “#CPEDID 2,0,0,0x5”,0x0D VS-62DT - Kramer Protocol 3000 Commands... -
Page 75: Step-In Commands
X is a hex digit. The binary form of every hex digit represents actions from the tab. Setting ‘1’ says that the corresponding action must be executed: 0 (echo controller), 1 (step-in HDBT), 2 (step-in HDMI) Response Triggers Notes Programs matrix action as a response for external event (programmable button pressed) K-Config Example VS-62DT - Kramer Protocol 3000 Commands... -
Page 76: Audio Commands
– number of channel: 1 (master), 2 (secondary) volume – volume level: -90 to 10 (dB) Response Triggers Notes K-Config Example Set the volume of the Audio Out (1) output to 0dB: “#AUD-LVL 1,1,0”,0x0D VS-62DT - Kramer Protocol 3000 Commands... - Page 77 Syntax Set: Set audio output swap #AUD-SWAP␠swap_mode␍ Get: Get audio output swap status #AUD-SWAP?␍ Response ~nn@AUD-SWAP␠swap_mode␍␊ Parameters swap_mode – 0 (off), 1 (on) Response Triggers Notes K-Config Example Set audio output swapping: “#AUD-SWAP 1”,0x0D VS-62DT - Kramer Protocol 3000 Commands...
- Page 78 Set audio mute #MUTE␠channel,mute_mode␍ Get: Get audio mute #MUTE?␠channel␍ Response ~nn@MUTE␠channel,mute_mode␍␊ Parameters channel - output number mute_mode – 0 (off), 1 (on) Response Triggers Notes K-Config Example Mute the Audio Out output: “#MUTE 1,1”,0x0D VS-62DT - Kramer Protocol 3000 Commands...
-
Page 79: Video Commands
After execution, response is sent to all comm ports if VID-PATTERN was set by any other external control device (button press, WEB, device menu and similar) Notes K-Config Example Set HDMI Out 2 to pattern 2 (checkerboard): “#VID-PATTERN,2,2”,0x0D VS-62DT - Kramer Protocol 3000 Commands... - Page 80 – 0 (disable video on output), 1 (enable video on output), 2 (blank video) Response Triggers Notes Video mute parameter 2 (blank picture) is not supported K-Config Example Disable the video output on HDMI Out: “#VMUTE 3,0”,0x0D VS-62DT - Kramer Protocol 3000 Commands...
- Page 82 SAFETY WARNING Disconnect the unit from the power supply before opening and servicing For the latest information on our products and a list of Kramer distributors, visit our Web site to find updates to this user manual. We welcome your questions, comments, and feedback.
Need help?
Do you have a question about the VS-62DT and is the answer not in the manual?
Questions and answers