Juniper MX960 Quick Start Manual
Ethernet services router
Hide thumbs
Also See for MX960:
- Hardware manual (761 pages) ,
- Quick start manual (34 pages) ,
- Installation instructions manual (16 pages)
Table of Contents
Advertisement
Quick Links
MX960 Ethernet Services Router
Quick Start
18 April 2008
Part Number: 530-021108-01
Revision 2
This document describes how to install the MX960 Ethernet Services Router.
Quick Start Description ...................................................................................3
Step 1: Prepare the Site ...................................................................................4
Rack-Mounting Requirements ...................................................................4
Tools Required ..........................................................................................5
Step 2: Install the Mounting Hardware ............................................................6
Install the Mounting Hardware in a Four-Post Rack or Cabinet .................6
Install the Mounting Hardware in an Open-Frame Rack ............................7
Step 3: Install the Router .................................................................................8
Install the Router Using a Lift ....................................................................8
Install the Router Without a Mechanical Lift ............................................10
Remove Components .......................................................................11
Lift the Router into the Rack .............................................................12
Reinstall Components ......................................................................13
Step 4: Connect External Devices and DPC Cables ........................................13
Connect to a Network for Out-of-Band Management ...............................13
Connect a Management Console .............................................................14
Connect the DPC Cables .........................................................................14
Step 5: Connect Ground and Power Cables ...................................................15
Connect Grounding Cable .......................................................................15
Connect Power to an AC Router ..............................................................15
Connect Power to a DC Router ...............................................................16
Step 6: Perform Initial Software Configuration ..............................................17
Safety Warnings ............................................................................................19
1
Advertisement
Table of Contents

Related Manuals for Juniper MX960


Summary of Contents for Juniper MX960
-
Page 1: Table Of Contents
MX960 Ethernet Services Router Quick Start 18 April 2008 Part Number: 530-021108-01 Revision 2 This document describes how to install the MX960 Ethernet Services Router. Contents Quick Start Description ...................3 Step 1: Prepare the Site ...................4 Rack-Mounting Requirements ..............4 Tools Required ..................5 Step 2: Install the Mounting Hardware ............6... - Page 2 MX960 Ethernet Services Router Quick Start Compliance Statements for NEBS ..............21 Compliance Statements for EMC Requirements ..........21 Canada ....................21 European Union ..................21 Declaration of Conformity ..............21 List of Technical Publications ................22 Requesting Technical Support ...............28 Revision History ....................29...
-
Page 3: Contents Quick Start Description
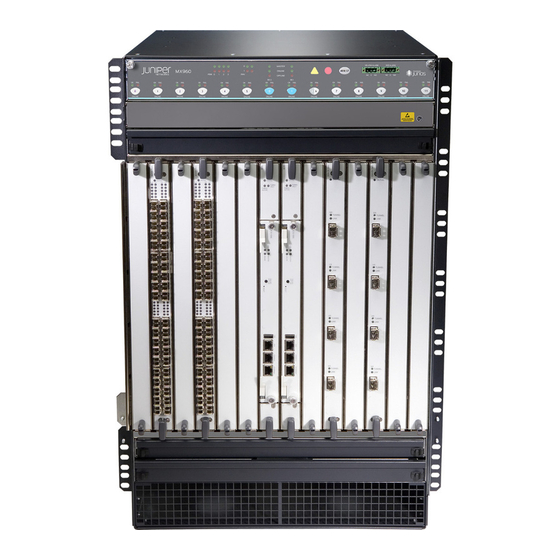
MX960 Ethernet Services Router Hardware Guide at http://www.juniper.net/techpubs/ The MX960 router is 16 rack units (RU) tall. Three routers can be stacked in a single floor-to-ceiling rack, for increased port density per unit of floor space. The router provides 14 slots that can be populated with up to 12 interface cards and two Switch Control Boards (SCBs) in nonredundant fabric configurations. -
Page 4: Step 1: Prepare The Site
MX960 Ethernet Services Router Quick Start Step 1: Prepare the Site Figure 1: Rack Clearance and Router Dimensions Rack-Mounting Requirements You can install the router in a four-post rack or cabinet or an open-frame rack. The rack rails must be spaced widely enough to accommodate the router chassis's external dimensions: 27.75 in. -
Page 5: Tools Required
Step 1: Prepare the Site 17.37 in. (44.11 cm) wide. The outer edges of the mounting brackets extend the width to 19 in. (48.3 cm). The rack must be strong enough to support the weight of the fully configured router, up to 350 lb (158.76 kg). If you stack three fully configured routers in one rack, it must be capable of supporting about 1,050 lb (476.3 kg). -
Page 6: Step 2: Install The Mounting Hardware
Install the Mounting Hardware in a Four-Post Rack or Cabinet To install the mounting shelf, follow this procedure: On the front rack rails, install cage nuts in the holes specified in the MX960 Ethernet Services Router Hardware Guide for the large shelf and the spacer bars. -
Page 7: Install The Mounting Hardware In An Open-Frame Rack
To install the mounting shelf, follow this procedure: On the rear of each rack rail, partially insert a mounting screw into the highest hole specified in the MX960 Ethernet Services Router Hardware Guide for the large shelf. Install the large shelf on the rack. Hang the shelf over the mounting screws using the keyhole slots located near the top of the large shelf flanges. -
Page 8: Step 3: Install The Router
Ensure the rack is in its permanent location and is secured to the building. Ensure that the installation site allows adequate clearance for both airflow and maintenance. For details, see the MX960 Ethernet Services Router Hardware Guide. Load the router onto the lift, making sure it rests securely on the lift platform (see Figure 4 on page 9). - Page 9 Step 3: Install the Router Figure 4: Load the Router onto the Lift Using the lift, position the router in front of the rack or cabinet, centering it in front of the mounting shelves. Lift the chassis approximately 0.75 in. above the surface of the mounting shelves and position it as close as possible to the shelves.
-
Page 10: Install The Router Without A Mechanical Lift
MX960 Ethernet Services Router Quick Start Install the Router Without a Mechanical Lift To install the router without a mechanical lift, perform all of the following procedures: Remove Components on page 11 Lift the Router into the Rack on page 12... -
Page 11: Remove Components
Do not stack removed components. Lay each one on a flat surface. NOTE: For complete instructions on removing router components, see Install the Router Without a Mechanical Lift” in the MX960 Ethernet Services Router Hardware Guide. Step 3: Install the Router... -
Page 12: Lift The Router Into The Rack
MX960 Ethernet Services Router Quick Start Lift the Router into the Rack Lifting the chassis and mounting it in a rack requires three people. The empty chassis weighs approximately 150 lb (60.4 kg). Ensure the rack is in its permanent location and is secured to the building. -
Page 13: Reinstall Components
Step 4: Connect External Devices and DPC Cables Reinstall Components Slide each component into the chassis evenly so that it does not become stuck or damaged. Tighten the captive screws for each component. NOTE: Make sure that all empty slots are covered with a blank panel before operating the router. -
Page 14: Connect A Management Console
MX960 Ethernet Services Router Quick Start Plug the other end of the cable into the network device. Connect a Management Console Turn off the power to the management device. Plug one end of the RJ-45 Ethernet cable into the port on the CONSOLE Routing Engine. -
Page 15: Step 5: Connect Ground And Power Cables
Connect Power to an AC Router Locate the power cords shipped with the router, which should have a plug appropriate for your geographical location (see the MX960 Ethernet Services Router Hardware Guide). Attach an electrostatic discharge (ESD) grounding strap to your bare wrist and connect the strap to one of the ESD points on the chassis. -
Page 16: Connect Power To A Dc Router
MX960 Ethernet Services Router Quick Start Dress the power cord appropriately. Verify that the power cord does not block the air exhaust and access to router components, or drape where people could trip on it. Repeat Step 1 through Step 6 for the remaining power supplies. -
Page 17: Step 6: Perform Initial Software Configuration
Step 6: Perform Initial Software Configuration NOTE: For information about connecting to DC power sources, see the MX960 Ethernet Services Router Hardware Guide. Loosen the captive screw on the cable restraint on the lower edge of the power supply faceplate. - Page 18 MX960 Ethernet Services Router Quick Start [edit] root@# set interfaces fxp0 unit 0 family inet address address/prefix-length Configure the IP address of a backup router, which is used only while the routing protocol is not running. [edit] root@# set system backup-router address Configure the IP address of a DNS server.
-
Page 19: Safety Warnings
WARNING: See installation instructions before connecting the router. This is a summary of safety warnings. For a complete list of warnings for this router, including translations, see the MX960 Ethernet Services Router Hardware Guide at http://www.juniper.net/techpubs/hardware/ WARNING: The intrabuilding port(s) of the router is suitable for connection to intrabuilding or unexposed wiring or cabling only. - Page 20 MX960 Ethernet Services Router Quick Start Only trained and qualified personnel should install or replace the router. Perform only the procedures described in this quick start or the MX960 Ethernet Services Router Hardware Guide. Other services should be performed by authorized service personnel only.
- Page 21 Compliance Statements for NEBS Compliance Statements for NEBS The equipment is suitable for installation as part of the Common Bonding Network (CBN). The equipment is suitable for installation in locations where the National Electrical Code (NEC) applies. The battery return connection is to be treated as a Common DC return (that is. DC-C), as defined in GR-1089-CORE.
- Page 22 JUNOS software with enhanced services. All documents are available at http://www.juniper.net/techpubs/ Table 5 on page 28 lists additional books on Juniper Networks solutions that you can order through your bookstore. A complete list of such books is available at http://www.juniper.net/books...
- Page 23 This material was formerly covered in the JUNOS System Basics Configuration Guide. System Basics Describes Juniper Networks routing platforms and explains how to configure basic system parameters, supported protocols and software processes, authentication, and a variety of utilities for managing your router on the network.
- Page 24 JUNOS API and Scripting Documentation JUNOScript API Guide Describes how to use the JUNOScript application programming interface (API) to monitor and configure Juniper Networks routing platforms. JUNOS XML API Configuration Reference Provides reference pages for the configuration tag elements in the JUNOS XML API.
- Page 25 Describes the Advanced Insight Manager (AIM) application, which provides a gateway between JUNOS devices and Juniper Support Systems (JSS) for case management and intelligence updates. Explains how to run AI scripts on Juniper Networks devices. J-series Routing Platform Documentation Getting Started Guide Provides an overview, basic instructions, and specifications for J-series routing platforms.
- Page 26 Table 3: JUNOS Software Network Operations Guides Book Description Baseline Describes the most basic tasks for running a network using Juniper Networks products. Tasks include upgrading and reinstalling JUNOS software, gathering basic system management information, verifying your network topology, and searching log messages.
- Page 27 List of Technical Publications mode commands documented in JUNOS configuration guides and command references. To configure and operate a WX Integrated Services Module, you must also use WX documentation. Table 4: JUNOS Software with Enhanced Services Documentation Book Description JUNOS Software with Enhanced Services Design Provides guidelines and examples for designing and and Implementation Guide implementing IP Security (IPSec) virtual private networks...
- Page 28 Provides a brief history of the Internet, explains IP addressing and routing (Routing Information for Multivendor IP Networks Protocol [RIP], OSPF, IS-IS, and Border Gateway Protocol [BGP]), explores ISP peering and routing policies, and displays configurations for both Juniper Networks and other vendors' routers. The Complete IS-IS Protocol Provides the insight and practical solutions necessary to understand the IS-IS protocol and how it works by using a multivendor, real-world approach.
- Page 29 Copyright © 2008, Juniper Networks, Inc. All rights reserved. Juniper Networks, the Juniper Networks logo, NetScreen, and ScreenOS are registered trademarks of Juniper Networks, Inc. in the United States and other countries. JUNOS and JUNOSe are trademarks of Juniper Networks, Inc. All other trademarks, service marks, registered trademarks, or registered service marks are the property of their respective owners.
- Page 30 MX960 Ethernet Services Router Quick Start Products made or sold by Juniper Networks or components thereof might be covered by one or more of the following patents that are owned by or licensed to Juniper Networks: U.S. Patent Nos. 5,473,599, 5,905,725, 5,909,440, 6,192,051, 6,333,650, 6,359,479, 6,406,312, 6,429,706, 6,459,579, 6,493,347, 6,538,518, 6,538,899, 6,552,918, 6,567,902, 6,578,186, and 6,590,785.
Need help?
Do you have a question about the MX960 and is the answer not in the manual?
Questions and answers