Advertisement
Table of Contents
- 1 Table of Contents
- 2 Assembling the Pcb
- 3 FLASH the ZIP Leds
- 4 Building the Wheels
- 5 Testing the Servos
- 6 Calibrating the Servos
- 7 Assembling the Chassis
- 8 Attaching Electronics
- 9 Code :Move Mini to Move
- 10 Draw a Shape Using Javascript
- 11 Go Online
- 12 Move Mini Pin out
- 13 Troubleshooting
- Download this manual
Advertisement
Table of Contents

Related Manuals for Kitronik BBC Micro Bit move Mini Mk2


Summary of Contents for Kitronik BBC Micro Bit move Mini Mk2
- Page 1 V1.0...
-
Page 2: Table Of Contents
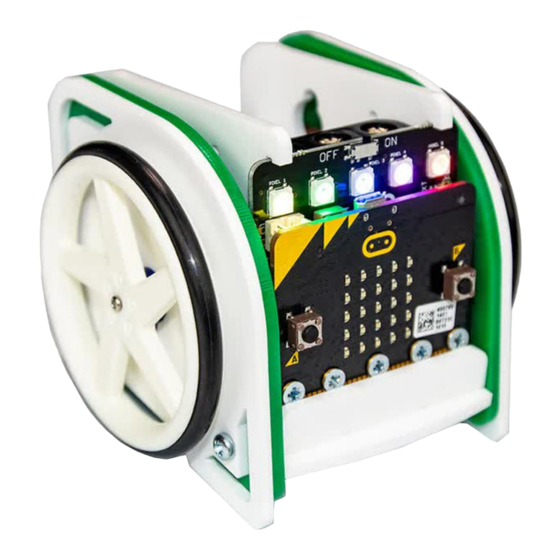
The Kitronik :MOVE mini for the BBC micro:bit provides an introduction to robotics. The :MOVE mini is a 2 wheeled robot, suitable for both remote control and autonomous operation. A range of add-on boards can expand the capabilities to include more advanced functionality. The included :MOVE Servo:Lite board can also be used in conjunction with a BBC micro:bit to build other movement based projects. - Page 3 SUPPLIED WITH THIS KIT ELECTRONICS FIXINGS CHASSIS PANELS www.kitronik.co.uk...
- Page 4 GETTING CONNECTED AND FINDING THE PROGRAMMING ENVIRONMENT Using a USB to micro-USB type B cable, connect the BBC micro:bit to a computer. Code will be created on the BBC micro:bit website. www.microbit.org...
- Page 5 It is possible to convert a Block program into JavaScript. This offers an easy way of progressing from Block programming to JavaScript. Other editor options include the Python Editor. Refer to www.kitronik.co.uk/microbit for tutorials based on this. www.kitronik.co.uk...
- Page 6 GETTING A PROGRAM ON GETTING A PROGRAM ON TO THE BBC MICRO:BIT TO THE BBC MICRO:BIT It is very easy to transfer a finished program to the BBC micro:bit. First of all select ‘download’ . This is where the program ‘download’...
-
Page 7: Assembling The Pcb
Micro:bit sold separately STEP 1: Use a small Phillips screwdriver to screw the five M3 machine screws through the micro:bit and spacer into the nuts mounted on the PCB. ZIP LEDs Servo Connections On/Off Switch PCB Mounted Nuts Spacer www.kitronik.co.uk... -
Page 8: Flash The Zip Leds
Additional packages should appear below. STEP 5: Select ‘Extensions’. STEP 6: In the search bar type ‘neopixel’, then select the ‘neopixel’ box. NOTE: This will load a set of blocks compatible with Kitronik’s ZIP LEDs, which makes them really easy to code! - Page 9 This could be a number, a word or a piece of information you want your program to remember. STEP 8: Create the following code. WHAT THIS MEANS This tells the micro:bit that Pin 0 is connected to 5 colour addressable LEDs. www.kitronik.co.uk...
- Page 10 WHAT THIS MEANS When button A is pressed, light up all the pixels red. WHAT THIS MEANS When button B is pressed, clear the LEDs represented by the variable ‘Pixel Array’. This will turn them off. STEP 9: Name your program and download! The program will automatically run on the simulator.
- Page 11 Set the first two pixels to red, the middle pixel to white and the last two to blue. REMEMBER: To show a change you must use a block with ‘show’ in it. STEP 13: Download Upload STEP 14: Press A and watch the lights! www.kitronik.co.uk...
- Page 12 STEP 15: Create the code below. WHAT THIS MEANS This code shows a colour changing pattern when button A is pressed and stops when button B is pressed. NOTE: The ‘rotate pixels’ block shifts each LED colour onto the next LED. When it reaches the end of the line, it goes back to the first LED.
-
Page 13: Building The Wheels
BUILDING THE WHEELS STEP 1: Stretch the O-Ring round the wheel, this will act as a tyre for :MOVE mini. Press fit the wheel onto the servo shaft and repeat for the opposite side. www.kitronik.co.uk... -
Page 14: Testing The Servos
TESTING THE SERVOS SERVOS The continuous rotation servos used in the :MOVE mini are controlled in the same manner as normal remote control servos. These servos are controlled by a repeating pulse, whose width commands the servo to turn to a position. For a normal servo, position is measured from the output shaft and used to determine what angle the servo should stop at. - Page 15 STEP 2: With both wheel servos plugged in, it is time to write some test code. Set out the servos like below. This will allow trimming/calibration of the servos. This means they will stop and travel at the same speed when commanded. www.kitronik.co.uk...
- Page 16 STEP 3: Bring up MakeCode Blocks Editor (makecode.microbit.org). STEP 4: Create the following code. When button A is pressed, both servos should turn anti-clockwise (looking from the wheel side). When button B is pressed both servos should turn clockwise (looking from the wheel side).
-
Page 17: Calibrating The Servos
STEP 2: Once the servos are calibrated unplug them from the board and detach the wheels from the servos. NOTE: The diagram below shows how the number of degrees set in the code relates to the speed of the servo. SPEED: STOP DEGREES: www.kitronik.co.uk... -
Page 18: Assembling The Chassis
ASSEMBLING THE CHASSIS NOTE: During assembly take care not to overtighten the screws as this can damage :MOVE mini. STEP 1: Slot one of the servos into the base plate as shown to the left. STEP 2: Slot one of the internal side panels over the top of the servos. - Page 19 Drop M3 nuts into the T-joints, and secure with the 16mm bolts. STEP 6: Repeat for opposite side. www.kitronik.co.uk...
- Page 20 STEP 7: Add a wheel (built earlier) and screw the smallest servo screw through the middle to secure it to the servo.
- Page 21 STEP 8: Repeat for the opposite side. The chassis is now complete. www.kitronik.co.uk...
-
Page 22: Attaching Electronics
ATTACHING ELECTRONICS STEP 1: Plug the servo cables back into the Servo:Lite board. The left servo should plug into the left-hand side of the board and vice versa. The cables should be threaded down the gaps on either side as shown below. STEP 2: Clip the Servo:Lite board under the hooks on the inner side plates and slide it between the... - Page 23 STEP 3: Push the Servo:Lite board fully back inside the :MOVE mini. STEP 4: Secure the Servo:Lite board and micro:bit with the :MOVE T-piece. STEP 5: Excess wires can then be fed into the servo compartment at the rear. www.kitronik.co.uk...
-
Page 24: Code :Move Mini To Move
CODE :MOVE MINI TO MOVE DRIVE IN A STRAIGHT LINE STEP 1: Create this code. NOTE: If the move mini does not travel in a straight line then you can adjust the values to make the servos run at the same speed. - Page 25 Drive one servo at full speed, and the stop the other. This will cause the :MOVE mini to drive in a circle. STEP 4: Download Upload ADD SOME LIGHTS! STEP 5: Create the following code to give :MOVE mini a head-light or tail-light. www.kitronik.co.uk...
-
Page 26: Draw A Shape Using Javascript
DRAW A SHAPE USING JAVASCRIPT A square has four equal sides, and four 90 degree corners. Instead of writing the same code four times for both the sides and the corners, we can save some time by writing control functions! This means we can write the code once, and then tell the program to refer back to it as many times as we want. - Page 27 Now we have made the function, lets use it! STEP 4: Program button A to call the function we have just created: NOTE: There is a pause to allow you to move your hand before the :MOVE mini starts turning. www.kitronik.co.uk...
- Page 28 STEP 6: Download Upload Download this code to the micro:bit and press A, the :MOVE mini should wait half a second (or 500 milliseconds) before turning through 90 degrees. STEP 7: If :MOVE mini turns too far, or not far enough, you will need to adjust the ‘DEGREES_PER_SEC’...
- Page 29 STEP 11: Under ‘onButtonPressed(Button.A, () ’ change the code to what is shown below: YOUR TURN: Write code to make the MOVE mini turn right, and drive backwards. Then combine that code to draw other shapes/pictures. STEP 11: Download Upload www.kitronik.co.uk...
-
Page 30: Go Online
For additional tutorials, add-on packs & resources, scan the QR Code or visit: kitronik.co.uk/moveminimk2 Kitronik have created custom blocks for the MakeCode coding environment, these make it ultra simple to code your :MOVE mini. Give it a try by adding the ‘Servo:Lite’ blocks from the... -
Page 31: Troubleshooting
- Try a felt tip pen, these tend to work best. - Try adding some weight to the top of the pen. - Try using a rubber band to secure the pen. If this hasn’t solved your issue, visit kitronik.co.uk/moveminimk2 www.kitronik.co.uk... - Page 32 The Kitronik :MOVE mini for the BBC micro:bit provides an introduction to robotics. The mini is a 2 wheeled robot, suitable for both remote control and autonomous operation. A range of add on boards can expand the capabilities to include more advanced functionality.
Need help?
Do you have a question about the BBC Micro Bit move Mini Mk2 and is the answer not in the manual?
Questions and answers