
Related Manuals for Amprobe TMD-53W


Summary of Contents for Amprobe TMD-53W
- Page 1 TMD-53 / TMD-53W Thermocouple thermometer K/J / Wireless Users Manual • Mode d’emploi • Bedienungshandbuch • Manual d’Uso • Manual de uso...
- Page 3 TMD-53 Thermocouple thermometer K/J TMD-53W Thermocouple thermometer K/J with wireless Users Manual June 2010, Rev.1 ©2010 Amprobe Test Tools. All rights reserved. Printed in Taiwan...
- Page 4 Please check the “Where to Buy” section on www.amprobe.com for a list of distributors near you. Additionally, in the United States and Canada In-Warranty repair and replacement units can also be sent to a Amprobe® Test Tools Service Center (see address below).
- Page 5 Non-Warranty Repairs and Replacement – US and Canada Non-warranty repairs in the United States and Canada should be sent to a Amprobe® Test Tools Service Center. Call Amprobe® Test Tools or inquire at your point of purchase for current repair and replacement rates.
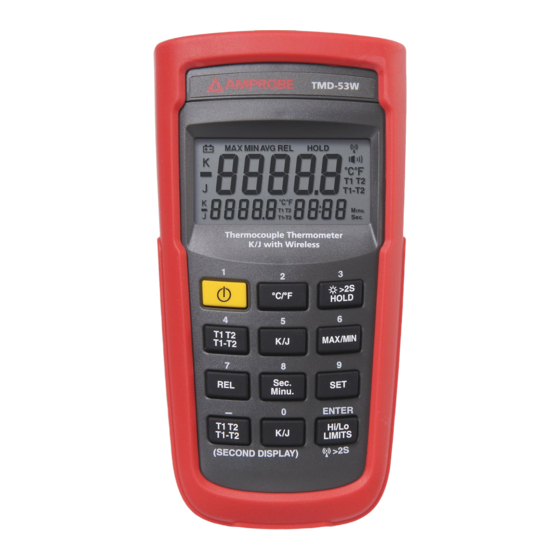
- Page 6 TMD-53/TMD-53W TMD-53 Main Display Second Display Third Display Thermocouple Thermometer K/J TMD-53W...
- Page 7 11) “K/J” Second display backlight 12) “Hi/Lo LIMITS” 4) “T1 T2/T1-T2” Main display Main display 13) Wireless 5) “K/J” Main display (TMD-53W only) 6) “MAX/MIN” 14) Display Main display 15) T1/T2 Input 7) “REL” Main display 8) “Sec. Minu.” Third display...
-
Page 8: Table Of Contents
“Sec. Minu.” Selecting the Time scale ......7 “SET” Mode ..............7 “T1 T2 T1-T2” Second Display Input Selection ....8 “K/J” Second display Input thermocouple type select .. 8 “Hi/Lo LIMITS” Mode ............8 Wireless Mode (TMD-53W only) ........8 SPECIFICATION ..............9 MAINTENANCE ..............11... -
Page 9: Symbols
To prolong lead life, avoid sharp bends in the leads, especially near the connector. Federal Communications Commission This device TMD-53W complies with Part 15 of the FCC Rules. Operation is subject to the following two conditions: (1) this device may not cause harmful... - Page 10 is no guarantee that interference will not occur in a particular installation if this equipment does cause harmful interference to radio or television reception, which can be determined by turning the equipment off and on, the user is encouraged to try to correct the interference by one or more of the following measures: •...
-
Page 11: Unpacking And Inspection
(N.I.S.T. Monograph 175 Revised to ITS-90) for K-type and J-type thermocouples. Two K-type thermocouple are supplied with the thermometer. Features • Wireless two ways transmission. (TMD-53W only) • K/J-type thermocouple selection dual input. • °C/°F user-selective. • MAX/MIN with elapsed time, AVG, REL, HOLD function. -
Page 12: Operation Instructions
OPERATING INSTRUCTIONS “ ” Power Button The “ ” key turns the thermometer on or off. In the SET mode cannot be powered off. Exit SET mode to power off. APO function mode Press “ ” power key for more than 4 seconds to disable the auto-power function. -
Page 13: K/J" Main Display Input Thermocouple Type Select
the difference between the two thermocouples (T1-T2), when the thermometer is turned on, it is set to T1. “K/J” Main display Input Thermocouple Type Select The “K/J” key selects the T1 thermocouple type, when the main display is showing T1. When the thermometer is turned on, it is set to the type selected when the thermometer was last turned off. -
Page 14: Sec. Minu." Selecting The Time Scale
value can also be entered by the user. (See “SET mode” later in this manual). When the desired relative value has been entered, press “REL” key to enter the relative mode and than press “SET” key use the entered relative value as a reference value. -
Page 15: T1 T2 T1-T2" Second Display Input Selection
Press “Hi/Lo LIMITS” key again to exit the Hi/Lo Limits mode. Wireless Mode (TMD-53W) Press the “ ” key for more than two seconds to start wireless function. Press the “ ” key again for another two seconds to stop wireless function. -
Page 16: Specification
To SET CH/ID to 00,00, press the “Hi/Lo LIMITS” key and “ ” power key for more than 6 seconds with the meter powered down. The meter will set channel and ID to 00,00 status. The second display will show 00, which means that the channel and ID has been set to 00. - Page 17 Input Protection 24V dc or 24V ac rms maximum input Voltage on any combination of input pins. Input Connector Accepts standard miniature thermocouple connectors (flat blades spaced 7.9mm, center to center). Maximum Differential Common Mode Voltage (Maximum Voltage between T1 and T2 during measurement): 1 Volt.
-
Page 18: Maintenance
260°C (500°F). Wire accuracy ±2.2°C or ±0.75% of reading (whichever is greater) from 0°C to 800°C (32°F to 1472°F). Wireless Features Frequency range 910~920MHz (TMD-53W) Low current consumption less than 1mA. The transmitting distance can reach 25M without magnetic interference. �... - Page 19 Installing and Replacing Battery A. Screw B. Battery Cover C. Battery 1. Power is supplied by 4pcs 1.5V (SIZE AAA) UM-4 R03. 2. The “ ” appears on the LCD display when replacement is needed. To replace battery remove screw from back of meter and lift off the battery cover.
Need help?
Do you have a question about the TMD-53W and is the answer not in the manual?
Questions and answers