
Related Manuals for Amprobe IR-712


Summary of Contents for Amprobe IR-712
- Page 1 IR-712 12:1 IR Thermometer IR-720 20:1 IR Thermometer IR-730 30:1 IR Thermometer Users Manual • Mode d’emploi • Bedienungshandbuch • Manual d’Uso • Manual de uso • Användarhandbok...
- Page 3 IR-712 12:1 IR Thermometer IR-720 20:1 IR Thermometer IR-730 30:1 IR Thermometer Users Manual September 2011, Rev.1 ©2011 Amprobe Test Tools. All rights reserved. Printed in China...
- Page 4 Amprobe® Test Tools distributor for an exchange for the same or like product. Please check the “Where to Buy” section on www.amprobe. com for a list of distributors near you. Additionally, in the United States and Canada In-Warranty repair and replacement units can also be sent to a Amprobe®...
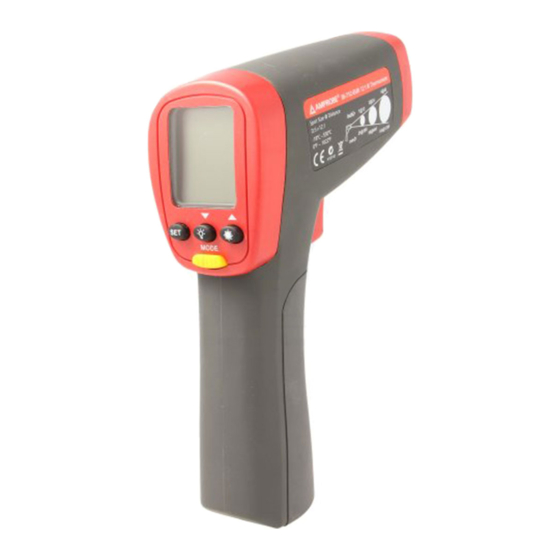
- Page 5 IR-712 12:1 IR Thermometer IR-720 20:1 IR Thermometer IR-730 30:1 IR Thermometer Laser Aperture Trigger Battery Cover Display Laser “ON” symbol Display backlight Measurement lock (Continuous measurement) Temperature unit (Celsius / Fahrenheit) 8 seconds auto display hold Making measurement (Pulling the trigger)
-
Page 6: Table Of Contents
IR-712 12:1 IR Thermometer IR-720 20:1 IR Thermometer IR-730 30:1 IR Thermometer CONTENTS SYMBOL .........................2 SAFETY INFORMATION ..................2 UNPACKING AND INSPECTION ................3 FEATURES .......................4 HOW THE THERMOMETERS WORK ..............5 OPERATING THE THERMOMETER .................5 Temperature Measurement ................5 Locating a Hot or Cold Spot ................10 Distance and Spot Size ..................11... -
Page 7: Symbol
SYMBOLS � Caution! Refer to the explanation in this Manual. Warning! Laser light. Do not stare into laser beam. °C Celsius. °F Fahrenheit. Battery indication. � Complies with European Directives. Do not dispose of this product as unsorted municipal waste. Contact a qualified recycler. -
Page 8: Unpacking And Inspection
30 minutes for instrument to stabilize before use) • Do not leave the thermometer on or near objects of high temperature UNPACKING AND INSPECTION Your shipping carton should include: Thermometer (IR-712 or IR-720 or IR-730) Carrying bag 9V battery (installed) Users manual If any of the items are damaged or missing, return the complete package to the place of purchase for an exchange. -
Page 9: Features
The Amprobe IR-712, a 12:1 spot to distance ratio infrared thermometer, offers best in class accuracy and response time with a temperature measurement range of 0°F to 1022°F or -18°C to 550°C. The IR-712 is specifically designed for HVAC/R, electrical, industrial maintenance, automotive as well as quality control and fire prevention applications. -
Page 10: How The Thermometers Work
• Precision accuracy and rapid response time • Laser pointer, backlit dual LCD Display • Auto display hold and MAX/MIN memory • Adjustable emissivity for measuring a variety of materials HOW THE THERMOMETERS WORK Infrared thermometers measure the surface temperature of an object. The thermometer’s optics sense emitted, reflected, and transmitted energy, which is collected and focused onto a detector. - Page 11 Rotary Switch Positions Button Description Press MODE button to toggle between MAX, MIN, DIF, and AVG options. MODE When the Thermometer goes into sleep mode, press MODE to turn the Thermometer ON again and it displays the last measurement result. Press to enter set-up mode stepping through Emissivity, Trigger Lock and Switching oC/oF set-up.
- Page 12 Emissivity set-up 1. Press SET button to select Emissivity set-up, icon is blinking on the display 2. Press to increase the value by 0.01. Press and hold for quick setting. The maximum value is 1.00. 3. Press to decrease the value by 0.01. Press and hold for quick setting.
- Page 13 Electoropolished 0.15 Iron Oxidized 0.5 – 0.9 Rusted 0.5 – 0.7 Iron Cast Oxidized 0.6 – 0.95 Unoxidized Molten 0.2 – 0.3 Iron Wrought Dull Lead Rough Oxidized 0.2 – 0.6 Molydbenum Oxidized 0.2 – 0.6 Nickel Oxidized 0.2 – 0.5 Platinum Black Steel...
- Page 14 Measure Surface Switch Setting NON-METALS Asbestos 0.95 Asphalt 0.95 Basalt Carbon Unoxidized 0.8 – 0.9 Graphite 0.7 – 0.8 Carborundum Ceramic 0.95 Clay 0.95 Concrete 0.95 Cloth 0.95 Glass Plate 0.85 Gravel 0.95 Gypsum 0.8 – 0.95 0.98 Limestone 0.98 Paper (any colour) 0.95 Plastic...
-
Page 15: Locating A Hot Or Cold Spot
Trigger Lock The thermometer trigger can be locked on for continuous measurement. To lockthe trigger: 1. Press SET button to select Trigger Lock set-up, icon is blinking on the display 2. Press to select ON or OFF. 3. Press MODE button to complete the setting and exit Trigger Lock set-up, or press SET button to complete the setting and continue setting for °C / °F. -
Page 16: Distance And Spot Size
Distance and Spot Size As the distance (D) from the target being measured increases, the spot size (S) of the area measured by the instrument becomes larger. The spot size indicates 90% encircled energy. -
Page 17: Field Of View
Field of View Make sure that the target is larger than the spot size. The smaller the target, the closer you should be to it. -
Page 18: Emissivity
Emissivity Emissivity describes the energy-emitting characteristics of materials. Most organic materials and painted or oxidized surfaces have an emissivity of about 0.95. If possible, to compensate for inaccurate readings that may result from measuring shiny metal surfaces, cover the surface to be measured with masking tape or flat black paint (<150°C / 302°F ) and use the high emissivity setting. - Page 19 2. The instrument cannot measure through transparent surfaces such as glass. It will measure the surface temperature of the glass instead. 3. See table of Surface Emissivity for use in measuring shiny or polished metal surfaces (stainless steel, aluminum, etc.).
-
Page 20: Typical Measurements
4. Steam, dust, smoke, etc., can prevent accurate measurement by obstructing the instrument’s optics. TYPICAL MEASUREMENTS This section describes a variety of measurements often performed by technicians. Reminder: • User could select to turn on or off the backlight and laser whenever you are making readings with the Thermometer. - Page 21 3. Press MODE to select MAX. 4. Start to scan. 5. Measure the relay casing, looking for hot spots. 6. Measure electrical connections on relay terminals looking for hot spots. Testing Fuses and Buss Connections 1. Press SET and then press to set emissivity to relatively high for paper covered fuse body or insulated connections.
- Page 22 7. Scan horizontal rows of wall from top to bottom, or horizontal rows of ceiling from wall to wall. Look for greatest deviations from baseline temperature to identify problems. This completes the insulation test scan. Turn on the blower (no heat, no cooling) and retest. If test results with the blower on are different than results with the blower off, this may indicate air leaks in conditioned envelope walls.
- Page 23 4. Aim the Thermometer at the surface to be measured. 5. Start recording temperature. 6. Slowly move the Thermometer up the belt toward second sheave. • If belt is slipping, sheave temperature will be high from friction. • If belt is slipping, belt temperature will remain high between sheaves. •...
-
Page 24: Specification
SPECIFICATION Feature IR-712 IR-720 IR-730 Temperature Range -18°C to 550°C -32°C to 1050°C -32°C to 1250°C (0°F to 1022°F) (-26°F to 1922°F) (-26°F to 2282°F) Accuracy (Assumes ±1.8% or ±1.8°C >0°C to 1250°C (>32°F to 2282°F): ±1.8% ambient operating (±4F), whichever is or ±1.8°C (±4F), whichever is greater... -
Page 25: Maintenance
Tripod mount √ √ √ Power 9V 6F22 alkaline battery or equivalent Battery Life 10 hours with laser and backlight on 30 hours with laser and backlight off Dimension (H x L x W) Approx.169 x 138 x 53 mm (6.7 x 5.4 x 2.1 in) Weight Approx.290 g (0.64 lb) with battery installed MAINTENANCE... -
Page 26: Trouble Shooting
TROUBLE SHOOTING Code Problem Action Target temperature is Select target within over range specifications Target temperature is Select target within under range specifications Check and/or replace Low battery Battery indication battery Check and/or replace Blank display Possible dead battery battery 1.Low or dead battery 1.Replace battery Laser does not work...
Need help?
Do you have a question about the IR-712 and is the answer not in the manual?
Questions and answers