Table of Contents
Advertisement
Available languages
Available languages
Quick Links
Advertisement
Chapters
Table of Contents

Related Manuals for Grundig GSND 6282 S


Summary of Contents for Grundig GSND 6282 S
- Page 1 BUZDOLABI KULLANMA KILAVUZU GSND 6282 S GSND 6383 S TR ENG www.grundig.com...
-
Page 3: Table Of Contents
içindekiler 1 Güvenlik ve Çevre Talimatları 5 5.18 Buzmakinası .......37 2. Buzdolabınız 5.19 Taze yiyeceklerin 2. Buzdolabınız dondurulması ......39 3. Kurulum 5.20 Donmuş gıdaların 3.1 Kurulum için doğru yer ..11 saklanmasıyla ilgili tavsiyeler ..40 3.2 Plastik takozların takılması .11 5.21 Derin dondurucu bilgileri ...40 3.3 Ayakların ayarlanması... - Page 4 Lütfen önce bu kılavuzu okuyun! Değerli Müşterimiz, Modern tesislerde üretilen ve titiz kalite kontrol işlemlerinden geçirilen üründen en iyi verimi almanızı istiyoruz. Bu nedenle, ürünü kullanmadan önce kullanma kılavuzunun tamamını dikkatle okuyun ve bir başvuru kaynağı olarak saklayın. Ürünü bir başkasına devretmeniz halinde, kılavuzu da verin. Kullanma kılavuzu ürünü hızlı ve güvenli bir şekilde kullanmanıza yardımcı olur.
-
Page 5: Güvenlik Ve Çevre Talimatları
Güvenlik ve Çevre Tali- tarafından kullanılmak üzere. matları pansiyon türü Bu bölümde, yaralanma ya da ortamlarda; maddi hasar riskini ortadan yemek hizmeti ve kaldıracak gerekli güvenlik perakendeci olmayan benzer talimatları yer almaktadır. uygulamalarda. Bu talimatlara uyulmaması 1.1. Genel Güvenlik halinde ürün her türlü garanti kapsamından çıkacaktır. - Page 6 • Kurulum, bakım, temizlik • Ürünü, topraklı bir prize ve tamir işlemleri sırasında bağlayın. Topraklama ürünün fişini prizden çekin. tesisatı uzman bir elektrikçi tarafından yapılmalıdır. • Ürün uzun süre • Ürününüzde led kullanılmayacaksa fişini elektrik prizinden çekin ve tipi aydınlatma var içindeki yiyecekleri çıkarın.
- Page 7 bir kısmını sıkıştırmamaya 80PSi (5,5 bar) değerini aşıyor dikkat edin. ise şebeke sisteminizde basınç limitleme valfi • Buzdolabındaki kapı ve kullanınız. Eğer su basıncınızı çekmece gibi kısımları nasıl kontrol edeceğinizi kesinlikle destek veya bilmiyorsanız profesyonel basamak olarak kullanmayın. tesisatçılardan yardım alınız. Ürünün devrilmesine • Eğer tesisatınızda su darbesi veya aksamlarının zarar...
- Page 8 • Ürünün satın alma Elektrikli ve elektronik tarihinden itibaren 10 yıl cihazların geri dönüşümü için boyunca orjinal yedek bir toplama noktasına götürün. parçalar sağlanacaktır. Bu toplama noktalarını bölgenizdeki yerel yönetimden öğrenebilirsiniz. Kullanılmış 1.3. Çocuk Güvenliği ürünleri geri dönüşüme • Ambalaj malzemeleri vererek çevrenin ve doğal çocuklar için kaynakların korunmasına...
-
Page 9: Buzdolabınız
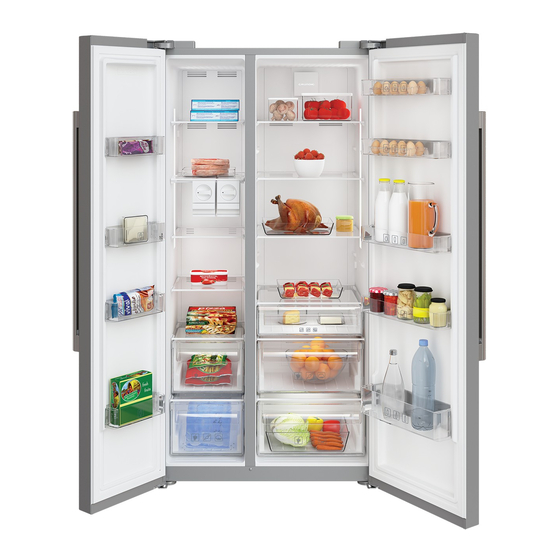
2. Buzdolabınız Dondurucu bölme Sıfır derece bölmesi Soğutucu bölme Sebzelikler Ayarlı ayaklar Tereyağ-peynir bölmesi Dondurulmuş yiyecek saklama Cam raflar bölmeleri Soğutucu bölme kapı rafları 15. Dondurucu bölme kapı rafları Minibar aksesuar Buzmatikler Su tankı Buz stok haznesi Şişe rafı Buz makinası dekoratif kapak 10. -
Page 10: Buzdolabınız
2. Buzdolabınız Bu kullanım kılavuzunda şekiller şematik olup ürününüzle birebir uyum içinde olmayabilir. Satın almış olduğunuz üründe ilgili parçalar yoksa başka modeller için geçerlidir. -
Page 11: Kurulum
3. Kurulum • Ürünü doğrudan güneş ışığına maruz bırakmayın ve rutubetli yerde bulundurmayın. 3.1 Kurulum için doğru yer • Ürününün verimli çalışabilmesi için çevresinde uygun bir Ürünün kurulumu için Yetkili hava dolaşımı olmalıdır. Servisi arayın. Ürünü kullanıma Ürünü duvara girintili bir yere hazır duruma getirmek için, yerleştirilecekseniz tavanla ve kullanma kılavuzundaki bilgilere yan duvarlarla arasında en az 5... -
Page 12: Ayakların Ayarlanması
Kapıları dikey olarak ayarlamak için, Altta bulunan sabitleme somununu gevşetin. Kapının pozisyonuna göre ayarlama somununu (saat yönünde/saat yönünün tersine) çevirin. Pozisyonu sabitlemek için sabitleme somununu sıkın. Kapıları yatay olarak ayarlamak için, Üstte bulunan sabitleme somununu 3.3 Ayakların ayarlanması gevşetin. Kapının pozisyonuna göre yan tarafta Ürün, yerleştirdiğiniz yerde bulunan ayarlama somununu (saat dengesiz duruyorsa öndeki... -
Page 13: Elektrik Bağlantısı
3.4 Elektrik bağlantısı UYARI: Uzatma kabloları ya da çoklu prizlerle bağlantı yapmayın. UYARI: Hasar görmüş elektrik kablosu Yetkili Servis tarafından değiştirilmelidir. İki soğutucu yan yana yerleştiriliyorsa aralarında en az 4 cm boşluk bırakılmalıdır. • Ürünün ulusal yönetmeliklere uygun topraklama ve elektrik bağlantısı yapılmadan kullanılması... -
Page 14: Su Bağlantısı
Su filtresi (1 adet *Opsiyonel 3.5 Su bağlantısı ) : Şebeke suyunu ürüne (Bu özellik opsiyoneldir) bağlamak için kullanılır. Damacana bağlantısı var ise; su UYARI: Bağlantı filtesi kullanımına gerek yoktur. esnasında ürün ve varsa su pompasının fişi 3.6 Su hortumunun ürüne çekilmelidir. bağlanması Ürününüzün, şebeke, filtre ve Su hortumunu ürüne bağlamak damacana bağlantıları... -
Page 15: Şebeke Suyuna Bağlama
Rakoru elle sıkarak hortum Musluk adaptörünü şebeke uçlu adaptöre sabitleyin. Boru hattı vanasına bağlayın. anahtarı veya pense kullanarak rakoru sıkabilirsiniz. Rakoru su hortumuna geçirin. Hortumun diğer ucu; şebeke suyuna bağlama yapılacaksa; (Bknz:Bölüm 3.7) eğer damacanaya bağlanacaksa; su pompasına (Bknz:Bölüm 3.8) takılmalıdır. -
Page 16: Damacana Kullanılacak Ürünler Için
Su hortumunu, zarar Su hortumunun diğer ucunu görmesini, kaymasını veya pompanın su hortumu girişinin yanlışlıkla yerinden çıkmasını içine iterek bağlantıyı yapın. önlemek için verilen klipslerle uygun yerlere sabitleyin. Pompa hortumunu damacananın içine yerleştirerek UYARI: Musluk açıldıktan sabitleyin. sonra, su hortumunun her iki bağlantı... -
Page 17: Su Filtresi
3.9 Su filtresi Su filtresi (1 adet ) : Şebeke suyunu ürüne bağlamak için (Bu özellik opsiyoneldir) kullanılır.Damacana bağlantısı Ürününüzde modele bağlı olarak var ise; su filtesi kullanımına harici veya dahili filtre bulunabilir. gerek yoktur. Su filtresini takmak için, aşağıdaki Musluk adaptörünü şebeke talimatları uygulayın. hattı... -
Page 18: Dahili Filtre
Su hattı : Bağlantı tamamlandıktan sonra görüntü aşağıda belirtildiği gibi olmalıdır. Damacana hattı : 3.9.2.Dahili filtre Ürün içinde gelen dahili filtre kurulu olarak gelmediğinden hazırlanması için gerekli işlemler aşağıda belirtilmiştir : Filtreyi bağladıktan sonra ilk 10 bardak suyu kullanmayın. - Page 19 Su filtresi by-pass kapağını Filtre kurulumu için “ kendinize doğru çekerek Off ” (Buz İptal) göstergesi çıkartın. etkin olmalıdır. Ekranda Kapak çıkarıldıktan ON - OFF göstergeleri arası sonra birkaç damla Ice”(Buz) düğmesine geçiş “ suyun gelmesi basarak yapılır. normaldir. Su filtresinin kapağını mekanizmanın içine oturtup ileri doğru iterek yerine kilitleyin.
-
Page 20: Ön Hazırlık
4 Ön hazırlık • Dondurucu bölme yer alan sıcaklık sensörü ile gıda paketlerinin doğrudan teması 4.1Enerji tasarrufu için engellenmelidir. Sensör ile yapılması gerekenler temas olması halinde cihazın enerji tüketiminde artış Ürünün elektronik enerji görülebilir. tasarruf sistemlerine bağlanması, ürüne zarar verebileceği için sakıncalıdır. • Buzdolabınızın kapılarını uzun süre açık tutmayın. - Page 21 Kompresör çalışmaya başladığında bir ses duyacaksınız. Soğutma sistemi içerisindeki sıkışmış sıvı ve gazlar, kompresör çalışmıyor olsa da ses çıkarması normaldir. Buzdolabının ön kenarlarının sıcak olması normaldir. Bu alanlar, yoğuşmayı önlemek için ısınacak şekilde tasarlanmıştır. Bazı modellerde gösterge paneli kapı kapandıktan 5 dakika sonra otomatik olarak sönmektedir.
-
Page 22: Ürünün Kullanımı
5. Ürünün kullanımı 5.1 Gösterge Paneli Gösterge paneli, buzdolabınızı kullanırken görsel ve işitsel fonksiyonları ile size kullanım kolaylığı sağlar. Soğutucu bölme göstergesi Hata durumu göstergesi Sıcaklık göstergesi Tatil fonksiyonu düğmesi Sıcaklık ayar düğmesi Bölme seçim düğmesi Dondurucu bölme göstergesi Ekonomi modu göstergesi Tatil fonksiyonu göstergesi Bu kullanım kılavuzunda şekiller şematik olup ürününüzle birebir uyum içinde olmayabilir. - Page 23 1. Soğutucu bölme göstergesi 6. Soğutucu bölme Soğutucu bölme sıcaklığı Seçim düğmesi soğutucu ve ayarlanırken soğutucu bölme ışığı dondurucu bölmeleri arasında yanar. geçiş yapmak için buzdolabı bölme seçim düğmesine basın. 2. Hata durumu göstergesi 7. Dondurucu bölme göstergesi Buzdolabınız yeterli soğutma yapmıyorsa ya da bir sensör arızası Dondurucu bölme sıcaklığı meydana gelirse, bu gösterge ayarlanırken soğutucu bölme ışığı...
-
Page 24: Gösterge Paneli
5.2 Gösterge Paneli Gösterge paneli, buzdolabınızı kullanırken görsel ve işitsel fonksiyonları ile size kullanım kolaylığı sağlar. Ekonomik kullanım Yüksek sıcaklık / hata uyarısı *opsiyonel Enerji tasarrufu (ekran kapalı) Hızlı soğutma Tatil fonksiyonu Soğutucu bölme sıcaklık ayarı Enerji tasarrufu (ekran kapalı)/ Alarm off uyarısı Tuş... - Page 25 1. Ekonomik kullanım enerji tasarrufu fonksiyonundan Bu simge, en ekonomik ayar çıkılır ve ekrandaki simgeler değerleri olarak dondurucu normale döner. bölme -18°C'ye ayarlandığında Enerji tasarrufu fonksiyonu fabrika yanar.( ) Hızlı soğut veya hızlı çıkışı aktif bir fonksiyondur, iptal dondur fonksiyonları seçildiğinde edilemez. ekonomik kullanım göstergesi 4. Hızlı soğutma söner.
- Page 26 6. Soğutucu bölme sıcaklık ayarı işareti söner ve tuş kilidi modu Bu düğmeye basıldığında soğutucu devreden çıkar. Buzdolabının bölme sıcaklığı sırayla 8,7,6,5,4,3,2 sıcaklık ayarlarını değiştirmeyi ve 1 değerlerine ayarlanabilir.( ) önlemek için Ekran kapatma 7. 1 Enerji tasarrufu (ekran düğmesine basın. kapalı) 9. Eko fuzzy Bu düğmeye ( )bastığınızda Eko fuzzy fonksiyonunu enerji tasarrufu simgesi ( ) yanar etkinleştirmek için eko fuzzy...
-
Page 27: Gösterge Paneli
5.3 Gösterge Paneli Gösterge paneli, buzdolabınızı kullanırken görsel ve işitsel fonksiyonları ile size kullanım kolaylığı sağlar. *opsiyonel 11.2 11.1 Dondurucu bölmesi sıcaklık ayarı Ekonomi modu Enerji tasarrufu (ekran kapalı) Hata durumu Soğutucu bölme sıcaklık ayarı Hızlı soğutma Tatil fonksiyonu Tuş kilidi / filtre değişimi uyarısı iptal Su, kırılmış... - Page 28 1. Dondurucu bölmesi sıcaklık rakamlar, servis personeline hata ayarı hakkında bilgi verir. (1) numaralı düğmeye basıldığında Bu gösterge elektrik kesintisi, )dondurucu bölme sıcaklığı yüksek sıcaklık arızası durumunda -18,-19,-20,-21,-22,-23,-24,-18... ve hata uyarılarında yanar. Uzun değerlerine ayarlanabilir. süre elektrik kesintisi olduğunda, 2. Ekonomi modu dondurucu bölme sıcaklığının Buzdolabının, enerji tasarruf ulaştığı...
- Page 29 soğutulmaya devam edecektir. 12. Auto eco Bu fonksiyonu iptal etmek için Auto eco düğmesine ( ) 3 saniye tekrar tatil fonksiyonu düğmesine basıldığında bu fonksiyon aktiflenir. basın.( ) Eğer bu fonksiyon seçiliyken kapı uzun süre kapalı kaldıysa, 8. Tuş kilidi / Tuş kilidi / filtre soğutucu bölme ekonomik değişimi uyarısı iptal çalışmaya başlar.
-
Page 30: Su Filtresi Değişim Uyarısının Aktiflenmesi
5.4 Su filtresi değişim uyarısının aktiflenmesi (Şebeke suyu bağlantısı yapılan ve filtre kullanılan ürünler için) Su filtresi değişim uyarısı aşağıda verildiği gibi ayarlanır. Otomatik filtre süresi hesaplama fonksiyonu fabrika çıkışında etkin değildir. Filtre kullanılan ürünlerde etkinleştirilmesi gerekir. Buzdolabında kullandığımız S4 display kartı dokuzlu tuş sistemine sahiptir. Displayde set değerleri gösterilmektedir. Dondurucu S et Soğutucu ... - Page 31 2 k ez b asılır 1 k ez b asılır PS 0 ekranı tekrar görüldükten sonra buzdolabının enerjisi kesilip tekrar verilir.Filtre sayacı aktiflenmiş olur.130 gün sonra PS 0 ekranı tekrar görüldükten sonra buzdolabının enerjisi kesilip tekrar verilir.Filtre sayacı aktiflenmiş olur.130 gün sonra displayde filtre uyarı...
-
Page 32: Nem Kontrollü Sebzelik
5.5 Nem kontrollü sebzelik Sebzelik içerisinde sebzeleri kesinlikle poşet içinde bırakmayınız. (FreSHelf) Sebzelerin poşet içinde kalmaları, (Bu özellik opsiyoneldir) kısa sürede çürümelerine neden olur. Nem kontrollü sebzelik özelliği ile Hijyen açısından diğer sebzeler ile sebze ve meyvelerin nem oranları temasın tercih edilmediği durumlarda kontrol altında tutulmakta ve poşet yerine, belirli bir gözenekliliğe gıdaların daha uzun süre taze sahip kağıt vb. -
Page 33: Su Pınarının Kullanılması
5.6 Su pınarının kullanılması (bazı modellerde) Pınardan alınan ilk birkaç bardak suyun ılık olması normaldir. Su pınarı uzun süre kullanılmamışsa, temiz su elde etmek için ilk birkaç bardak suyu dökün. İlk kullanım sırasında, suyun soğuması için yaklaşık 12 saat beklemeniz gerekir. -
Page 34: Su Pınarının Su Deposunun Doldurulması
Ekranı kullanarak su almak için Su deposu kapağını çıkararak önce su seçeneğini seçin, daha temizleyin. sonra tetiği çekerek suyu alın. Tetiği çektikten biraz sonra bardağı Su deposuna su dışında, dışarı alın. meyve suyu, karbonatlı gazlı içecekler, alkollü içecekler gibi su pınarıyla kullanıma uygun olmayan başka bir sıvı... -
Page 35: Damlama Tepsisi
• • İlk çalıştırma sonucundaki Ürün, tatil vb. sebeplerle uzun 30 parça küp buz (3-4 Litre) süre kullanılmayacaksa su tüketilmemelidir. bağlantısının iptal edilmesi • Ürün çalışırken elektrik kesintisi tavsiye edilir. • ya da geçici bir arıza meydana Su pınarı uzun süre gelirse buzlar bir miktar eriyip kullanılmadığında, alınan ilk 1-2 tekrar donabilir. -
Page 36: Sebzelik
Çıkarmak için öne doğru 5.15 Minibar duruncaya kadar çekip yukarı (Bu özellik opsiyoneldir) kaldırarak kendinize çekmeniz Buzdolabındaki minibar kapı yeterlidir. rafına, buzdolabı kapısı açılmadan erişilebilir. Böylece, sıklıkla 5.12 Sebzelik tükettiğiniz yiyecekleri ve içecekleri Buzdolabının sebzeliği, özellikle buzdolabından kolayca alabilirsiniz. sebzelerin nemini kaybetmeden Minibar kapısını açmak için elinizle taze olarak korunması... -
Page 37: Buzmatik Ve Buz Saklama Kabı
5.17 Buzmatik ve buz saklama kabı (Bu özellik opsiyoneldir) Buzmatiği su ile doldurup yerine koyunuz. Yaklaşık iki saat sonunda buzlarınız hazırdır. Buz almak için buzmatiği yerinden çıkarmayınız. Buz haznelerinin üzerindeki düğmeleri 90˚ sağa çeviriniz, Buzmatik dekoratif kapağı yukarı buzlar alltaki buz saklama kabına yönde hareket ettirerek çıkartın. dökülecektir. - Page 38 Hazneyi yerine takmada zorluk yaşarsanız buz sürme motoru karşılığına oturmamış demektir. Buz stok haznesi üzerindeki döndürme somununu 90° çevirdikten sonra tekrar deneyiniz. (Şekil 3) Buzların hazneye düşerken çıkardıkları ses normal çalışma gereğidir. Buzların tamamının alınamaması durumunda Buz küpleri uzun bir süre alınmadığında, birbirlerine yapışarak büyük buz kütleleri oluşmasına neden olabilir.
-
Page 39: Taze Yiyeceklerin Dondurulması
Buz haznesinin içinde yer alan bıçak UYARI: Buzdolabı mekanizması keskindir ve elinizi çalışırken buz kanalı ve kesmenize neden olabilir. buz kırma bıçaklarına Buz pınarından buz gelmiyorsa elinizi veya başka bir buzlar birbirine yapışmış olabilir. cisim sokmayınız Bu durumda hazneyi çıkarıp Küçük çocukların buz temizlemeniz gerekir. -
Page 40: Donmuş Gıdaların Saklanmasıyla Ilgili Tavsiyeler
Dondurucu Soğutucu Bölmesi Bölmesi Açıklamalar Ayarı Ayarı -18°C 4°C Bu, normal tavsiye edilen ayardır. -20,-22 veya Bu ayarlar, ortam sıcaklığı 30°C'yi 4°C -24°C geçtiğinde tavsiye edilir. Yiyeceklerinizi kısa zamanda dondurmak istediğinizde kullanın. İşlem bittiği Hızlı Dondur 4°C zaman ürününüz önceki konumuna geri dönecektir. -
Page 41: Gıdaların Yerleştirilmesi
5.22 Gıdaların yerleştirilmesi 5.24 Aydınlatma lambası Aydınlatma lambası olarak led tipi Et, balık, Dondurucu lamba kullanılmaktadır. Bu lamba dondurma, sebze bölme ile ilgili herhangi bir sorunda yetkili vb. gibi farklı rafları servisi çağırın. donmuş gıdalar. Bu cihazda kullanılan lamba(lar) Tencere, kapalı evde aydınlatma amaçlı Soğutucu tabak ve kapalı... -
Page 42: Bakım Ve Temizlik
6 Bakım ve temiz- 6.1 Kötü kokuların önlenmesi Ürününüzün üretiminde kokuya neden olacak hiçbir madde kullanılmamaktadır. Ancak uygun Ürünün düzenli temizlenmesi olmayan yiyecek saklamaya ve halinde kullanım ömrü uzar. ürün iç yüzeyinin gerektiği şekilde UYARI: Buzdolabınızı temizlenmemesine bağlı olarak temizlemeden önce koku ortaya çıkabilir. elektrik bağlantısını Bu sorunu önlemek için 15 günde kesin. -
Page 43: Sorun Giderme
7 Sorun Giderme • Kapı çok sık açılıp kapanmıştır. >>> Ürünün kapısını çok sık açıp Servis çağırmadan önce, bu listeyi kapamamaya dikkat edin. gözden geçirin. Bunu yapmak sizi zaman • Ortam çok nemlidir. >>> Ürünü çok ve para kaybından kurtarır. Bu liste sık nemli ortamlara kurmayın. - Page 44 • Ortam sıcaklığının değişmesine Dondurucu sıcaklığı çok düşük ama bağlı olarak ürünün çalışma soğutucu sıcaklığı yeterli. performansı değişebilir. Bu • Dondurucu bölme sıcaklığı çok normaldir ve bir arıza değildir. düşük bir değere ayarlanmıştır. Buzdolabı çok sık ya da çok uzun >>> Dondurucu bölme sıcaklığını süre çalışıyor. daha yüksek bir dereceye ayarlayıp • Yeni ürün, eskisinden daha geniş kontrol edin.
- Page 45 • Ürünün soğutma işlemini • Soğutucu bölme sıcaklığı çok gerçekleştirebilmesi için fan yüksek bir değere ayarlanmış kullanılmaktadır. Bu normaldir ve olabilir. >>> Soğutucu bölme sıcaklık ayarının dondurucu bir arıza değildir. bölme sıcaklığı üzerinde etkisi Ürünün iç duvarlarında terleme vardır. Soğutucu ya da dondurucu oluyor.
- Page 46 • Yiyecek paketleri kapının kapanmasını engelliyor olabilir. >>> Kapıları engelleyen paketlerin yerlerini değiştirin. • Ürün zemin üstünde tamamen dik durmuyor olabilir. >>> Ayaklarını ayarlayarak ürünü dengeleyin. • Zemin düz ya da sağlam değildir. >>> Zeminin düz ve ürünü taşıyabilecek kadar sağlam olmasına dikkat edin.
- Page 47 musteri.hizmetleri@grundig.com...
- Page 48 Garanti belgesi üzerinde tahrifat yapıldığı, ürün üzerindeki orijinal seri numarası kaldırıldığı veya tahrif edildiği takdirde bu garanti geçersizdir. Müşteri Hizmetleri: Tüm sorularınız için Grundig Hizmet Merkezi’ni haftanın 7 günü 24 saat aşağıdaki numaradan arayabilirsiniz. Grundig Hizmet Merkezi 444 0 888 (Sabit telefonlardan veya cep telefonlarından alan kodu çevirmeden *)
- Page 49 Ürünün Tüketicinin onarım hakkını kullanmasına rağmen malın; -Tüketiciye teslim edildiği tarihten itibaren, garanti süresi içinde kalmak kaydıyla, bir yıl içerisinde en az dört defa veya imalatçı-üretici ve/veya ithalatçı tarafından belirlenen garanti süresi içerisinde altı defa arızalanmasının yanı sıra, bu arızaların maldan yararlanamamayı...
- Page 50 Contents 1. Safety and environment instructions 5. Operating the product 5.1 Indicator panel ......20 2. Your Freezer 5.2 Indicator panel ......22 2. Your Freezer 5.3 Indicator panel ......25 3. Installation 5.4 Humidity controlled crisper .28 3.1 Right place for installation ..9 5.5 Activating water filter change 3.2 Attaching the plastic wedges .9 warning ........29...
- Page 51 Please read this manual first! Dear Customer, We hope that your product, which has been produced in modern plants and checked under the most meticulous quality control procedures, will provide you an effective service For this, we recommend you to carefully read the entire manual of your product before using it and keep it at hand for future references.
-
Page 52: Safety And Environment Instructions
Safety and environment – farm houses and by clients instructions in hotels, motels and other This section provides the safety residential type environments; instructions necessary to – bed and breakfast type prevent the risk of injury and environments; material damage. Failure to –... - Page 53 • Do not use the product when • Do not touch frozen food with the compartment with circuit wet hands! It may adhere to cards located on the upper your hands! back part of the product • Do not place liquids in bottles (electrical card box cover) (1) and cans into the freezer is open.
- Page 54 prevention equipment in your installation. Consult Professional plumbers if you are not sure that there is no water hammer effect in your installation. • Do not install on the hot water inlet. Take precautions against of the risk of freezing of the hoses. Water temperature operating 1.1.1 HC warning interval shall be 33°F (0.6°C)
- Page 55 1.5. Compliance with 1.3. Child safety RoHS Directive • Keep packaging materials out of children’s reach. • This product complies with • Do not allow the children to EU WEEE Directive (2011/65/ play with the product. EU). It does not contain • If the product’s door harmful and prohibited comprises a lock, keep the...
-
Page 56: Your Freezer
2. Your Freezer Freezer compartment Vegetable bins Cooler compartment Adjustable stands Frozen food storing compart- Butter-cheese compartment ments Glass shelves Freezer compartment door Cooler compartment door shelves shelves Icematics Minibar accessory Ice storage box Water tank Ice-maker decorative lid Bottle shelf *Optional Odour filter Zero degree compartment... -
Page 57: Your Freezer
2. Your Freezer Figures in this user manual are schematic and may not match the product exactly. If the subject parts are not included in the product you have purchased, then those parts are valid for other models. -
Page 58: Installation
3. Installation To attach the wedges, remove the screws on the product and use the screws provided with 3.1 Right place for installation the wedges. Contact the Authorized Service for the product's installation. To ready the product for installation, see the information in the user guide and make sure the electric and water utilities are as required. -
Page 59: Power Connection
adjusting nut fixing nut fixing nut adjusting nut 3.4 Power connection In order to adjust the doors vertically, •Loosen the fixing nut at the bottom WARNING: Do not •Screw adjusting nut (CW/CCW) use extension or multi according to the position of the door sockets in power •Tighten the fixing nut for the final connection. -
Page 60: Water Connection
• Connect the refrigerator to an earthed socket with 220- 240V/50 Hz voltage. The plug must comprise a 10-16A fuse. • Do not use multi-group plug with or without extension cable between the wall socket and the refrigerator. 3.5 Water connection (Optional) WARNING: Unplug the... -
Page 61: Connecting Water Hose To The Product
Connector (1 piece): Used to attach the water hose to the rear of the product. Hose clip (3 pieces): Used to fix the water hose on the wall. Water hose (1 piece, 5 meter diameter 1/4 inches): Used for the water connection. Faucet adapter (1 piece): Comprises a porous filter, used for connection to the... -
Page 62: For Products Using Water Carboy
not available or if you are unsure, Attach the connector into the consult a qualified plumber. faucet adaptor and tighten by Detach the connector (1) from hand / tool. the faucet adaptor (2). To avoid damaging, shifting Connect the faucet adaptor to or accidentally disconnecting the water mains valve. -
Page 63: Water Filter
Connect one end of the water Once the connection is estab- hose provided with the pump lished, plug in and start the to the product (see 3.6) and water pump. follow the instructions below. Please wait 2-3 minutes after starting the pump to achieve the desired efficiency. - Page 64 Connector (1 piece): Used to Attach the water hose exten- attach the water hose to the ding from the top of the filter rear of the product. to the product’s water connec- Faucet adapter (1 piece): Used tion adaptor, (see 3.6.) for connection to the cold wa- ter mains.
-
Page 65: Internal Filter
3.9.2.Internal filter “Ice Off” indicator must be active while installing the fil- The internal filter provided with ter. Switch the ON-OFF indica- the product is not installed tor using the “Ice” button on upon delivery; please follow the the screen. instructions below to install the filter. - Page 66 Remove the water filter by- pass cover by pulling. A few drops of water may flow out after removing the cover; this is normal. Place the water filter cover into the mechanism and push to lock in place. Push the “Ice” button on the screen again to cancel the “Ice Off”...
-
Page 67: Preparation
4. Preparation • Food contact with the temperature sensor in the freezer compartment may 4.1 What to do for increase energy consumption of energy saving the appliance. Thus any contact with the sensor(s) must be Connecting the product avoided. to electric energy saving •... - Page 68 It is normal for the front edges of the refrigerator to be warm. These areas are designed to warm up in order to prevent condensation. In some models, the instrument panel automatically turns off 5 minutes after the door has closed.
-
Page 69: Operating The Product
5. Operating the product 5.1 Indicator panel Indicator panels may vary depending on the model of your product. Audial and visual functions of the indicator panel will assist in using the refrigerator. Cooler compartment indicator Error status indicator Temperature indicator Vacation function button Temperature adjustment but- Compartment selection but-... - Page 70 1. Cooler compartment indicator 6. Compartment selection button The cooler compartment light will Use the refrigerator compartment turn on when adjusting the cooler selection button to toggle compartment temperature. between the cooler and freezer compartments. 2. Error status indicator 7. Cooler compartment indicator This sensor will activate if the refrigerator is not cooling The freezer compartment light will...
-
Page 71: Indicator Panel
5.2 Indicator panel Indicator panels may vary depending on the model of your product. Audial and visual functions of the indicator panel will assist in using the refrigerator. Economic use High temperature / fault alert Energy saving function (disp- *opsiyonel lay off) Rapid cooling Vacation function... - Page 72 4. Rapid cooling 1. Economic use When the rapid cooling function is This sign will light up when the turned on, the rapid cool indicator freezer compartment is set to -18°C' , will light up ( ) and the cooler the most economical setting.
- Page 73 activate. Activating the energy-saving The indicator will light up after 6 function will turn off all other signs hours when the eco-fuzzy function is on the display. When the energy- active. saving function is active, pressing 10. Freezer compartment any button or opening the door temperature setting will deactivate the energy-saving The temperature in the freezer...
-
Page 74: Indicator Panel
5.3 Indicator panel Indicator panels may vary depending on the model of your product. Audial and visual functions of the indicator panel will assist in using the refrigerator. *opsiyonel 11.2 11.1 Freezer compartment tempe- rature setting Economy mode Energy saving function (disp- lay off) Power failure/High tempera- ture / error warning indicator... - Page 75 the digital display. After checking 1. Freezer compartment the food located in the freezer temperature setting compartment press the alarm off Pressing the button ( ) will button to clear the warning. enable the freezer compartment temperature to be set at -18,-19,-20,- 5.
- Page 76 refrigerator's filter must be 11.2 Alarm off warning replaced every 6 months. If you In case of power failure/high follow the instructions in the temperature alarm, after checking section 5.2, the refrigerator the food located in the freezer will automatically calculate the compartment press the alarm off remaining period and the filter button to clear the warning.
-
Page 77: Humidity Controlled Crisper
5.4 Humidity controlled crisper Do not place together the pear, apricot, peach, etc. and apple in (FreSHelf) particular which have a high level (This feature is optional) of generation of ethylene gas in Humidity rates of the vegetables the same crisper with the other and fruit are kept under control vegetables and fruit. -
Page 78: Activating Water Filter Change Warning
5.5 Activating water filter change warning (For products connected to the mains water line and equipped with filter) Water filter change warning is activated as follows: Automatic filter usage time calculation is not enabled ex factory. It must be enabled in products equipped with a filter. The S4 display board we use in the refrigerator has a nine-key system. - Page 79 Press twice Press once “Upon seeing PS 0 screen, de-energise the refrigerator and energise it again. This way, the filter counter will be activated. The filter warning LED will be active on the display in 130 days. After replacing the filter with a new one, press the Key Lock button for 3 seconds to make the filter counter to count down from 130 days.
-
Page 80: Using The Water Fountain
5.6 Using the water fountain Use the display to select the water option, then pull the trigger to get (for certain models) water. Remove the glass shortly after pulling the trigger. The first few glasses of water taken from the 5.7 Filling the fountain fountain will normally be water tank... -
Page 81: Cleaning The Water Tank
5.8 Cleaning the water tank Remove the water filling reservoir inside the door shelf. Detach by holding both sides of the door shelf. Hold both sides of the water tank and remove at 45° angle. Remove and clean the water tank lid. -
Page 82: Taking Ice / Water
5.9 Taking ice / water WARNING: product’s water system (Optional) should be connected To take water ( ) / ice cube ( to cold water line only. ) / fragmented ice ( ), use the Do not connect to hot display to select the respective water line. -
Page 83: Drip Tray
• 5.11 Zero degree compartment If the water fountain is not used for a long time, the first 1-2 (Optional) glasses of water received may Use this compartment to be warm. keep delicatessen at lower temperatures or meat products 5.10 Drip tray for immediate consumption. -
Page 84: Ionizer
5.14 Ionizer 5.17 Icematic and ice storage box Optional) The ionizer system in the cooler (Optional) compartment's air duct serves Fill the icematic with water and put to ionize the air. The negative ion in place. The ice will be ready after emissions will eliminate bacteria approximately two hours. -
Page 85: Ice-Maker
5.18 Ice-maker If you have difficulty in refitting the reservoir, turn the rotary gear 90° (Optional) and reinstall it as shown in the Ice maker is located on the upper figure3. section of the freezer cover. Any sound you hear when the ice Hold the handles on the sides of drops into the reservoir is a part of the ice stock reservoir and move... - Page 86 When ice does not come out, check If you close the door hard, it may for any ice stuck in the canal and cause water spilling over the ice remove it. Regularly check the ice stock reservoir. canal to clear the obstacles as Do not dismount the ice stock shown in the figure 5.
-
Page 87: Freezing Fresh Food
5.19 Freezing fresh food 5.20 Deep freezer details • To preserve food quality, the As per the IEC 62552 standards, food items placed in the freezer the freezer must have the capacity compartment must be frozen to freeze 4,5 kg of food items at as quickly as possible, use the -18°C or lower temperatures in 24 rapid freezing for this. -
Page 88: Placing The Food
Freezer Cooler Compartment Compartment Descriptions Setting Setting This is the default, recommended -18°C 4°C setting. These settings are recommended -20,-22 or 4°C for ambient temperatures exceeding -24°C 30°C. Use this to freeze food items in a short time, the product will reset to Rapid Freeze 4°C previous settings when the process... -
Page 89: Door Open Alert
5.22 Door open alert (Optional) An audible alert will be heard if the product's door remains open for 1 minute. The audible alert will stop when the door is closed or any button on the display (if available) is pressed. 5.23 Interior light Interior light uses a LED type lamp. -
Page 90: Maintenance And Cleaning
6. Maintenance clean the outer surfaces and chromium coated parts of and cleaning the product. Chlorine causes corrosion on such metal Service life of the product extends surfaces and frequently faced problems decrease if cleaned at regular 6.1 Avoiding bad odors intervals. -
Page 91: Troubleshooting
7. Troubleshooting The product will restart after approximately 6 minutes. If the Check this list before contacting product does not restart after the service. Doing so will save you this period, contact the service. time and money. This list includes •... - Page 92 • • Large quantities of hot food may The cooler compartment have been recently placed into temperature is set to a very the product. >>> Do not place low degree. >>> Set the freezer hot food into the product. compartment temperature to a •...
- Page 93 • • Any items placed on the product The foods were placed in may cause noise. >>> Remove unsealed holders. >>> Keep the any items placed on the product. foods in sealed holders. Micro- organisms may spread out of The product is making noise of unsealed food items and cause liquid flowing, spraying etc.
- Page 94 Notes ......................................................................................................................................................................................................................................................................................................................................................................................................................................................................................................................................................................................................................................................................................................................................................................................................................................................................................................................................................................................................................................................................................................................................................................................................................................................................................................
- Page 95 Notes ......................................................................................................................................................................................................................................................................................................................................................................................................................................................................................................................................................................................................................................................................................................................................................................................................................................................................................................................................................................................................................................................................................................................................................................................................................................................................................................
- Page 96 57 5225 0000/AL TR-EN www.grundig.com...
Need help?
Do you have a question about the GSND 6282 S and is the answer not in the manual?
Questions and answers