
Subscribe to Our Youtube Channel
Related Manuals for Hach AutoCAT 9000


Summary of Contents for Hach AutoCAT 9000
- Page 1 50081-18 Chlorine Amperometric Titrator © Hach Company, 2002–2003, 2007. All rights reserved. Printed in the USA. pks 4/07 3ed...
- Page 2 50081_TTL.fm...
-
Page 3: Table Of Contents
Table of Contents Safety Information ..............................5 Specifications ................................7 Section 1 Introduction ..........................9 1.1 General Information............................9 1.2 Instrument Startup Summary ..........................9 1.3 Unpacking .................................10 1.4 User Access Levels ............................11 Section 2 Instrument Assembly ......................13 2.2 Instrument Assembly ............................15 2.2.1 Attaching the Titrant Bottle Holder ......................15 2.2.2 Connecting the Electrode Head and Accessories..................15 2.2.3 Connecting the Titrant Bottle........................16 2.2.4 Assembling the Burette ...........................17... - Page 4 4.6 Obtaining the Certificate of Analysis for Hach Reagents.................41 Section 5 Collecting and Accessing Data ..................43 5.1 Using the AutoCAT 9000 for Amperometric Methods ..................43 5.2 AutoCAT Titration ............................43 5.2.1 Data Collection ............................43 5.2.1.1 Current Range ........................43 5.2.1.2 Volume Increment ......................44 5.2.1.3 Predose Volume .........................44...
- Page 5 Table of Contents Section 6 Calibration Procedures ......................49 PAO/5.64 mN, Amperometric Forward Titrant Calibration...................51 Iodine, Amperometric Back Titrant Calibration .....................57 Section 7 Sampling ............................63 7.1 Chlorine ................................63 7.2 Container Pretreatment .............................63 7.3 Handling................................63 7.4 Samples for Back Titration ..........................63 Section 8 Titration Procedures ......................65 Chlorine Dioxide...
- Page 6 1.5 Order of Reagent Addition ..........................151 Appendix B Printer Installation and Setup ..................153 Appendix C Replacement Parts & Accessories ................157 Appendix D Low Level Standards & Testing .................159 Appendix E AutoCAT 9000 Validation Study ................161 General Information ............................167 Certification ................................169 How To Order ..............................171...
-
Page 7: Safety Information
Safety Information Please read this entire manual before unpacking, setting up, or operating this instrument. Pay particular attention to all danger and caution statements. Failure to do so could result in serious injury to the operator or damage to the equipment. To ensure that the protection provided by this equipment is not impaired, do not use or install this equipment in any manner other than that which is specified in this manual. - Page 8 Page 6 50081_Safety.fm...
-
Page 9: Specifications
Specifications Specifications are subject to change without notice. Methods Titration methods 7 embedded methods Titration stops Automatic and manual titration termination Titrant addition technique Incremental Titrant calibration 4 embedded procedures Back titration with manual reductant addition Measuring Ranges Current ranges 2 µA, 20 µA, 200 µA, 1 mAmp Temperature range –10 to +100 °C (14 to 212 °F) - Page 10 Specifications Burette Embedded burette stand Burette volume 5- or 10-mL ISO/FDIS 8655-3 compliant Burette step motor 18,000 steps UV-protected encapsulated glass syringe Embedded operating procedures Burette exchange, air bubble removal (Flush), Rinse, Fill, and Empty functions Inputs/Outputs Electrode input Temperature input Serial connections for printer/PC PS/2 port for PC keyboard Language Options...
-
Page 11: Introduction
Section 1 Introduction 1.1 General Information The AutoCAT 9000™ is an automated chlorine amperometric end point titration instrument. Its biamperometric system uses a dual platinum electrode (DPE) probe. Hach offers amperometric methods for determining total chlorine*, free chlorine, sulfite, and chlorine dioxide in water. The chlorine dioxide procedure also provides a measurement of chlorite concentration. -
Page 12: Unpacking
Not shown 14909-32 Buffer, pH 4, 100-mL MDB Not shown 21553-32 Buffer, pH 7, 100-mL MDB Not shown 50081-18 User manual If any items are missing or damaged, please contact Hach Company or your sales representative immediately. Page 10 50081_Introduction.fm... -
Page 13: User Access Levels
1.4 User Access Levels The AutoCAT offers two user access levels: Supervisor allows users to edit titration and analysis parameters to fit specific needs. A Supervisor-level user can also assign a password to protect the data and customized settings from inadvertent changes. Routine allows users to access only the routine functions when performing the embedded analyses. - Page 14 Page 12 50081_Introduction.fm...
-
Page 15: Instrument Assembly
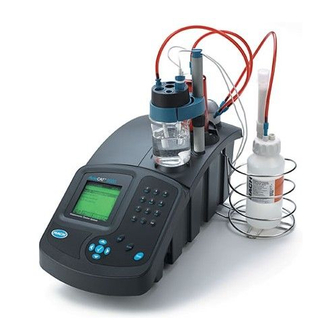
Section 2 Instrument Assembly 2.1 Operating Environment Maintain an ambient temperature of 5–40 °C (40–104 °F) for proper instrument operation. The relative humidity should be between 20 and 80%; do not allow moisture to condense on the instrument. Note: Retain the original packaging material. Instruments returned for service should be shipped in the original packaging material to protect against damage during transportation. - Page 16 Operating Environment Figure 2 Assembled AutoCAT 9000 Legend Number Item Name Number Item Name Magnetic Stir Bar Titrant Pick-up Tubing Connection 250-mL Beaker Desiccant Column Plastic Anti-diffusion Tip Electrode (BNC Connector) Temperature Sensor Temperature Sensor (CINCH Connector) Dual Platinum Electrode...
-
Page 17: Instrument Assembly
Operating Environment Instrument Assembly Perform the assembly procedures in this section and then complete the steps in Section 3 on page 23 to enter basic user information in preparation for performing analyses to comply with Good Laboratory Practices (GLP). Refer to Section 4 on page 33 for the software setup required prior to performing analyses. -
Page 18: Connecting The Titrant Bottle
Note: The provided stir bar has been specifically selected for use with the AutoCAT 9000. A different stir bar may spin erratically and produce unwanted turbulence and added noise in the titration curve. 2.2.3 Connecting the Titrant Bottle 1. -
Page 19: Assembling The Burette
Operating Environment 4. Push the long section of exposed titrant pick-up tubing through the remaining connection point on the bottle stopper and into the titrant bottle. Thread the tubing connector into the bottle stopper. 5. Thread the opposite connector into the corresponding receptacle on the rotating valve. -
Page 20: Connecting The Temperature Sensor
Operating Environment 3. Place the burette on the burette stand in position A then slide the burette from position A to position B. Note: Inspect the alignment of the piston with the plunger shaft. Ensure that they are properly engaged as displayed in the illustration to the right. -
Page 21: Installing The Electrode
A UL/CSA-approved 125-V ac power cord (Cat. No. 18010-00) is supplied with the North American AutoCAT 9000 models. To power North American AutoCAT 9000 models with 230 V ac, replace the supplied 125-V ac power cord with a UL/CSA approved 230-V ac power cord. See section Section 3.3.6 Selecting the ac Power Frequency on page 28 for configuration settings. -
Page 22: Serial Printer And Pc Connections
(Cat. No. A95P201). The cable provides a direct connection between the AutoCAT 9000 Workstation and the 9-pin “D” connector used for the serial port found on most personal computers. If your computer has a 25-pin D connector, use a 9-pin to 25-pin adapter (available at many computer supply stores). -
Page 23: Operation
Operation Operation DANGER Handling chemical samples, standards, and reagents can be dangerous. Review the necessary Material Safety Data Sheets and become familiar with all safety procedures before handling any chemicals. DANGER La manipulation des échantillons chimiques, étalons et réactifs peut être dangereuse. Lire les Fiches de Données de Sécurité... - Page 24 Page 22 50081_OperationStop.fm...
-
Page 25: Basic Operation
Section 3 Basic Operation 3.1 Instrument Display and Keypad The instrument display and keypad form an interactive user interface for the AutoCAT 9000 allowing the user to view data, select options, and enter commands. Individual screens define certain keystrokes at the bottom of the display. The horizontal scroll bar indicates the relative status of the page being displayed. -
Page 26: Autocat Main Menus
STOP or exit an embedded method. If an analysis is interrupted, the AutoCAT 9000 will prompt the user to resume or end the analysis. All data for the analysis will be lost if it is ended prior to completion. -
Page 27: Titrants Menu
Basic Operation • Method library—(available in Supervisor Mode) contains all of the adjustable method parameters. Those with supervisor access can edit, reset, and delete method parameters to suit specific needs. • GLP-Archives—provides access to the Good Laboratory Practice (GLP) tables, the stored method analysis results, and global variables. -
Page 28: Daily Start-Up
Basic Operation 3.2.3.2 Daily Start-up Even though the delivery tube has an anti-diffusion tip, titrant in the delivery line can be slightly diluted or contaminated when electrodes are in storage solution (tap water, or water with weak bleach solution). Bubbles may form due to titrant outgassing. Diluted titrant and air bubbles can be purged with a manual empty/fill cycle prior to first run on a daily basis, or after a lengthy idle period. -
Page 29: Cell Menu
3. Press the to confirm. CHECK MARK Note:If already operating in Supervisor mode, the AutoCAT 9000 will not request the supervisor code to access the Setup menu. 4. Select the Configuration Menu and proceed to Section 3.3.2. 3.3.2 Setting a User ID Select whether or not a User ID will be required: 1. -
Page 30: Set The Time
Basic Operation 3.3.4 Set the Time 1. Highlight Time. 2. Press the to confirm the selection. CHECK MARK 3. Input the hour (00 to 23). Press the key to scroll to minutes. RIGHT 4. Input the minutes (00 to 59). Press the key to scroll to seconds. -
Page 31: Printer Status
Basic Operation 3.3.7 Printer Status See Printer Installation and Setup on page 153 for the printer installation procedure. 1. Select the printer status using the key to highlight Printer. DOWN Press the to confirm the selection. CHECK MARK 2. Press the key. -
Page 32: Customizing The Station
4. Select Confirm. The Methods menu will be displayed. 3.4 Edition Mode The AutoCAT 9000 edition feature allows the user to multi-task by viewing/editing parameters during embedded procedure timer and data collection periods. This can only be accessed during data collection, timers, and on screens where Esc is not defined. -
Page 33: Using Sub-Id's
3.5 Using Sub-ID's The AutoCAT 9000 allows the user to store optimized parameters for up to three Sub-IDs for each method. The user can create these Sub-IDs with parameters optimized for a specific point of the process they need to monitor. - Page 34 Basic Operation Basic Operation Page 32 50081_Operation.fm...
-
Page 35: Software Setup
Section 4 Software Setup The AutoCAT 9000 requires both assembly and software setup before any calibration or titration analyses may be performed. The software setup labels the installed hardware/titrant for use with the embedded procedures. In this section the supervisor-level user will perform, in order, the following setup tasks: 1. -
Page 36: Software Setup For Electrode And Temperature Sensor Installation
Software Setup Press the Highlight Supervisor. Press to select The AutoCAT is now CHECK MARK to change the Confirm Mode. operating in Supervisor Press the CHECK MARK Return In Mode. mode. The Methods menu validate. will be displayed. Proceed to Software Setup for Electrode and Temperature Sensor Installation. -
Page 37: Software Setup For Disconnecting Or Replacing Electrodes
Software Setup Press to select confirm Highlight S/N. Use the alphanumeric Press to select and proceed to temperature keypad to input the last Confirm and complete the Press the CHECK MARK sensor installation. 10 digits of the sensor serial installation and return to the input or change. -
Page 38: Software Setup For Burette Installation
Software Setup 4.3 Software Setup for Burette Installation Use navigation keys to Press to select Press to select The burette will tab to the Titrants menu. automatically move to the Burette Functions. Install Burette. install position. Highlight Highlight the desired Highlight S/N. -
Page 39: Software Setup For Removing Or Replacing The Burette
Software Setup Verify the burette Install the burette if not The burette will Press Esc to return to information. already installed. See automatically reposition the Titrants menu. Proceed Section 2.2.4 Assembling after the install. to Section 4.4 on page 38. Press to confirm. -
Page 40: Software Setup For Titrant Installation
Software Setup 4.4 Software Setup for Titrant Installation From the Titrants menu, Press to select Highlight Lot no. Use the alphanumeric press to select Install Titrants Setup. keypad to input or change Press the CHECK MARK Titrants. the titrant lot number— input or change. -
Page 41: Software Setup For Switching Or Replacing Titrants
Software Setup Connect the tubing and The burette will The titrant has been install the titrant bottle if it complete several cycles to successfully installed. is not already installed. See purge air bubbles in the Discard the waste titrant and Section 2.2.3 Connecting system. -
Page 42: Setting Titrant Concentration
CHECK MARK Titrant Conc. view the list of available to validate. CHECK MARK titrants for the chosen Note: The AutoCAT 9000 procedure. automatically stores installed titrants for later concentration Note: 5.64 mN is equivalent to updates or calibrations. 0.00564 N. -
Page 43: Obtaining The Certificate Of Analysis For Hach Reagents
Hach titrant or standard solution. 1. Go to www.hach.com. 2. Click on “Information Central”. 3. Click on “Certificate of Analysis Download”. The Catalog Number and Lot Number, located on the label of your Hach reagent bottle, will be requested. Software Setup Page 41... - Page 44 Page 42 50081_SoftwareSetup.fm...
-
Page 45: Collecting And Accessing Data
Current Range allows the user to set the maximum current (in µA) expected for a particular titration. The AutoCAT 9000 allows four possible settings (2 µA, 20 µA, 200 µA, and 1 mA) for the current range. The default setting (20 µA) setting is adequate for most purposes. -
Page 46: Volume Increment
Collecting and Accessing Data 5.2.1.2 Volume Increment The AutoCAT 9000 delivers titrant to the sample solution in discrete volume increments. During data collection, the AutoCAT 9000 injects one volume increment of titrant solution into the sample once every 3 seconds. The volume increment is an adjustable parameter that controls the volume (mL) of titrant dispensed for each addition. -
Page 47: Manual End Point Determination (Mepd)
Manual End Point Determination can be found on page 135. 5.2.2.2 Automatic End Point Determination (AEPD) AEPD allows the AutoCAT 9000 to search for a pair of intersecting lines that best fit the titration curve. The end point is determined from the intersection of the two best-fit lines. -
Page 48: Dilution
PAO or sodium thiosulfate) solution. Reductant concentration is the concentration (mN) of the solution used to fix the sample. The exact concentration of a Hach reductant solution can be obtained. See Obtaining the Certificate of Analysis for Hach Reagents on page 41. -
Page 49: Calculation Of Mean
Collecting and Accessing Data 5.2.4.1 Calculation of Mean The mean is calculated using the following equation: ∑ Mean ---------------- - Where: is the result from the i replicate measurement (i.e., Test) N is the number of replicate measurements. 5.2.4.2 Calculation of Standard Deviation (<5 replicate analyses) When the number of replicate measurements is between 2 and 5, the standard deviation of the mean, S is estimated using the following formula:... -
Page 50: Retrieving Analysis Results From Archives
(higher number) position in the archive. The AutoCAT 9000 can archive the results from 200 individual analyses; if more than 200 results are archived, the oldest analysis result is displaced in favor of the most recent result. -
Page 51: Calibration Procedures
Section 6 Calibration Procedures Calibration Procedures Page 49 50081_CalibrationStopper.fm... - Page 52 Page 50 50081_CalibrationStopper.fm...
-
Page 53: Pao/5.64 Mn, Amperometric Forward Titrant Calibration
• Hach buffer reagents for chlorine titrations are highly recommended for this analysis. • Download the “Certificate of Analysis” (COA) to obtain the exact concentration of any unopened bottle of Hach titrant or standard solution. See Obtaining the Certificate of Analysis for Hach Reagents on page 41. - Page 54 PAO/5.64 mN AutoCAT Calibration Method PAO/5.64 mN Titrant Turn the instrument on Highlight ID. Highlight Press to select if necessary and access the PAO 5.64mN. Press the Edit titrant. CHECK MARK Titrants menu. to change. Press the CHECK MARK Press to select Titrant to validate.
- Page 55 PAO/5.64 mN Press to select. Press the Highlight Highlight Lot No. CHECK MARK to change the User or press Concentration. Run calibration to start the Press the CHECK MARK to confirm. calibration sequence. Press the change the titrant lot number CHECK MARK change the concentration or or proceed to step 13.
- Page 56 PAO/5.64 mN The calibration titration The Start Timer will The Zoom range Select two line starts by filling the burette begin. determination window will segments, one on each side with titrant and display the titration curve. of the titration end point, by This allows the electrode to subsequently dispensing a positioning cursors at the...
- Page 57 (NaThio), are standardized by titrating them against a know volume of 0.0282 N Iodine Standard Solution. The PAO/NaThio calibration procedure embedded in the AutoCAT 9000 is adapted from procedure 4500-Cl C. a. in “Standard Methods for Examination of Water and Wastewater“(20th Edition).
- Page 58 Contact the HACH office or distributor serving you. Telephone: (970) 669-3050 FAX: (970) 669-2932 On the Worldwide Web – www.hach.com ; E-mail – techhelp@hach.com © Hach Company, 2002–2003, 2007. All rights reserved. Printed in the U.S.A. 3/07 3ed Page 56 50081_PAONaThioCalibration.fm...
-
Page 59: Iodine, Amperometric Back Titrant Calibration
• Rinse the electrode, temperature probe, and anti-diffusion tip with deionized water before every calibration. Reagent Tips and Techniques • Download the “Certificate of Analysis” (COA) to obtain the exact concentration of any unopened bottle of Hach titrant or standard solution. See Obtaining the Certificate of Analysis for Hach Reagents on page 41. - Page 60 Iodine AutoCAT Calibration Method Iodine Titrant Calibration Turn the instrument on Highlight ID. Highlight Iodine Press to select if necessary and access the 28.2mN. Edit Titrant. Press the CHECK MARK Titrants menu. to change. Press the CHECK MARK Press to select to validate.
- Page 61 Iodine Press to select.Run Press the Highlight Highlight Lot No. CHECK MARK Calibration to start the to change the User. Concentration. Press the CHECK MARK embedded calibration Press to confirm. Press the change the titrant lot number CHECK MARK sequence. change the concentration or or proceed to step 13.
- Page 62 Iodine The calibration titration The Start Timer will The Zoom Range Select two line starts by filling the burette begin to allow the electrode Determination window will segments, one on each side with titrant and to stabilize before data is display the titration curve.
- Page 63 Summary of Method The 0.0282 N Iodine solution is standardized by titrating it against 0.1000 N Arsenite Standard Solution. The Iodine calibration procedure embedded in the AutoCAT 9000 is adapted from procedure 4500-Cl C. g. in “Standard Methods for Examination of Water and Wastewater”...
- Page 64 Contact the HACH office or distributor serving you. Telephone: (970) 669-3050 FAX: (970) 669-2932 On the Worldwide Web – www.hach.com ; E-mail – techhelp@hach.com © Hach Company, 2002–2003, 2007. All rights reserved. Printed in the U.S.A. 3/07 3ed Page 62 50081_IodineCalibration.fm...
-
Page 65: Sampling
Section 7 Sampling 7.1 Chlorine A common source of error when testing water samples for chlorine is the failure to obtain a representative sample. Free chlorine is a strong oxidizing agent and is very unstable in natural waters. It reacts readily with certain inorganic compounds and oxidizes organic compounds more slowly. - Page 66 Page 64 50081_Sampling.fm...
-
Page 67: Titration Procedures
Section 8 Titration Procedures Titration Procedures Page 65 50081_ProcedureStopper.fm... - Page 68 Page 66 50081_ProcedureStopper.fm...
-
Page 69: Chlorine Dioxide
Each test is given a different number, all of which are listed under the same Sample ID. When starting a new sample, a new ID is assigned. • The AutoCAT 9000 can accommodate any sample size. The default volume for this method is 5.0 mL and can be adjusted to expand the test range. - Page 70 Container Pretreatment on page 63. Dilute the sample to Place the sample onto Verify User. Highlight Sample ID. approximately 200-mL with the AutoCAT 9000 stirrer Press the Press the CHECK MARK CHECK MARK Organic Free water. platform. enter a new user or press enter a new sample ID or confirm.
- Page 71 Chlorine Dioxide Generator Yield Highlight Predilution Add 1 dose of pH 7.0 Use the measuring The timer will start, volume. Phosphate Buffer. spoon to add 1.0 g of allowing the reagents to mix potassium iodide (KI). before starting the titration. Press the Press the CHECK MARK...
- Page 72 Chlorine Dioxide Generator Yield Lower the electrode The analysis parameters The Start Timer The Zoom Range head onto the beaker rim. that have been stored for the will start to allow the Determination window will current Sub-ID may be electrode to stabilize before display the titration curve.
- Page 73 Note: For more information on modes. The results are not manual EP determination, see stored until accepted. page 135. Note: The AutoCAT 9000 stores all titration results and then automatically calculates each analyte value after the procedure is complete. Chlorine Dioxide Generator Yield Page 71 50081_ChlorineDioxideGeneratorYield.fm...
- Page 74 Chlorine Dioxide Generator Yield AutoCAT Titration Method Yield Tiration 2 Raise the electrode The timer will start. Remove the sample The analysis parameters head. from the dark and carefully that have been stored for the This timer allows a 5-minute place onto the AutoCAT current Sub-ID may be Add 2.0 mL of...
- Page 75 Chlorine Dioxide Generator Yield The Start Timer will The Zoom Range Select the type of end Using the navigation begin, allowing the Determination window will point determination. keys, select two line electrode to stabilize before display the titration curve. segments, one on each side Press for Manual.
- Page 76 Chlorine Dioxide Generator Yield AutoCAT Titration Method Yield Titration 3 Press the Transfer 200 mL of Insert the purge tube Use a needle valve CHECK MARK to enter a new volume. organic-free DI water to a and dispersion tip into the to adjust the flow of Gas Washing Bottle (GWB).
- Page 77 Chlorine Dioxide Generator Yield The analysis parameters The Start Timer will The Zoom range Select type of end point that have been stored for the begin, allowing the determination window will determination. current Sub-ID may be electrode to stabilize before display the titration curve.
- Page 78 Chlorine Dioxide Generator Yield Use the navigation Press the CHECK MARK buttons to select two line to accept the analysis and segments, one on each side proceed to Titration 4. of the titration end point, by Press to return to the positioning the cursors at previous window to adjust the beginning and end of...
- Page 79 Chlorine Dioxide Generator Yield AutoCAT Titration Method Yield Titration 4 Raise the electrode The timer will start. Remove the sample The analysis parameters head. from the dark and place that have been stored for the This timer allows a 5-minute onto the AutoCAT titration current Sub-ID may be Add 2.0 mL of...
- Page 80 Chlorine Dioxide Generator Yield The Start Timer will The Zoom Range Select type of end point Use the navigation begin, allowing the Determination window will determination. buttons to select two line electrode to stabilize before display the titration curve. segments, one on each side Press for Manual.
- Page 81 – → Titration 4 The AutoCAT 9000 stores all titration results and, after completion, calculates each analyte value. This method can be greatly accelerated by purging a sample portion (used for Titrations 3 and 4) with nitrogen while performing Titrations 1 and 2.
- Page 82 Contact the HACH office or distributor serving you. Telephone: (970) 669-3050 FAX: (970) 669-2932 On the Worldwide Web – www.hach.com ; E-mail – techhelp@hach.com © Hach Company, 2002–2003, 2007. All rights reserved. Printed in the U.S.A. 3/07 3ed Page 80 50081_ChlorineDioxideGeneratorYield.fm...
-
Page 83: Chlorine Dioxide, Amperometric Forward Titration
• Rinse the electrode, temperature probe, and anti-diffusion tip with deionized water before every titration. Reagent Tips and Techniques • Download the “Certificate of Analysis” (COA) to obtain the exact concentration of any unopened bottle of Hach titrant or standard solution. See Obtaining the Certificate of Analysis for Hach Reagents on page 41. - Page 84 Container Pretreatment on page 63. Place the sample onto Verify User. Highlight Sample ID. Highlight Volume for the AutoCAT 9000 stirrer Test 1. Press the Press the CHECK MARK CHECK MARK platform. enter a new user or press...
- Page 85 Chlorine Dioxide Add 1.0 mL of pH 7.0 Use the measuring The timer will start. Lower the electrode Phosphate Buffer Solution. spoon to add 1.0 g of head onto the beaker rim. This allows a short period of potassium iodide (KI). Press the time for the reagents to mix Press the...
- Page 86 The results are not (cursors) at the beginning segments and reanalyze the stored until accepted. and end of each segment. data. Note: The AutoCAT 9000 Press the stores all titration results and CHECK MARK confirm changes or press then automatically calculates...
- Page 87 Chlorine Dioxide AutoCAT Titration Method Chlorine Dioxide Titr. 2 Raise the electrode The timer will start. Remove the sample The analysis parameters head. from the dark and carefully that have been stored for the This timer allows a 5-minute place onto the AutoCAT current Sub-ID may be Add 2.0 mL of reaction period before...
- Page 88 Chlorine Dioxide The Start Timer will The Zoom Range Select the type of end Using the navigation begin to allow the electrode Determination window will point determination. keys, select two line to stabilize before data is display the titration curve. segments, one on each side Press for Manual.
- Page 89 Chlorine Dioxide AutoCAT Titration Method Chlorine Dioxide Titr. 3 Press the Pipet 200 mL sample Insert the purge tube Use a needle valve CHECK MARK to enter a new volume. into a Gas Washing Bottle and dispersion tip into the to adjust the flow of (GWB).
- Page 90 Chlorine Dioxide The analysis parameters The Start Timer will The Zoom range Select type of end point that have been stored for the begin to allow the electrode determination window will determination. current Sub-ID may be to stabilize before data is display the titration curve.
- Page 91 Chlorine Dioxide Use the navigation Press the CHECK MARK buttons to select two line to accept the analysis and segments, one on each side proceed to Titr. 4. of the titration end point, by Press to return to the positioning the cursors at previous window to adjust the beginning and end of the linear segments and...
- Page 92 AutoCAT Titration Method Chlorine Dioxide Titr. 4 Raise the electrode The timer will start. Remove the sample The analysis parameters head. from the dark and place that have been stored for the This timer allows a onto the AutoCAT titration current Sub-ID may be Add 2.0 mL of 5-minute reaction period...
- Page 93 Chlorine Dioxide The Start Timer will The Zoom Range Select type of end point Use the navigation begin. Determination window will determination. buttons to select two line display the titration curve. segments, one on each side This allows the electrode to Press for Manual.
- Page 94 – → Titration 4 The AutoCAT 9000 stores all titration results and, after completion, calculates each analyte value. This method can be greatly accelerated by purging a sample portion (used for Titrations 3 and 4) with nitrogen while performing titrations 1 and 2.
-
Page 95: Free Chlorine, Amperometric Forward Titration
• Rinse the electrode, temperature probe, and anti-diffusion tip with deionized water before every titration. Reagent Tips and Techniques • Download the “Certificate of Analysis” (COA) to obtain the exact concentration of any unopened bottle of Hach titrant or standard solution. See Obtaining the Certificate of Analysis for Hach Reagents on page 41. - Page 96 Note: Use only the provided stir bar to minimize loss of chlorine. Place the sample onto Verify User. Highlight Sample ID. Highlight the AutoCAT 9000 stirrer Press the Press the Volume for Test 1. CHECK MARK CHECK MARK platform. enter a new user or press...
- Page 97 Free Chlorine Add 1.0 mL of pH 7.0 The timer will start and Lower the electrode The analysis parameters Phosphate Buffer Solution. the reagents will mix for a head onto the beaker rim. that have been stored for the short period before titration current Sub-ID may be Press the Press the...
- Page 98 Free Chlorine The Start Timer will The Zoom Range Select the type of end Use the navigation keys start. Determination window will point determination. to select two line segments, display the titration curve. one on each side of the The electrode will stabilize Press CHECK MARK titration end point, at the...
- Page 99 Free Chlorine Press to select New Test to perform a replicate sample. Press to select New Sample to analyze a new sample with a new ID. Press to select End Analysis to return to the Methods menu. Table 1 Recommended Volume Increment Settings for Free Chlorine Estimated Chlorine Conc.
- Page 100 Titration curve end points are not as sharp as those for Total Chlorine. Therefore, the determination of Free Chlorine concentrations below 0.1 mg/L becomes problematic. As a result, the lower limit for the AutoCAT 9000 has been arbitrarily set to 0.1 mg/L for experimental reasons.
-
Page 101: Total Chlorine, Amperometric Back Titration
• Adjust the contrast of the display by accessing the Methods menu and pressing 7 to lighten, and 0 to darken. • A distinction is drawn between running a new test and a new sample on the AutoCAT 9000. Each test is a replicate run of the current or previous sample analysis. - Page 102 Pipet 1.00 mL of Place the sample Verify User. To enter a new sample reductant (0.00564 N PAO onto the AutoCAT 9000 ID, reductant concentration, Press to confirm. or sodium thiosulfate) and stirrer platform. reductant volume, or sample...
- Page 103 Total Chlorine Add 1 SwifTest Add 1.0 mL of pH 4 The timer will start and Lower the electrode dispensation (0.1 g) of acetate buffer. the reagents will mix for a head onto the beaker rim. potassium iodide (KI). short period of time before Press the Press the CHECK MARK...
- Page 104 Total Chlorine Select two line Press the The AutoCAT 9000 will Press the CHECK MARK CHECK MARK segments, one on each side to accept the analysis. run the analysis based on to accept the analysis. or of the titration end point, by...
- Page 105 Total Chlorine Table 1 Recommended Volume Increment Settings for Total Chlorine (Back) Estimated Chlorine Conc. (mg/L) Suggested Volume Increment (mL) <0.10 0.0010* 0.10–0.90 0.0030 0.90–1.00 0.0010 * with pre-dose Note: These recommendations apply to Total Chlorine back titrations, correspond to data collection times typically under 5 minutes, and provide adequate data points on both sides of the titration end point for proper analysis.
- Page 106 Contact the HACH office or distributor serving you. Telephone: (970) 669-3050 FAX: (970) 669-2932 On the Worldwide Web – www.hach.com ; E-mail – techhelp@hach.com © Hach Company, 2002–2003, 2007. All rights reserved. Printed in the U.S.A. 3/07 3ed Page 104 50081_Chlorine_Total_Back.fm...
-
Page 107: Total Chlorine, Amperometric Forward Titration
• Rinse the electrode, temperature probe, and anti-diffusion tip with deionized water before every titration. Reagent Tips and Techniques • Download the “Certificate of Analysis” (COA) to obtain the exact concentration of any unopened bottle of Hach titrant or standard solution. See Obtaining the Certificate of Analysis for Hach Reagents on page 41. - Page 108 Total Chlorine AutoCAT Titration Method Total Cl - Fwd Turn the instrument on Highlight Press to select Measure 200 mL of if necessary and access the Run method. sample solution into a clean Total Cl2 - Fwd and press the Methods menu.
- Page 109 Total Chlorine Add 1 SwifTest Add 1.0 mL of pH 4 The timer will start. Lower the electrode dispensation (0.1 g) of acetate buffer. head onto the beaker rim. The reagents will mix for a potassium iodide (KI). Press the brief period before starting Press the CHECK MARK...
- Page 110 Total Chlorine Use the navigation keys Press the The AutoCAT will run Press the CHECK MARK CHECK MARK to select two line segments, to accept the analysis. the analysis based on the to accept the analysis, or one on each side of the Proceed to step 21.
- Page 111 Total Chlorine Table 1 Recommended Volume Increment Settings for Total Chlorine Estimated Chlorine Conc. (mg/L) Suggested Volume Increment (mL) < 0.010 0.0003 0.010–0.050 0.0010 0.050–0.200 0.0030 0.200–0.400 0.0070 0.400–0.600 0.0110 0.600–0.800 0.0150 0.800–1.000 0.0200 > 1.000 0.0500 Note: These recommendations apply to Total Chlorine forward titrations, correspond to data collection times typically under 5 minutes, and provide adequate data points on both sides of the titration end point for proper analysis.
- Page 112 Contact the HACH office or distributor serving you. Telephone: (970) 669-3050 FAX: (970) 669-2932 On the Worldwide Web – www.hach.com ; E-mail – techhelp@hach.com © Hach Company, 2002–2003, 2007. All rights reserved. Printed in the U.S.A. 3/07 3ed Page 110 50081_Chlorine_Total_Forward.fm...
-
Page 113: Sulfite, Amperometric Back Titration
• Adjust the contrast of the display by accessing the Methods menu and pressing 7 to lighten, and 0 to darken. • A distinction is drawn between running a new test and a new sample on the AutoCAT 9000. Each test is a replicate run of the current or previous sample analysis. - Page 114 CHECK MARK Place the sample onto the proceed to step 8. concentration or proceed to enter a new user. AutoCAT 9000 step 9. Note: This screen will be stirrer platform. skipped if the User ID has been disabled in the Configuration Note: Depending on sulfite menu.
- Page 115 Sulfite Highlight Oxidant vol. Highlight Volume for Add 1 SwifTest Add one dose of pH 7.0 Test 1. dispensation (0.1 g) of Phosphate Buffer. Press the CHECK MARK potassium iodide (KI). enter a new oxidant volume Press to confirm. Press the CHECK MARK (see Table 1), or proceed to Press the...
- Page 116 Sulfite The timer will start and Lower the electrode The analysis parameters The Start Timer will the reagents will mix for a head onto the beaker rim. that have been stored for the begin, allowing the short period of time before current Sub-ID may be electrode to stabilize before Press...
- Page 117 Note: For more information on of the titration curve from the manual EP determination, see analysis. page 135. The AutoCAT 9000 will Press the The analysis for this test Press to select CHECK MARK run the analysis based on to accept the analysis.
- Page 118 Sulfite Oxidant Volume Adjustment Deviations can occur in the sulfite method due to loss of iodine through the iodine demand of the sample. Minimizing the total amount of free iodine to be titrated in the solution can reduce this phenomenon. By increasing the oxidant volume to slightly more than is needed to react with the sulfite, the amount of free titratable iodine will be minimized.
- Page 119 Sulfite Summary of Method 2– This procedure follows method number 4500-SO B in Standard Methods for the Examination of Water and Wastewater. In the amperometric back titration, a measured volume of oxidant (iodine) is added directly to a measured volume of the sample at collection time.
- Page 120 Contact the HACH office or distributor serving you. Telephone: (970) 669-3050 FAX: (970) 669-2932 On the Worldwide Web – www.hach.com ; E-mail – techhelp@hach.com © Hach Company, 2002–2003, 2007. All rights reserved. Printed in the U.S.A. 3/07 3ed Page 118 50081_Sulfite_Back.fm...
-
Page 121: Total Oxidants, "Quick" Two Step Amperometric Titration
• Rinse the electrode, temperature probe, and anti-diffusion tip with deionized water before every titration. Reagent Tips and Techniques • Download the “Certificate of Analysis” (COA) to obtain the exact concentration of any unopened bottle of Hach titrant or standard solution. See Obtaining the Certificate of Analysis for Hach Reagents on page 41. - Page 122 Container Pretreatment on page 63. Place the sample onto Verify User. Highlight Sample ID. Highlight the AutoCAT 9000 stirrer Volume for Test 1. Press the Press the CHECK MARK CHECK MARK platform. enter a new user or press...
- Page 123 Total Oxidants Add 1.0 g of potassium Add 1.0 mL of pH 4 The timer will start. Lower the electrode iodide (KI). acetate buffer. head onto the beaker rim. This allows a short period of Press the Press the time for the reagents to mix Press the CHECK MARK CHECK MARK...
- Page 124 Total Oxidants Use the navigation keys Press the Note: The analysis data may CHECK MARK to select two line segments, to accept the analysis and be analyzed as many times as needed from the Zoom Range one on each side of the proceed to Titration 2, or Determination window, in titration end point, by...
- Page 125 Total Oxidants AutoCAT Titration Method Total Oxidants Titration 2 Raise the electrode The timer will start. Remove the sample The analysis parameters head. from the dark and carefully that have been stored for the This timer allows a 5-minute place onto the AutoCAT current Sub-ID may be Add 2.0 mL of reaction period before...
- Page 126 Total Oxidants The timer will begin, The Zoom Range Select the type of end Using the navigation allowing the electrode to Determination window will point determination. keys, select two line stabilize before data is display the titration curve. segments, one on each side Press for Manual.
- Page 127 Total Oxidants Safety Good safety habits and laboratory techniques should be used throughout the procedure. Consult the Material Safety Data Sheet (MSDS) for information specific to the reagents used in this procedure. Summary of Method This method gives results as “total oxidants”, which includes total chlorine (Cl –...
- Page 128 Contact the HACH office or distributor serving you. Telephone: (970) 669-3050 FAX: (970) 669-2932 On the Worldwide Web – www.hach.com ; E-mail – techhelp@hach.com © Hach Company, 2002–2003, 2007. All rights reserved. Printed in the U.S.A. 3/07 3ed Page 126 50081_TotalOxidants.fm...
-
Page 129: Chlorite, "Quick" Two Step Amperometric Titration
• A distinction is drawn between running a new test and a new sample. Each test is a replicate run of the current or previous sample analysis. The AutoCAT 9000 automatically tracks the results of a series of tests, and automatically calculates the mean and standard deviation for all the results. - Page 130 Chlorite AutoCAT Titration Method Chlorite Titration 1 Turn the instrument on Highlight Chlorite. Press to select Verify User. and access the Run method. Press the Press the CHECK MARK CHECK MARK Methods menu. to validate. This method uses the enter a new user or press 1 to Press to choose 5.64 mN PAO titrant.
- Page 131 Chlorite Use a needle valve to Purge nitrogen gas Transfer the purged Use the measuring adjust the flow of nitrogen through the sample for 15 sample into a 250-mL spoon to add 1.0 g of to provide a steady stream minutes.
- Page 132 Chlorite Select type of end point Use the navigation keys Press the CHECK MARK to select two line segments, to accept the analysis and determination. one on each side of the proceed to Titration 2, or Press for Manual. titration end point, by press to return to the Note: Automatic determination...
- Page 133 Chlorite AutoCAT Titration Method Chlorite Titration 2 Raise the electrode Carefully remove the Remove the sample The analysis parameters head. sample from the stirrer from the dark and carefully that have been stored for the platform and place in the place onto the AutoCAT current Sub-ID may be Add 2.0 mL of...
- Page 134 Chlorite The timer will begin, The Zoom Range Select the type of end Use the navigation keys allowing the electrode to Determination window will point determination. to select two line segments, stabilize before data is display the titration curve. one on each side of the Press for Manual.
- Page 135 This procedure involves two amperometric titrations. These titrations are as follows: • Titration 1 — Cl (not volatized by a nitrogen gas purge) • Titration 2 — ClO The AutoCAT 9000 stores all titration results and, after completion, calculates the analyte value. Required Reagents Description Qty. required per test Unit Cat.
- Page 136 Contact the HACH office or distributor serving you. Telephone: (970) 669-3050 FAX: (970) 669-2932 On the Worldwide Web – www.hach.com ; E-mail – techhelp@hach.com © Hach Company, 2002–2003, 2007. All rights reserved. Printed in the U.S.A. 3/07 3ed Page 134 50081_Chlorite.fm...
-
Page 137: Manual Endpoint Determination
Manual Endpoint Determination General Guidelines for Manual Endpoint Determination In the Zoom screen, Press to enter the Move the four cursors Press the CHECK MARK move the right and left manual endpoint to select one linear region to calculate the result. cursors as necessary, to determination screen. - Page 138 Page 136 50081_ManualEndpoint.fm...
-
Page 139: Below Detectable Limit
Below Detectable Limit Method Limits When a titration result is below the limits of the Hach method in use, the instrument will return a result of “Below Detectable Limit” (BDL). During normal operation, drift can occur. Even when a result reads below the method threshold, a real endpoint with low noise level is possible. - Page 140 Page 138 50081_BDL.fm...
-
Page 141: Maintenance
Do not use strong solvents. 9.1.4 Cleaning and Conditioning the Electrode Clean and condition the AutoCAT 9000™ dual platinum electrodes (DPE) as shown in the procedure below, to make them more responsive. The frequency of use and the type of samples analyzed will dictate the frequency for electrode cleaning and conditioning. -
Page 142: Maintenance Intervals
Contact your Hach representative for instrument software updates. Annually 9.3 Replacing the Fuse The AutoCAT 9000 is protected by both primary (user-serviceable) and secondary (factory-serviceable only) fuses. The primary fuse is installed in a holder located above the instrument power cord receptacle (see Section 2 Instrument Assembly, Figure 3 on page 19). -
Page 143: Troubleshooting
Section 10 Troubleshooting The following table is designed to help identify and solve various problems that may be encountered while running the AutoCAT. Problem Symptom Probable Cause Corrective Action Category • Confirm that the power switch on the back of the instrument has been turned ON. - Page 144 Troubleshooting Problem Symptom Probable Cause Corrective Action Category Not enough The number of points • Increase the number of points before the end point points in the before the end point is too (Methods>Method library> “method“ Titr.>Auto-scaling Yes> titration curve. small.
- Page 145 See Section 2 titration curve. Instrument Assembly Figure 2 on page 14. This is generally not a • Install a surge protector between the AutoCAT 9000 and the major problem but wall outlet. electrical spikes may be •...
- Page 146 Troubleshooting Problem Symptom Probable Cause Corrective Action Category If the measured • Confirm that the correct titrant concentration has been concentration does not entered into the instrument. concentration match actual value (within • Confirm that the titrant concentration has the correct units. for a known an acceptable uncertainty •...
-
Page 147: Appendix A Amperometric Titration Theory
Appendix A Amperometric Titration Theory 1.1 General Titration Theory All titrations are carefully regulated and monitored chemical reactions. Any chemical reaction involves adding one reactant to another to form one or more reaction products. → Reactant 1 Reactant 2 Reaction Products 1.1.1 Redox Reactions Oxidation-reduction reactions (Redox reactions) are a special class of chemical reactions where electrons are transferred from one species to another to form new chemical... -
Page 148: Determining Concentration
Amperometric Titration Theory Figure 1 Total Chlorine Forward Titration Titrant Volume (mL) 1.1.3 Determining Concentration Experimentally the concentration of the titrant is known very accurately, as is the volume of titrant that must be added to reach the titration end point. Use the following formula to calculate the concentration of the analyte in an unknown sample: Titrant Titrant... -
Page 149: Sample Spike
1.2.2 Deposition on Electrode Surfaces The AutoCAT 9000 is designed with self-cleaning platinum electrodes. Occasionally, it may be necessary to perform the embedded clean/condition procedure to maintain optimal performance. Sharp amperometric titration end points require clean, well-... - Page 150 ) as titrant, since a higher acidity is required to liberate free iodine. Research scientists at Hach have confirmed that nitrites can oxidize KI to iodine at low pH values, similar to the reaction of KI with chlorine or chloramines. The reaction of KI with nitrite is dependent on the titration pH and the order of reagent addition.
- Page 151 Even solid potassium iodide can be oxidized with enough exposure to oxygen and ultraviolet light. Hach controls its KI reagent for iodine and trace oxidant contamination before packaging.
- Page 152 Amperometric Titration Theory addition to adsorption, iodine can react with organic matter, forming carbon-iodine bonds. This is one reason for the traditional preference of the back titration methods for total chlorine in sewage treatment plant effluents. Figure 3 Titration Curves Using Thiosulfate vs. PAO Titrants a) Thiosulfate as Titrant b) PAO as Titrant Volume Titrant (mL)
- Page 153 Amperometric Titration Theory 1.4 Shift of Endpoints Due to Sample Iodine Demand Certain organic compounds exert an “iodine demand” which shifts the titration end point, even if the back titration procedure is used. An example of this effect is shown in Figure 4.
- Page 154 Page 152 50081_Titration.fm...
- Page 155 PC/Printer port located on the back panel of the AutoCAT 9000 (see Figure 3 on page 19). Plug one end of the printer power adapter into a 110-V ac outlet and the other end to the printer.
- Page 156 Printer Installation and Setup Scroll through the Highlight Title. Use the keypad to enter Highlight Detailed. method parameters. Press a printout title. Press the Press the CHECK MARK CHECK MARK to select Printouts. to change. Press the to change. CHECK MARK to validate.
- Page 157 Printer Installation and Setup Software Setup Sample Printout DETAIL CURVE AND LINE FIT Printer Installation and Setup Page 155 50081_PrinterInstallation.fm...
- Page 158 Page 156 50081_PrinterInstallation.fm...
- Page 159 Appendix C Replacement Parts & Accessories Replacement Parts Burette, 5-mL replacement, with protective UV plastic housing, see Figure 1 on page 13, item 6 ........................50082-10 Delivery tubing for titrant, stopcock to sample, without anti-diffusion tip, see Figure 1 on page 13, item 2 ........................A25B630 Delivery tubing for titrant, stopcock to sample, with anti-diffusion tip, see Figure 1 on page 13, item 2 ........................50082-40 Electrode, dual platinum, see Figure 1 on page 13, item 5 ................50086-00...
- Page 160 Page 158 50081_ReplacementParts.fm...
- Page 161 Preparing an accurate low-level chlorine standard is difficult, as there are multiple potential sources of error that can affect standard accuracy. For verification of low range chlorine analysis, Hach recommends the preparation of chlorine standard solutions at concentrations no lower than 0.10 mg/L. Preparation of chlorine standard solutions at lower concentrations is not recommended for method verification.
- Page 162 Low Level Standards & Testing In order to assess the accuracy of a chlorine analysis method, such as DPD, Hach recommends the preparation of a chlorine standard solution at a concentration greater than 0.10 mg/L. The actual concentration of the prepared standard must be verified, because the many potential error sources mean that the actual concentration of the standard solution may not match the theoretical calculated concentration of the standard.
- Page 163 Appendix E AutoCAT 9000 Validation Study An AutoCAT 9000 chlorine amperometric autotitrator was tested in a validation study to see whether the instrument could in fact routinely measure chlorine concentrations in the low ppb (µg/L) range, according to Standard Method 4500 Cl D.
- Page 164 AutoCAT 9000 Validation Study A comparison graph at a chlorine concentration of 16 µL Cl is shown in Figure 2. Figure 2 Titration Curve—16 µg/L Chlorine Spreadsheet analysis of the data pairs, utilizing linear regressions of the line segments prior to and after the endpoint, and results calculation, resulted in equivalent results to those displayed on the instrument, again with excellent correlation and signal to noise.
- Page 165 AutoCAT 9000 Validation Study For low-range determination of total chlorine, the instrument thus appears to be suitable for facilities that are required to meet NPDES discharge limits, in the low µg/L range, as determined by 40 CFR, Part 136, Appendix B.
- Page 166 AutoCAT 9000 Validation Study Table 2 Percent Recovery in Drinking Water and Wastewater (continued) Average % Method Sample Type Spike Level, mg/L Cl % Recovery Range Recovery Free Cl Drinking Water 97.3 (n=4) 95.8—99.1 at 0.465 mg/L 87.23 (n=4) 73.5—94.8 at 0.423 mg/L...
- Page 167 AutoCAT 9000 Validation Study electrode is clean, but also that the reference electrode has sufficient electrolyte, and that the reference junction is not fouled. In titrators that employ dual platinum pins, without a reference electrode (a biamperometric system), there is no reference electrode to maintain.
- Page 168 AutoCAT 9000 Validation Study laboratory technique, preparation of chlorine standards in the low parts per billion range can be achieved. A distinction must be made regarding skill levels required to run the autotitrator to obtain accurate and reproducible trace chlorine measurements, versus the skill level required to accurately conduct MDL studies.
- Page 169 General Information At Hach Company, customer service is an important part of every product we make. With that in mind, we have compiled the following information for your convenience. Page 167 50081_GeneralInfoStop.fm...
- Page 170 Page 168 50081_GeneralInfoStop.fm...
- Page 171 Product Safety UL 61010A-1 (ETLus listing mark) CSA C22.2 No. 1010.1 (ETLc certification mark) Certified by Hach to EN 61010-1 Amd.'s 1 & 2 per 73/23/EEC, supporting test records with APAVE, report No. 20111436. Immunity EN 61326:98 (EMC Requirements for equipment for measurement, control and laboratory use) per 89/336/EEC EMC: Supporting test records by Hach Company, certified compliance by Hach Company.
- Page 172 1. Disconnect the Model AutoCAT 9000 Titration Work Station from it's power source to verify that it is or is not the source of the interference. 2. If the Model AutoCAT 9000 Titration Work Station is connected into the same outlet as the device with which it is interfering, try another outlet.
- Page 173 Call 1-800-227-4224 or E-mail techhelp@hach.com. International Customers Hach maintains a worldwide network of dealers and distributors. To locate the representative nearest you, send E-mail to intl@hach. com or contact: In Canada, Latin America, Africa, Asia, Pacific Rim: Telephone: (970) 669-3050;...
- Page 174 Repair Service Authorization must be obtained from Hach Company before sending any items for repair. Please contact the HACH Service Center serving your location. In the United States: Hach Company 100 Dayton Avenue Ames, Iowa 50010 (800) 227-4224 (U.S.A. only)
- Page 175 On the basis of strict liability or under any other legal theory, in no event shall Hach Company be liable for any incidental or consequential damages of any kind for breach of warranty or negligence.
Need help?
Do you have a question about the AutoCAT 9000 and is the answer not in the manual?
Questions and answers