
Related Manuals for Kramer VS-44H2A


Summary of Contents for Kramer VS-44H2A
- Page 1 USER MANUAL MODEL: VS-44H2A 4K HDMI 4x4 Matrix Switcher P/N: 2900-301078 Rev 1 www.KramerAV.com...
-
Page 2: Table Of Contents
Defining VS-44H2A 4K HDMI 4x4 Matrix Switcher Mounting VS-44H2A Connecting VS-44H2A Connecting to VS-44H2A via RS-232 Connecting VS-44H2A via E THE RNE T Port Operating VS-44H2A via Front Panel Buttons Powering On VS-44H2A Understanding Illuminat ed Buttons and LEDs Locking/Unlocking Control Panel Buttons... -
Page 3: Introduction
Kramer Electronics Ltd. Introduction Welcome to Kramer Electronics! Since 1981, Kramer Electronics has been providing a world of unique, creative, and affordable solutions to the vast range of problems that confront the video, audio, presentation, and broadcasting professional on a daily basis. In recent years, we... -
Page 4: Overview
European Advanced Recycling Network (EARN) and will cover any costs of treatment, recycling and recovery of waste Kramer Electronics branded equipment on arrival at the EARN facility. For details of Kramer’s recycling arrangements in your particular country go to our recycling pages at www.kramerav.com/support/recycling. -
Page 5: Typical Applications
• Control rooms with multiple displays. • Presentation and multimedia applications. • Systems that require automatic HDMI routing. Controlling your VS-44H2A Control your VS-44H2A directly via the front panel push buttons, or: • By RS-232 serial commands transmitted by a touch screen system, PC, or other serial controller. -
Page 6: Defining Vs-44H2A 4K Hdmi 4X4 Matrix Switcher
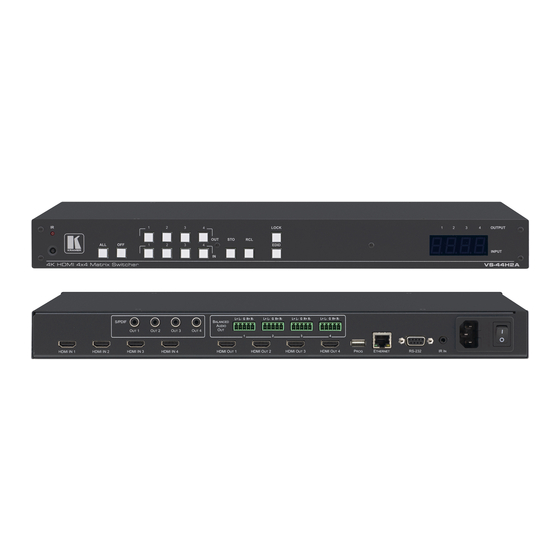
Matrix Switcher This section defines the VS-44H2A. Front Panel Figure 1: VS-44H2A 4K HDMI 4x4 Matrix Switcher Front Panel The behavior of the front panel buttons and the 7-segment display changes along with the operation modes. For further details see Operating VS-44H2A via Front Panel Buttons page 11. - Page 7 Kramer Electronics Ltd. Back Panel Figure 2: VS-44H2A 4K HDMI 4x4 Matrix Switcher Rear Panel Feature Function HDMI IN Connectors (1 to 4) Connect to up to 4 HDMI sources. S/PDIF OUT (coaxial) RCA Connectors Connect to up to 4 digital audio acceptors.
-
Page 8: Mounting Vs-44H2A
Kramer Electronics Ltd. Mounting VS-44H2A This section provides instructions for mounting VS-44H2A. Before installing, verify that the environment is within the recommended range: • Operation temperature – 0 to 40C (32 to 104F). • Storage temperature – -40 to +70C (-40 to +158F). -
Page 9: Connecting Vs-44H2A
Kramer Electronics Ltd. Connecting VS-44H2A Always switch off the power to each device before connecting it to your VS-44H2A. After connecting your VS-44H2A, connect its power and then switch on the power to each device. Figure 3: Connecting to the VS-44H2A Rear Panel... -
Page 10: Connecting To Vs-44H2A Via Rs-232
Kramer Electronics Ltd. Connecting to VS-44H2A via RS-232 You can connect to the VS-44H2A via an RS-232 connection using, for example, a PC. Connect the RS-232 terminal block on the rear panel of the VS-44H2A to a PC/controller, as follows:... - Page 11 (TCP/IPv4) depending on the requirements of your IT system. 5. Click Properties. The Internet Protocol Properties window relevant to your IT system appears as shown in Figure 6 Figure Figure 6: Internet Protocol Version 4 Properties Window VS-44H2A – Connecting VS-44H2A...
- Page 12 To control several units via Ethernet, connect the Master unit (Device 1) via the Ethernet port to the Ethernet port of your PC. Use your PC provide initial configuration of the settings (see Connecting VS-44H2A via ETHERNET Port on page 8).
-
Page 13: Operating Vs-44H2A Via Front Panel Buttons
Powering On VS-44H2A After connecting the power cord, press the Power Switch to power on the device. When powering on VS-44H2A, it undergoes a 10-second initialization process during which the front panel displays the following: • The 7-segment display LEDs are on. -
Page 14: Locking/Unlocking Control Panel Buttons
2. Press an IN button (1 to 4) The output is routed to the selected input and the LED Display indicates the change. You can route multiple outputs to a single input. VS-44H2A – Operating VS-44H2A via Front Panel Buttons... -
Page 15: Routing All Outputs To A Single Input
To mute all audio/video outputs: 1. Press ALL The ALL button illuminates. 2. Press OFF All the outputs audio and video are muted, and the LED Display indicates the change. VS-44H2A – Operating VS-44H2A via Front Panel Buttons... -
Page 16: Storing And Recalling A Routing Setup
The setup stored for that button is restored and the LED Display indicates the change. Copying an EDID You can copy the EDID to an input from a connected output or use the default EDID. VS-44H2A – Operating VS-44H2A via Front Panel Buttons... - Page 17 EDID Wait about 5 seconds for the device to copy the default EDID. Press EDID within 9 seconds to apply settings, otherwise the action times out. VS-44H2A – Operating VS-44H2A via Front Panel Buttons...
-
Page 18: Firmware Upgrade
The Ethernet, using embedded web pages. • By USB or RS-232 using Kramer K-UPLOAD tool. The latest firmware version and the latest version of K-UPLOAD and installation instructions can be downloaded from the Kramer Website at www.kramerav.com/downloads/VS-44H2A. VS-44H2A – Firmware Upgrade... -
Page 19: Using Embedded Web Pages
Managing Web page Security on page 30. • Setting Timeout on page 31. • Displaying OSD Information on page 32. • Setting Step-In Devices on page 33. • Viewing About Page on page 34. VS-44H2A – Using Embedded Web pages... -
Page 20: Browsing Web Pages
Kramer Electronics Ltd. Browsing Web Pages To browse the VS-44H2A web pages: 1. Open your Internet browser. 2. Type the IP address of the device in the address bar of your browser. For example, the default IP address: The Authentication window appears... -
Page 21: Switching And Setting Ports
22. • Viewing and Adjusting Input Settings on page 23. • Changing Input Name on page 24. • Setting Input HDCP Behavior on page 24. • Controlling a Connected Device Remotely on page 25. VS-44H2A – Using Embedded Web pages... - Page 22 The Switching page appears (Figure 11). 2. Click the speaker icon located under a volume slider (Figure 14). The Audio Mute icon displays an x and the volume of the output selected is muted. VS-44H2A – Using Embedded Web pages...
- Page 23 It may be convenient (to prevent flickering when switching from an HDCP input to a non-HDCP input) to set an output to always stream HDCP (whether the input is HDCP or not). To ensure output is always HDCP: 1. In the Navigation pane, click Switching. VS-44H2A – Using Embedded Web pages...
- Page 24 2. Slide a volume slider (1 to 4) or type a number in the field above the slider and press Enter (Figure 14). The output volume in accordance with the slider value. Figure 14: Volume Adjustment Sliders Figure 15: Switching Page – Changing the Output Label VS-44H2A – Using Embedded Web pages...
- Page 25 Setting Step-In Devices on page 33). • Switch Video icon to switch a selected output to this input. • Remote device setting to manage a Step-In device (for example, Kramer DIP-30) connected to VS-44H2A (see Setting Step-In Devices on page 33).
- Page 26 Input supports an HDCP device if HDCP is set to On. There are video sources (e.g., some Apple devices) that automatically switch to HDCP mode if connected to a device that supports HDCP (e.g. VS-44H2A). If an acceptor/display connected to...
- Page 27 Kramer Electronics Ltd. Controlling a Connected Device Remotely To manage a Step-In device (for example, Kramer DIP-30) connected to VS-44H2A remotely. To control another device remotely: 1. In the Navigation pane, click Switching. The Switching page appears (Figure 11). 2. Click the Edit Input icon...
-
Page 28: Changing Device Settings And Upgrading Firmware
• After changing the IP address, reload the web page with the new IP address. • After changing the subnet mask turn the power off and then on again. VS-44H2A • If DHCP is checked, you need to reload the web page with the new IP address. VS-44H2A – Using Embedded Web pages... -
Page 29: Managing Edid
The EDID Management page lets you read the EDID from: • Any of the outputs. • The default EDID. • Any of the inputs. • A file in your PC (File BROWSE). The selected EDID can be copied to the selected input/s. VS-44H2A – Using Embedded Web pages... - Page 30 When reading from an output, make sure that that output is connected to an acceptor. 3. Select an input or all the inputs (from the right) to which the EDID is copied. 4. Click COPY. A message appears. Figure 22: Copy EDID Message 5. Click Close. VS-44H2A – Using Embedded Web pages...
- Page 31 5. If required, Check adding stereo audio to the selected EDID. 6. Click OK. 7. Follow the instructions on-screen. When viewing the 7-segment display in the EDID mode, the input with EDID read from a file displays “L”. VS-44H2A – Using Embedded Web pages...
-
Page 32: Managing Web Page Security
Set changes button. A confirmation message appears and a key icon appears in the upper right corner. A password must contain 5 to 15 alphanumeric characters and no spaces. VS-44H2A – Using Embedded Web pages... -
Page 33: Setting Timeout
1. In the Navigation pane, click Advanced Setting. The Advanced Setting page appears (Figure 26). Figure 26: Advanced Setting page 2. Set the delay time 0-9999 seconds (where 0 is no timeout) and click SET. The timeout is set. VS-44H2A – Using Embedded Web pages... -
Page 34: Displaying Osd Information
To set the OSD display to Off: 1. In the Navigation pane, click Advanced Setting. The Advanced Setting page appears (Figure 26). 2. Set OSD Information to Off. The OSDs are no longer displayed. VS-44H2A – Using Embedded Web pages... -
Page 35: Setting Step-In Devices
Kramer Electronics Ltd. Setting Step-In Devices Use the Step-In Settings page to manage Step-In devices (for example, Kramer DIP-30). To manage a Step-In device: 1. Connect the HDMI output of a Step-In device (for example, DIP-30) to an HDMI input on the VS-44H2A. -
Page 36: Viewing About Page
Kramer Electronics Ltd. Viewing About Page VS-44H2A About Us page lets you view the web page version and Kramer Electronics Ltd details. Figure 28: About Page VS-44H2A – Using Embedded Web pages... -
Page 37: Technical Specifications
Power of f the device, press and hold the LOCK, EDID and STO buttons Front Panel Buttons: simultaneously f or about 3 seconds while powering the device, and then release. Until all f ront panel buttons illuminate “#f actory” command. Protocol 3000: VS-44H2A – Technical Specifications... -
Page 38: Default Parameters
Priority order is highest f or 1 and lowest f or 4 All video inputs are routed to each of the video Auto Switching settings outputs Kramer def ault EDID with "monitor name"= Def ault EDID "VS-44H2A" Lock EDID state... -
Page 39: Protocol 3000
Kramer Electronics Ltd. Protocol 3000 Kramer devices can be operated using Kramer Protocol 3000 commands sent via serial or Ethernet ports. Understanding Protocol 3000 Protocol 3000 commands are a sequence of ASCII letters, structured according to the following. • Command format:... -
Page 40: Protocol 3000 Commands
BUILD-DATE? Get device build date. COMMAND Get the device build date: YYYY = Year #BUILD-DATE?<CR> #BUILD-DATE?<CR> MM = Month FEEDBACK DD = Day ~nn@BUILD-DATEdate, time<CR><LF> – Format: hh:mm:ss where time hh = hours mm = minutes ss = seconds VS-44H2A – Protocol 3000... - Page 41 3 – Custom EDID ~nn@ERR 002<CR><LF> in_index – Number that indicates the is received. specific input: 1-4 size – Size of data to be sent from device, 0 means no EDID support VS-44H2A – Protocol 3000...
- Page 42 – Maximum audio_preset_count #INFO-PRST?<CR> FEEDBACK number of audio presets in the unit ~nn@INFO-PRSTvidvideo_preset_count, In most units, video audaudio_preset_count<CR><LF> and audio presets with the same number are stored and recalled together by commands #PRST-STO and #PRST-RCL. VS-44H2A – Protocol 3000...
- Page 43 1 – On Get audio mute. COMMAND – Number that indicates Get mute status of output 1 MUTE? out_index the specific output: 1-4 #MUTE?out_index<CR> #MUTE1?<CR> mute_mode – On/Off FEEDBACK 0 – Off ~nn@MUTEout_index, mute_mode<CR><LF> 1 – On VS-44H2A – Protocol 3000...
- Page 44 Set the IP address to xxx.xxx.xxx.xxx 192.168.1.39: #NET-IPip_address<CR> For proper settings #NET- FEEDBACK consult your network IP192.168.001.039<CR> ~nn@NET-IPip_address<CR><LF> administrator. – Format: NET-IP? Get IP address. COMMAND ip_address Get the IP address: #NET-IP?<CR> xxx.xxx.xxx.xxx #NET-IP?<CR> FEEDBACK ~nn@NET-IPip_address<CR><LF> VS-44H2A – Protocol 3000...
- Page 45 – Connection character between in > FEEDBACK The GET command and out parameters ~nn@VID>out_id<CR><LF> identifies input switching –Output number out_id on Step-in clients. * for all outputs This is a legacy command. New Step-in modules support the ROUTE command. VS-44H2A – Protocol 3000...
- Page 46 Get video on output status: the specific output: 1-4 #VMUTE?out_index<CR> #VMUTE?2<CR> Video mute parameter – Video Mute flag FEEDBACK 2 (blank picture) is not 0 – Video enabled ~nn@VMUTEout_index, flag<CR><LF> supported. 1 – Video disabled 2 – Blank picture VS-44H2A – Protocol 3000...
-
Page 47: Result And Error Codes
(Reserved) ERR_RESERVED_8 (Reserved) ERR_RESERVED_9 (Reserved) ERR_RESERVED_10 (Reserved) ERR_RESERVED_11 (Reserved) ERR_RESERVED_12 (Reserved) ERR_EDID_CORRUPTED EDID corrupted ERR_NON_LISTED Device specific errors File has the same CRC – no changed ERR_SAME_CRC ERR_WRONG_MODE Wrong operation mode ERR_NOT_CONFIGURED Device/chip was not initialized VS-44H2A – Protocol 3000... - Page 48 What Kramer Electronics Will Do Kramer Electronics will, at its sole option, provide one of the following three remedies to whatever extent it shall deem nec essary to satisfy a proper claim under this limited warranty: 1.
- Page 49 SAFETY WARNING Disconnect the unit f rom the power supply bef ore opening and servicing For the latest information on our products and a list of Kramer distributors, visit our Web site where updates to this user manual may be found.
Need help?
Do you have a question about the VS-44H2A and is the answer not in the manual?
Questions and answers