Page 1
SCS 4000/5000 Series™ Consoles Installation and Operation Manual P/N 016-0159-925 Rev F 05/15 E19667 Copyright 2015...
Page 2
Raven systems, or products used as components of systems, which rely upon the reception of these signals or availability of these services. Raven Industries accepts no responsibility for the use of any of these signals or services for other than the stated purpose.
Table of Contents Calibration Reference Sheet ..................... v Edit Mode ..........................v Unit Definitions and Conversions ..................... vi Unit of Measure Definitions ....................vi Unit of Measure Conversions ..................... vi Chapter 1 Important Safety Information..........1 Safety Information ........................1 Hydraulic Safety ........................
Page 4
Table of Contents Chapter 6 Data Menu ................37 Serial Submenu ........................37 Additional Serial Options ......................38 SCS 4000/4070/5000 ......................38 SCS 4400/4600 ......................... 38 Product Submenu ........................39 Page 1 ..........................39 Page 2 ..........................41 Page 3 ..........................
Page 5
..................69 Flow Meter/Encoder Cables ....................70 Testing the Flow Meter Cable .................... 70 Chapter 11 Connecting an SCS Console to a Raven Field Computer. 71 Firmware Requirements ......................71 Operation Guidelines ......................71 Field Computer Set Up ......................72 Viper Pro ...........................
Page 6
Table of Contents Chapter 16 Serial Interface & Data String Formats....... 89 Remote Computer to SCS Console ..................89 Rate Change Request ....................... 89 SCS 4000/4070/5000 Console to Remote Computer ........................90 SCS 4400/4600 Console to Remote Computer ..............91 SCS 4000/5000 Series™...
Calibration Reference Sheet Record the settings and calibration values used when programming the SCS console and keep this sheet for future reference or when contacting a service technician. Circle the setting selected on the console for the following options: US (Acres) SI (Hectares) Turf (1000 Square Feet) Units...
Chapter 2 Unit Definitions and Conversions Unit of Measure Definitions Abbreviation Definition Abbreviation Definition Gallons per Minute Pounds per 1,000 square feet L/min Liters per Minute Millimeters dL/min Deciliters per Minute Centimeters Pounds per Square Inch Decimeters Kilopascal Meter Gallons per Acre Miles per Hour L/ha Liters per Hectare...
• Follow all safety information presented within this manual. • If you require assistance with any portion of the installation or service of Raven equipment, contact a local Raven dealer for support. • Follow all safety labels affixed to the system components. Be sure to keep safety labels in good condition and replace any missing or damaged labels.
CAUTION Hydraulic Safety • Raven Industries recommends that appropriate protective equipment be worn at all times when working on any hydraulic system. • Never attempt to open or work on a hydraulic system with the equipment running. Care should always be taken when opening a system that has been previously pressurized.
C h a p t e r 2 Sprayer & Spreader Control Systems The Raven SCS 4000/5000 Series control systems are designed to simplify sprayer or spreader applications by providing speed compensated product application regardless of the vehicle speed while adjusting for the width and status of programmed boom sections and a target rate set by the operator.
Chapter 2 System Components The following sections offer a description of the system components for the various SCS consoles and control systems. SCS 4000/5000 Control Systems The SCS 4000/5000 system consists of a computer-based control console, a CAN boom sense/speed node, a speed sensor, a boom switch box or boom switches, up to five CAN product control nodes, control valve(s), flow meter(s) or encoder(s), injection modules (if applicable), and appropriate cabling.
Introduction 
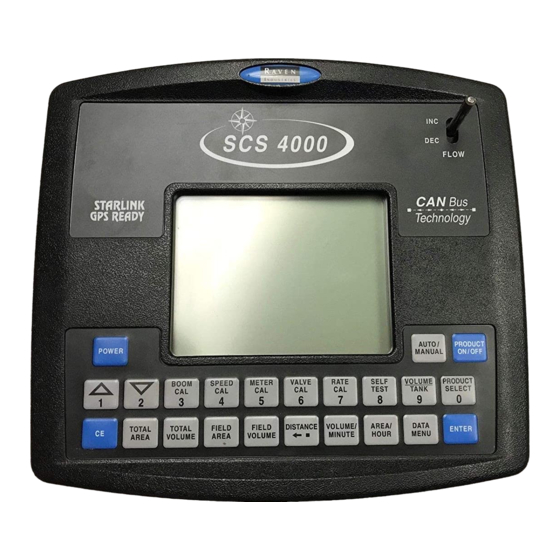
SCS 4000/5000 Series Console Feature Overview Display Area Each of the SCS 4000/5000 Series consoles feature an easy to read, backlit LCD display. This area displays application and user interface information such as speed, PSI, calibration and function data, rate of application, control mode (AUTO/MAN), percent of compact flash card used (only on SCS 4400/4600 consoles), and boom status.
Page 14
Chapter 2 SCS 4000/5000 Consoles The manual flow control switch provides the capability for spot spraying. Note: The SCS 4000 and 5000 consoles require an external or vehicle switch box to sense boom status. SCS 4070 Consoles In addition to a manual flow switch, The SCS 4070 console offers seven boom and a master ON/OFF switch for boom section control.
Introduction Care and Use Refer to the following guidelines for proper care and use of the SCS console. CAUTION • Mount the console securely and route cables to prevent tripping hazards and to keep the wires from pinching or breaking. •...
Chapter 2 Updates Updates for Raven manuals as well as software updates for Raven consoles are available at the Raven Applied Technology Division web site: www.ravenhelp.com At Raven Industries, we strive to make your experience with our products as rewarding as possible.
C AN Networking and CHAPTER C h a p t e r 3 CAN Data Menu A Controller Area Network, or CAN, is a high-integrity serial data communications bus that operates at a data rate of 250 kilobits per second for real-time control applications and uses special CAN cables and terminators for operation.
Page 18
Chapter 3 SCS 4000/5000 Single Product (Liquid) CAN Control System FIGURE 1. SCS 4000/5000 Series Installation & Operation Manual...
CAN Networking and CAN Data Menu SCS 4070 Single Product (Liquid) CAN Control System FIGURE 2. Manual No. 016-0159-925...
Page 20
Chapter 3 SCS 4000/5000 Multi-Product CAN Control System FIGURE 3. One Granular Product plus Spinner Control SCS 4000/5000 Series Installation & Operation Manual...
Page 21
CAN Networking and CAN Data Menu SCS 4000/5000 Multi-Product CAN Control System Two Granular Products FIGURE 4. Manual No. 016-0159-925...
Page 22
Chapter 3 SCS 4000/5000 Multi-Product CAN Control System FIGURE 5. Two Granular Products plus Spinner Control SCS 4000/5000 Series Installation & Operation Manual...
Page 23
CAN Networking and CAN Data Menu SCS 4400 Granular Control System FIGURE 6. Manual No. 016-0159-925...
Page 24
Chapter 3 SCS 4600 Granular Control System FIGURE 7. SCS 4000/5000 Series Installation & Operation Manual...
CAN Networking and CAN Data Menu Detecting CAN Nodes The SCS 4000/5000 Series console must be able to communicate with the CANbus system to ensure that the products are applied correctly. The SCS console should automatically establish communication with the boom/ speed node, the AccuBoom™...
Chapter 3 Programming CANbus Nodes The CAN nodes are programmed using the SCS console in Edit mode. See Chapter 5, Initial Startup & Console Programming, for information on programming CAN product nodes. Refer to the AutoBoom™ Calibration & Operation manual for detailed operation of the optional AutoBoom™ system with your SCS 4000/5000 Series console.
Page 27
• Make sure that both ends of the CANbus system are properly • CANbus ends not terminated. Refer to the Raven CANbus Installation Manual for terminated CANbus cannot read more information about installing terminators on the CANbus.
I nstallation CHAPTER C h a p t e r 4 CAUTION Be sure to follow instructions for connecting the power leads to the battery carefully. Reversing the power leads may cause damage to the SCS console. Be sure to connect the battery leads after all other components have been properly mounted and connected.
Figure 5, “Chassis Cable Platform Example (SCS 4000/4070/5000 Consoles Only),” on page 26 Note: Flow meter and speed sensor extension cables are available from a local Raven dealer. Use the supplied cable ties to secure the console cable to prevent the cable from pinching or breaking and to prevent tripping hazards.
Page 31
Installation Connect the console cable to vehicle power as shown in the figures designated above. Refer to the Raven CANbus Network Installation Manual for details on connecting the console to vehicle power using the cabling platform installed on the vehicle.
Page 32
Chapter 4 SCS 4400 Console Connections FIGURE 3. Note: The SCS 4400 with part number 063-0172-281 features a compact flash card slot for application data transfer to a home or office computer. The data logging feature will only be used when connecting to an optional external console for logging or mapping applications.
Page 33
Installation SCS 4600 Console Connections FIGURE 4. Note: The SCS 4600 with part number 063-0172-343 features a compact flash card slot for application data transfer to a home or office computer. The data logging feature will only be used when connecting to an optional external console for logging or mapping applications.
Page 34
Chapter 4 Chassis Cable Platform Example (SCS 4000/4070/5000 Consoles Only) FIGURE 5. To Port ‘A’ To ‘CAN’ Port Power To Port ‘B’ To Port ‘A’ Power To ‘CAN’ Port SCS 4000/5000 Series™ Installation & Operation Manual...
I nitial Startup & CHAPTER C h a p t e r 5 Console Programming The first time the SCS console is powered on, it will automatically enter a calibration mode. This initial programming sequence requires a selection for the units, product control type, speed sensor type, and control valve type before the flashing “CAL”...
Page 36
Press the CE key to cycle between: Note: Some application types may require a specific node firmware version or an optional CANbus control hardware. If an application type selection is not available, contact a local Raven dealer for assistance. LIQUID. Application of a liquid product.
Page 37
Initial Startup & Console Programming Valve Type The default setting for the Valve Type screen is “Standard Valve.” Press the CE key to cycle between: • STANDARD VALVE • FAST VALVE • FAST CLOSE VALVE • PWM VALVE • PWM CLOSE VALVE •...
Page 38
The valve cal value is used to control the response time of control valve motors with respect to changes in vehicle speed. The valve cal can be adjusted after the initial programming to refine valve response. Raven recommends the following values for the initial control valve calibration number: •...
Initial Startup & Console Programming Speed Cal Raven recommends the following speed calibration values for initial system setup. Sensor Type Sensor Type English Metric Setting External Raven GPS Receiver Internal GPS from Radar/GPS (SP2) Envizio Pro/Cruizer Raven Radar Wheel Magnets...
Chapter 5 Console Programming Edit Mode During normal operation of the SCS console, pressing the calibration keys will access the selected calibration screen. In order to program numerical values into the SCS console, use the Edit mode. To enter Edit mode: Press the ENTER key.
Initial Startup & Console Programming Valve Cal Press the VALVE CAL button to display the currently programmed calibration value used to adjust the control valve and keep product application on the target rate. This value sets control characteristics such as speed and reaction of the various control valves.
Chapter 5 Volume/Minute Pressing the VOLUME/MINUTE key displays the current volume per minute, or flow rate, in the units which the SCS console is programmed to apply. Area/Hour Pressing the AREA/HOUR key displays an estimate of the area that could be covered if both the current speed and boom operation were maintained over one hour.
Initial Startup & Console Programming Decimal Shift The decimal shift feature is used to increase system accuracy at low application rates. Decimal shift is set during the setup of meter cal or product density. Note: The programmed rate cal value is also affected by the decimal shift feature. Be sure to verify the programmed rate cal when changing the decimal shift feature.
D ata Menu CHAPTER C h a p t e r 6 Additional features of the SCS console can be modified using the Serial, Product, Console, and CAN submenus accessed by pressing the DATA MENU key on the SCS keypad. The Data Menu also contains the Product Summary screens for each product as well as the AutoBoom if the optional hardware is installed.
To send and receive data through the serial communication port, be sure to enable the data logging feature. Review Data Logger section on page 37 for more information. The default serial baud rate is configured at 9600 to work with most DGPS receivers or Raven consoles and field SCS 4000/5000 Series™ Installation & Operation Manual...
Data Menu computers. Refer to the Serial Baud Rate (SCS 4000/4070/5000 Only) section on page 38 to reconfigure the serial communication baud rate if necessary. COM 1 Stop Bits Select between one or two stop bits for communicating with a GPS receiver. Datalog Mode Select between logging “GPS and Console Data”...
Page 48
Chapter 6 If the motor exceeds the desired RPM, decrease the high offset by 10 and hold INC again. Repeat step 3 until the motor runs at the desired RPM. Add 10 to the current high offset value and use the Edit mode to program the new high offset value. PWM Low Offset The PWM low offset is used to set the minimum desired RPM or hydraulic output (zero point or shutoff point) of a PWM (Pulse Width Modulated) control valve.
Data Menu Low Flow Limit If actual volume/minute falls below the assigned limit, the control valve will be controlled to low flow limit and low limit alarm is activated. This value is automatically proportioned to the percentage of booms that are on (i.e.
Page 50
Chapter 6 Dual Sensor Alarm % For liquid chemical injection applications, sets tolerance between flow switch monitor and flow readings before “FLOW SW” alarm is enacted. For applications controlled in “Gran 3” mode, this value sets tolerance between dual encoder readings before “DUAL FLOW” alarm is enacted (boom select feature must be set up for only booms being used).
Data Menu VLV STATUS (when not programmed in PWM mode) Displays the current status of the control valve (i.e. increasing, decreasing or idle) and gives further detail on the control status (Full on, in second breakpoint or in first breakpoint). Page 3 Standby (Pressure) Enable (PWM Valves Only) Note:...
Page 52
Chapter 6 rerun the auto calibration to ensure the system is properly calibrated for the changes to the system. To perform the auto calibration: Empty any granular bins or fill liquid tanks with water only before performing the auto calibration process. Press the PRODUCT ON/OFF key to turn the selected product off.
Data Menu Console Submenu Contrast Press ENTER to adjust the screen contrast. Press and hold the UP ARROW key to lighten or the DOWN ARROW to darken. Press ENTER when complete. Audible Alarm Press the CE key to toggle audible alarm On or Off. Display Smoothing Enable the display smoothing feature to allow the console to smooth the rate displayed during product applications.
Chapter 6 Zero Speed Shutoff Enable or disable low speed shutoff feature. If enabled, product control will be shut off if speed drops below 0.7 mph [km/H] in automatic mode. The master switch must be cycled OFF and then ON to restart the system. If a constant speed greater than 0.7 mph [km/H] is not attained within 10 seconds, the low speed shutoff will be enacted again.
Data Menu Readdress Control Nodes Reconfigure product control node order. AccuBoom Control Node Indicates status of AccuBoom control node. The program and revision number of the AccuBoom node will be displayed if this feature is installed. Calibration Summary These screens allow the operator to review the current values and settings for each configured product control channel.
Page 56
Chapter 6 Press the DOWN ARROW key to advance to the Datalog mode. Use the CE key to select between logging “GPS and Console Data,” or “GPS Data Only.” Note: If “GPS and Console Data” is selected, the master switch will pause the data logging feature. Each time the data logger is continued, a shapefile (.shp, .shx, .dbf) is created using the GPS GGA string from the receiver along with the console data.
Data Menu SCS Alarm Definitions The following are brief descriptions of the visual and audible alarms for the SCS console. The audible alarm may be enabled or disabled from the Console submenu within the Data Menu. Note: The Audible Alarm: Beeps for 1/2 second once per second.
Page 58
Chapter 6 Audible Mode Display Alarm Description Alarm (*) When Zero Speed Shutoff is enabled, an alarm will occur when speed drops below ZERO SPD 0.7 MPH [km/H]. Product control will not be resumed until the master switch is cycled (See Zero Speed Shutoff section on page 46).
SCS console accurately control products during sprayer or spreader applications. Note: Write down these Calibration Values for future reference or for calling technical support. Speed Cal Raven industries recommends the following values for the initial speed cal: Sensor Type Sensor Type English Metric...
Chapter 7 At the end of the driven distance, press DISTANCE again and record the odometer reading. The SCS odometer should read a value of approximately 5280 [1000]. If the display reads between 5260-5300 [990-1010], the default value of 598 [152] is accurate for the speed cal value. If the distance displayed is not between 5260-5300 [990-1010], calculate the speed cal with the formula: ×...
Console Calibration Adjusting for Additional Magnets Typically, four magnets are used with the wheel drive speed sensor. However, to ensure accurate speed readings for large tires and very low speed applications, additional wheel magnets may be necessary. Any even number of magnets may be used as long as they are of alternating color and equally spaced. After calculating the speed cal, this number must be adjusted according to the number of magnets used using the following formula: ×...
Chapter 7 Liquid Applications Boom Cal For liquid sprayers, the boom cal value is the width of the individual boom sections. Calculate the width of each boom section by measuring the spacing between spray tips in inches [cm] and then multiplying by the number of tips in each boom section.
Console Calibration Valve Cal Note: If the dual loop control feature is enabled, the valve cal and valve cal 2 values will be replaced with flow cal and system gain settings. Refer to the Dual Loop Control Mode Settings section on page 57 details on setting and adjusting the flow cal and system gain values when using this control mode.
Chapter 7 Rate Cal The following information must be known in order to determine which spray nozzles to use with the sprayer. • Nominal Application Pressure_________ PSI [kpa] • Target Application Rate_________ GPA [L/ha] • Target Speed_________ MPH [km/h] • Nozzle Spacing_________ inches [cm] From this information, calculate the volume per minute per nozzle as follows: ×...
Console Calibration Tier 2 High Volume per Minute On a 3 tier system, this selects the maximum allowed volume per minute before both tiers 1 and 2 are enabled. Set to zero for a 2 tier system. Percent Tier Disable Percentage factor at which the previously described volume per minute settings will cause the system to disable the higher tier.
Chapter 7 System (Pressure) Gain The default setting for the system gain value is 100. To adjust the system aggressiveness, enter a value between 1 and 999 as necessary. Note: It is recommended to increase or decrease the current value in increments of 10 or less when making adjustments to the system gain setting.
Console Calibration Metric Rate Display For Rates displayed in 1 kg increments, the formula to calculate the spreader constant is: 18 000 000 --------------------------------- - × × Where SC = the Spreader Constant, L = Length of belt travel in centimeters per 1 revolution of the encoder, GH = Gate Height in centimeters and GW = Gate Width in centimeters.
Chapter 7 Rate Cal The target application rate in lbs/acre [kg/ha] is programmed by pressing RATE CAL. Consult the equipment manual to ensure that the selected gate opening is capable of applying at this application rate. Note: The spreader constant must be recalculated anytime the gate opening is changed. Spinner RPM When using a CAN control node capable of controlling spinner speed, set up the product in SPINNER RPM CONTROL mode and use the following calibration values:...
J ob Setup & Field CHAPTER C h a p t e r 8 Testing Before beginning an actual application, you will need to verify that the programming of the SCS console will produce the desired results. After the Initial Programming and Calibration procedures, the SCS console should be relatively accurate.
Chapter 8 Hold the Manual Override switch in the INC position until pressure reaches maximum. This ensures that the motorized Control Valve is fully open. Verify maximum pressure and RATE. (Pressure gauge is not supplied). Note: A pressure gauge must be installed to properly monitor the system. Adjust agitator line hand valve for desired agitation.
Job Setup & Field Testing Granular Applications Initial Job Setup Verify that the product bin is empty. Place all boom section switches in the OFF position. Turn the SCS console power ON and verify that the console is in Automatic mode (Press AUTO/MANUAL to toggle).
Page 73
T roubleshooting CHAPTER C h a p t e r 9 Problem Action No display with power ON. • Check fuses in console cabling. • Check battery connections. • Hold the DOWN ARROW key to darken the LCD contrast. • Return console to your dealer for service. A digit cannot be entered via the •...
Chapter 9 Problem Action Speed inaccurate or unstable (wheel • Run speed check on hard surface road. If SPEED is accurate, investigate speed sensor on different wheel. drive speed sensor). • Remove one red magnet and one black magnet from the wheel (reposition remaining magnets directly across from each other).
Troubleshooting Problem Action Boom valve(s) will not operate. • Check cable for wires with breaks. • Check connectors for cleanliness. • Check section switch(es) and master switch for operation. • Replace boom valves. Can’t obtain GPS signal • Verify connections to GPS receiver. •...
Page 76
Chapter 9 Problem Action Console displays: “CHECK • If node is not connected to the CANbus, press DATA MENU key. CAN menu will appear and CAN node options can be toggled ON or ACCUBOOM NODE,” “CHECK OFF using the CE key. Operation can then be resumed as normal. AUTOBOOM NODE,”...
T esting Extension CHAPTER C h a p t e r 1 0 Cables Speed Sensor Cables Disconnect the extension cable from speed sensor assembly cable. Hold the extension cable connector so that the keyway is in the 12 o’clock position. Speed Sensor Extension Cable Connector Pins FIGURE 1.
Chapter 10 Flow Meter/Encoder Cables Disconnect the extension cable from the flow meter. Hold the flow meter cable so that the keyway is pointing in the 12 o’clock position. Flow Meter Extension Cable Connector Pins FIGURE 2. Keyway 10 o’clock 2 o’clock Ground Power...
SCS 4000/5000 Series consoles with firmware v1.80 or higher will support the ability for an SCS 4070, SCS 4400 or SCS 4600 console to reside on a Raven CANbus and appear as CAN control node(s) to a Raven field computer. This firmware allows the field computer to be set up as the CAN controller and initiate VRA and/ or AccuBoom jobs in conjunction with the SCS console via the CANbus.
Chapter 11 Field Computer Set Up Viper Pro To set up the Viper Pro console for CAN product control: Touch the Menu button in the lower, right corner of the Viper Pro display. Select Setup and then Prod Control within the menu. On the Select Controller screen, select the CAN option from the list and touch the OK button to accept the selection and return to the main screen.
Connecting an SCS Console to a Raven Field Computer SCS 4000/5000 Series Console with a Raven Field Computer FIGURE 1. Manual No. 016-0159-925 Rev. F...
F low Meter CHAPTER C h a p t e r 1 2 Maintenance & Adjustment Procedure Note: Thoroughly bleed nurse tank hose and all other system lines prior to disassembling the flow meter, fittings, or hoses. Remove flow meter from the vehicle and flush with clean water to remove any chemicals. Remove flange bolts or clamp from the flow meter.
Page 86
Chapter 12 Empty the applicator tank under normal operating conditions. If the total volume displayed is different from the predetermined amount of measured liquid by more than +/- 3%, complete the following calculation: × ---------------------- - Where CMC = the Corrected Meter Cal, MC = the Meter Cal used to apply the known volume, and VM = the Volume that your SCS console measured, and VA = the predetermined volume applied.
R atio Rate Feature CHAPTER C h a p t e r 1 3 In Ratio Rate mode, the SCS console offers the ability to control up to four products in ratio to the first. The Ratio Rate feature is enabled through the console submenu within the Data Menu. When the Ratio Rate mode is enabled, product 1 will control to a user defined volume/area when in Automatic (AUTO) mode, or display the Rate as volume/minute when in Manual (MAN) mode.
Page 88
Chapter 13 Handgun Operation: Turn Ratio Rate mode ON through Data Menu. Enter the desired ratio rate for products 2-5. Place all boom switches to the OFF position. Place the master switch to ON. Put product 1 in manual mode. Adjust pressure using the INC/DEC switch. Put products to be injected in automatic mode.
R emote Switch Option CHAPTER C h a p t e r 1 4 The Remote Switch option is only available for the SCS 4400 console. Remote Switch FIGURE 1. Note: When properly installed, the remote switch is in parallel with the master switch; therefore switching the remote switch or the master switch ON will energize the boom valves.
Using a USB to Serial Adapter Computers without a serial port may still be used to update the Raven SCS 4000/5000 Series consoles using a USB to Serial Adapter (P/N 524-0002-063). Please read the following instructions for assistance setting up the USB to Serial Adapter before beginning the appropriate console update procedure later in this chapter.
Page 92
Chapter 15 On the “System Properties” window, select the “Hardware” tab. On the Hardware tab, click the “Device Manager” button. The “Device Manager” window is displayed. Double click on the “Ports (COM & LPT)” item in the available devices list to access the “USB Serial Port” item within the port devices.
Note: A standard serial cable will not work. A USB-serial adapter (P/N 524-0002-063) is required for computers without a serial port. This part is available through your local Raven dealer or most electronics suppliers. On a home or office computer, go to the Raven web site: www.ravenhelp.com...
Page 94
Chapter 15 Use the Port drop down to select the communication port to which the console is connected. If you are unsure about the comm port assignment, refer to the procedure in USB to Serial Adapter Preparation section on page 83 starting with step 3. The assigned comm port should be displayed in parenthesis at the end of the available items on the Device Manager screen.
Note: A standard serial cable will not work. A USB-serial adapter (P/N 524-0002-063) is required for computers without a serial port. This part is available through your local Raven dealer or most electronics suppliers. On a home or office computer, go to the Raven web site: www.ravenhelp.com...
Page 96
Chapter 15 In the HyperTerminal program on your home or office PC, click “Transfer” in the menu bar and then choose “Send Text File.” Locate the appropriate text file to update the SCS console connected to the computer. Update File Name Connected SCS Console SCS 4000 SCS 4070...
2 Stop Bits Data stream to Raven console. Note: All request and output strings begin with “$R,” to indicate a Raven communication string. Remote Computer to SCS Console Rate Change Request To set Rate Cal values for all three products: $R,RC,<rate_1_cal>,<rate_2_cal>,<rate_3_cal><CR><LF>...
Rate 1 Rate 2 Note: The decimal point will not be sent from the remote computer to the Raven console. SCS 4000/4070/5000 Console to Remote Computer All SCS 4000/4070/5000 output strings begin with $R114-, the $R indicates a Raven communication string, 114 are the last three digits of the program number and “-”...
SCS 4400/4600 Console to Remote Computer All console output strings begin with $R164-, the $R indicates a Raven communication string, 164 are the last three digits of the SCS 4400/4600 program number and “-” denotes the software revision letter. Calibration Strings: •...
Page 101
Index Decimal Shift Detecting CAN Nodes Calibration Additional Data 60 “Zero Out” Display Information 60 Entering Tank Volume 60 Edit Mode v, 32 Granular Applications 58 Boom Cal 58 Rate Cal 60 Spinner RPM 60 Firmware Update Procedure Spreader Constant 58 Flow Meter Maintenance &...
Page 102
Index Self Test Mode Serial Interface & Data String Formats Remote Computer to SCS Console 89 SCS 4000/4070/5000 Console to Remote Computer 90 SCS 4400/4600 Console to Remote Computer 91 System Components SCS 4000/5000 Control Systems 4 SCS 4070 Control Systems 4 SCS 4400/4600 Control Systems 4 Testing Extension Cables Flow Meter Cables 70...
Page 103
Bring the defective part and proof of purchase to your Raven dealer. If the dealer approves the warranty claim, the dealer will process the claim and send it to Raven Industries for final approval. The freight cost to Raven Industries will be the customer’s responsibility.
Page 104
Bring the defective part and proof of purchase to your Raven dealer. If the dealer approves the warranty claim, the dealer will process the claim and send it to Raven Industries for final approval. The freight cost to Raven Industries will be the customer’s responsibility.
Need help?
Do you have a question about the SCS 5000 Series and is the answer not in the manual?
Questions and answers