
Related Manuals for NovoPress HP 95


Summary of Contents for NovoPress HP 95
- Page 1 Repair Instructions Spare Parts Lists PRESSING CYLINDERS 01000\R06eng 0704...
-
Page 2: Table Of Contents
General Notes ....................1 Pressing Cylinder HP 95 Dismantling .....................2 Assembly......................4 Parts list and exploded view ................6 31830 Hand switch HP 95 and HP 300 ............10 Pressing Cylinder HP 300 Dismantling ....................14 Assembly.......................16 Parts list and exploded view .................18 Pressing Cylinder HPM 400 Dismantling ....................22... - Page 3 Leave safety devices where they belong. Hand tools may not be installed as fixtures. Repair and maintenance. Have repairs and maintenance work carried out in an authorised NOVOPRESS specialist workshop. Only use original and identical NOVOPRESS spare parts. We reject all responsibility and liability for work carried out by third- party personnel.
- Page 4 SAFETY INSTRUCTIONS FOR HYDRAULIC EQUIPMENT Please read the operating instructions. Acquaint yourself with the hydraulic equipment. Provide the equipment with the necessary care. Always keep the equipment in operational condition. Cleanness is an essential requirement for good and safe working. Switch off the electric power supply to the hydraulic equipment, •...
-
Page 5: General Notes
(3/31830) refers to item 3 of the parts list 31830. NOTE! (3/31830) refers to item 3 of Spare Parts List 31830 Item 3 in this case lock nut Spare Parts List 31830 in this case hand switch HP 95 and HP 300... -
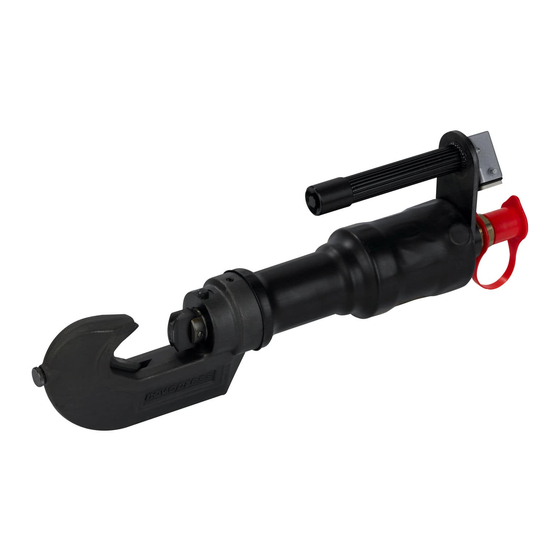
Page 6: Pressing Cylinder Hp 95
Cut open the shrink-on sleeve (23) and remove it. For devices as of serial no.: 2350: Undo the grub screw (10) Grip the HP 95 by its head (1) in a vice. Undo the screw connector (21). For HP’s with hand switch only: •... - Page 7 Pressing Cylinder HP 95 1.11 Remove the head (1) with the piston (2) and the valve (6) from the piston (3). 1.12 Up to serial no.: 2349: Remove the piston (4) with the locating washer (14), the springs (11) and (12) and the supporting washer (5) from the cylinder (3).
-
Page 8: Assembly
Pressing Cylinder HP 95 1.18 Undo the cap screw (8) and push the locating washer (17) out with a piece of wire. 1.19 Remove the washer (18), spring (13) and conical pin (7). ASSEMBLY WARNING! Please note the position of all locating washers. - Page 9 Pressing Cylinder HP 95 2.19 Insert and fully seat the locating washer (17) into the cap screw (8). 2.20 Place the washer (18) and the spring (13) on to the cap screw (8). 2.21 Insert the cone of the pin (7) into the locating washer.
- Page 10 3000 Pressing Cylinder HP 95 up to serial no.: 2349 Item Description Order Qty. Head 3001 Piston 3002 Low-pressure cylinder 3003 Low-pressure piston 2352 Supporting washer 3005 Valve 3007 Conical pin 1497 Cap screw 1498 Thrust pin 1499 Spring 1215...
- Page 11 3000 Pressing Cylinder HP 95 up to serial no.: 2349...
- Page 12 3000 Pressing Cylinder HP 95 as of serial no.: 2350 Item Description Order Qty. Head 39092 Piston 39093 Low-pressure cylinder 39094 Low-pressure piston 39095 Supporting washer 39096 Valve 3007 Conical pin 1497 Cap screw 1498 Thrust pin 1499 Grub screw M 4x6...
- Page 13 3000 Pressing Cylinder HP 95 as of serial no.: 2350...
-
Page 14: 31830 Hand Switch Hp 95 And Hp 300
31830 Hand switch HP 95 and HP 300 (old) Item Description Order No. Qty. 1 Handle 31823 2 Switch socket 31824 3 Lock nut 31827 4 Adapter 31826 5 Shim 11025 6 Cup washer 14231 7 Cable 14235 8 Extension... - Page 15 31830 Hand switches HP 95 and HP 300 (old)
- Page 16 31830 Hand switch HP 95 and HP 300 (new) Item Description Order No. Qty. 1 Handle 36960 3 Lock nut 31827 4 Adapter 31826 5 Shim 11025 6 Cup washer 14231 17 Grub screw M5x10 11078...
- Page 17 36960 Hand switch HP 95 and HP 300 Item Description Order No. Qty. 1 Handle 31823 2 Switch socket 31824 3 Wire 14834 4 Pan head screw M3 x 8 13127 5 Serrated lock washer A3,2 14215 6 Housing 14243...
-
Page 18: Pressing Cylinder Hp 300
Pressing Cylinder HP 300 For spare parts list and component drawing, see pages 20 to 23 DISMANTLING Slit and remove the shrink-on sleeve (21). For devices as of serial no.: 3401 Undo the grub screw (8) Grip the HP 300 by the head (1) in a vice. Unscrew the plug connector (20). - Page 19 Pressing Cylinder HP 300 3.11 Screw off the head (1) and remove it together with the piston (5), the valve (30) and the locating washer (14) from the HP 300. 3.12 Up to serial no.: 3400 Remove the locating washer (14) from the piston (5). As of serial no.: 3401 Remove the Turcon stepseal (14) from the piston (5).
-
Page 20: Assembly
Pressing Cylinder HP 300 3.18 Up to serial no.: 3400 Push the locating washer (15) out of the cylinder (3). (e.g. using a screwdriver) From serial no.: 3401 Take the Turcon stepseal (15) out of the cylinder (3). WARNING! Any scoring of the contact faces of the cylinders must be polished or ground out. If scoring is very severe, replace the cylinder. - Page 21 Pressing Cylinder HP 300 4.12 As of serial no.: 3401 Insert and tighten the grub screw (8). 4.13 Insert and tighten the grub screw (34) and arrest it with a centre punch mark. 4.14 Fit the locating washer (17) into the cap screw (29). 4.15 Place the washer (31) and the spring (25) on the cap screw (29).
- Page 22 1000 Pressing Cylinder HP 300 up to serial no.: 3400 Item Description Order Qty. Head 1014 Low-pressure cylinder 1002 High-pressure cylinder 1003 Low-pressure piston 2351 High-pressure piston 1005 Punch Cu + Al for HP 300 1008 Die for Cu for HP 300 1009 Retaining screw complete 1694...
- Page 23 1000 Pressing Cylinder HP 300 up to serial no.: 3400...
- Page 24 1000 Pressing Cylinder HP 300 as of serial no.: 3401 Item Description Order Qty. Head 1014 Low-pressure cylinder 39088 High-pressure cylinder 39089 Low-pressure piston 39090 High-pressure piston 39091 Punch Cu + Al for HP 300 1008 Die for Cu for HP 300 1009 Grub screw M 4x6 11758...
- Page 25 1000 Pressing Cylinder HP 300 as of serial no.: 3401...
-
Page 26: Pressing Cylinder Hpm 400
Pressing Cylinder HPM 400 For spare parts list and drawing of the part, see pages 27 to 29 DISMANTLING Undo and remove the two screws (53). Pull of the rotating head (31). Undo the cap screw (30) and take out the complete pressure relief valve (30a). - Page 27 Pressing Cylinder HPM 400 5.14 Replace the seals (44) and (49) in the piston (5) and in the sealing screw (7). Insert the O-ring (44) into the piston (5) with the tool No. 8458 (special accessory). 5.15 Undo the screw (43). 5.16 Unscrew the cylinder (2) from the head (1).
-
Page 28: Assembly
Pressing Cylinder HPM 400 ASSEMBLY Fit the seals (51) and (46), the valve piston (21) and the parts (22) and (26) in to the cap screw (23). Insert the O-Ring (56) into the piston (17). Screw the cap screw together with the parts listed under 6.1 into the piston and tighten with 50 Nm of torque. - Page 29 Pressing Cylinder HPM 400 6.14 Place the suction cup (15) on to the pump housing and fit the rings (9) and (13). The rim of the suction cup must not slip in the groove in the pump housing. 6.15 Fit the pump housing on to the cylinder (5) without the pressure relief valve. WARNING! The small O-ring (52) must be in the pump housing and the holes (oil passage) in the cylinder and in the pump housing must be in line.
- Page 31 5200 Pressing Cylinder HPM 400 Item Description Order Qty. Head HP 300 1014 Cylinder 5493 Pump housing 5533 Pump lever 5590 Low-pressure piston 5435 High-pressure piston 5436 Seal screw 5584 Spacer 5585 Ring 5788 Conical pin 6627 Valve seat 5442 Valve screw 5446 Ring...
- Page 32 5200 Pressing Cylinder HPM 400 Item Description Order Qty. O-ring 11945 O-ring 11946 O-ring 11947 O-ring 11703 Support washer 11702 Support washer 11948 Support washer 11949 Support washer 11950 O-ring 11951 Pivot bolt 5725 O-ring 11953 O-ring 11714 O-ring 11955 Usit-ring 11369 Ball Ø...
- Page 33 5200 Pressing Cylinder HPM 400...
-
Page 34: Pressing Cylinder Hp 450
Pressing Cylinder HP 450 For spare parts list and drawing of the parts, see pages 34 to 35 DISMANTLING Slit the shrink-on sleeve (38) and remove it. Grip the HP 450 by the head (1) in a vice. Unscrew the plug connector (36). For HP’s with hand switch only: •... - Page 35 Pressing Cylinder HP 450 7.10 Remove the retaining ring (3/30655). 7.11 Remove the lock pin (1/30655) and spring (2/30655). 7.12 Remove the retaining ring (34). 7.13 Push the guide pin (32) up and remove it. 7.14 Grip the head (1) with fittings in a vice. 7.15 To secure the piston (2), insert a screw M 10 x 30 mm with washer Ø10.5 into the piston.
-
Page 36: Assembly
Pressing Cylinder HP 450 ASSEMBLY WARNING! It is essential that all locating washers are returned to their original position. Grip the head (1) horizontally in a vice. Insert the spacer (7) and the spring (16) into the head. Fit the piston (2) with a new seal (26), the spring (17) and the slide (3) into the head (1). - Page 38 3850 Pressing Cylinder HP 450 Item Description Order Qty. Head 3918 High-pressure piston 3935 Slide 3934 3835 Low-pressure cylinder 3836 Low-pressure piston 3837 Spacer 3838 Washer 3839 Thrust pin 3845 Punch stop 30645 Die stop 30655 Conical pin 1497 Cap screw 1498 Spring high-pressure 3957...
- Page 39 3850 Pressing Cylinder HP 450...
-
Page 40: 31831 Hand Switch Hp 450
31831 Hand Switch HP 450 (old) Item Description Order No. Qty. Handle 31821 Switch socket 31824 Lock nut 31827 Adapter 31826 Shim 11025 Cup spring 14231 Cable 14236 Extension 14242 Protective sleeve 14271 Cable grip 14270 Sleeve casing 14219 Insert plug 14218 Push switch 14186... - Page 41 31831 Hand Switch HP 450 (old)
- Page 42 31831 Hand Switch HP 450 (new) Item Description Order No. Qty. Handle 36961 Lock nut 31827 Adapter 31826 Shim 11025 Cup spring 14231 Grub screw M5x10 11078...
- Page 43 36961 Hand Switch HP 450 Item Description Order No. Qty. Handle 31821 Switch socket 31824 Wire 14834 Pan head screw M3 x 8 13127 Serrated lock washer A3,2 14215 Housing 14243 Insert plug 14218 Push switch 14186 Pushbutton 14187 Shrink sleeve 14237 Shrink sleeve 14244...
-
Page 44: 7375 Valve
7375 Valve HP 450 complete Item Description Order Qty. Spring sleeve 3936 Ball 1541 Spring 1218 Socket head bolt M 5x90 11068 Hex. nut M5 11065... -
Page 45: 30645 Punch Stop
30645 Punch Stop Item Description Order Qty. Lock pin 30646 Knurled nut 30647 Spring 13812 30655 Die stop Item Description Order Qty. Lock pin 3939 Spring 3854 Retaining ring 11814... - Page 46 Repair / Service Scharnhorststraße 1 P.O. Box 101163 D-41460 Neuss 1 D-41411 Neuss Tel. 02131 / 288-0 02131 / 28855...
Need help?
Do you have a question about the HP 95 and is the answer not in the manual?
Questions and answers