
Subscribe to Our Youtube Channel
Related Manuals for Clearaudio Jubilee MC


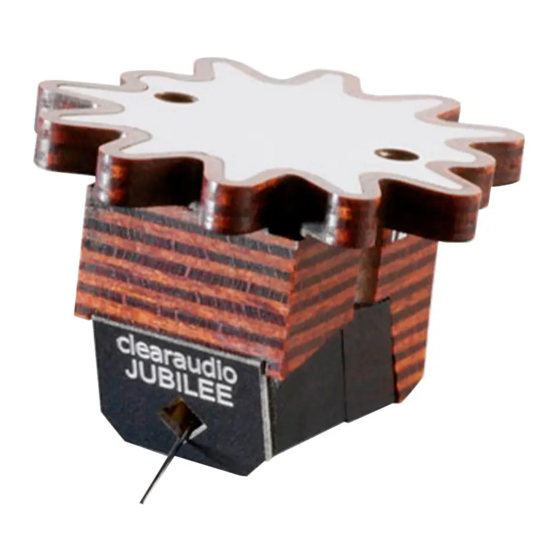
Summary of Contents for Clearaudio Jubilee MC
- Page 1 Jubilee MC User manual Bedienungsanleitung Pic. similar / Abb. ähnlich © clearaudio electronic GmbH Made in Germany...
- Page 2 Clearaudio moving coil cartridge made of armoured wood and its shape is reminiscent of the masterpieces of the V2 moving coil series. The name „Jubilee” MC and MM was inspired by Clearaudio’s 40th anniversary, uniting four decades of dedication to “loving music”. Please note: This user manual gives you valuable information for the correct installation of your cartridge.
-
Page 3: Table Of Contents
User manual / Bedienungsanleitung Contents 1. Included accessories ......4 2. Mounting procedure .......5 - 6 3. Adjustment of the tracking force ...7 4. Special instructions ........8 - 9 5. Technical data ........10 Warranty information .........20 - 21 Made in Germany Page / Seite 3... -
Page 4: Included Accessories
(Art. No. BIN070904) Setting Template Clearaudio • (Art. No. AC005/IEC) Weight Watcher touch • Clearaudio (Art. No. AC163) Elixir of Sound Clearaudio • (Art. No. AC003) Diamond cleaner brush Clearaudio • (Art. No. AC014) © clearaudio electronic GmbH Page / Seite 4... -
Page 5: Mounting Procedure
Be careful not to over-tighten the screws as they may strip the threaded holes. Now connect the pins of your Clearaudio cartridge to the jacks of the headshell or tonearm cable, taking care not to use too much force. If necessary, you can use suitable precision pliers or tweezers for assistance. - Page 6 5. Plug the mains power cord into your electrical power supply. Our tip for mounting the cartridge: Choose a bright workplace and good tools, and take your time so you can concentrate. © clearaudio electronic GmbH Page / Seite 6...
-
Page 7: Adjustment Of The Tracking Force
In the event that it is not possible to set the optimal tracking force due the cartridge being too light, you should use a spacer plate available from your Clearaudio importer/dealer. Further valuable information for the correct adjustment of your cartridge can be found in the respective user manual of the turntable and/or tonearm manufacturer. -
Page 8: Special Instructions
Always use the original packaging when shipping the cartridge and secure the stylus guard with a rubber band. • If any service or repair to a Clearaudio product is necessary, please contact your dealer / distributor. We can advise you of your nearest service location. - Page 9 Do not try to remove the stylus assembly yourself. Please contact your dealer / distributor. Any damage caused by failure to follow the advice given in the Clearaudio user manual will invalidate the product warranty. Clearaudio will assume no liability for any such damage.
-
Page 10: Technical Data
Cartridge body: Bullet proof wood Manufacturer’s warranty: 2 years* *Provided that the warranty card is correctly completed and returned to Clearaudio, or your product is registered online at https://clearaudio.de/en/service/registration.php, within 14 days of purchase. © clearaudio electronic GmbH Page / Seite 10... - Page 11 GmbH entschieden haben. Clearaudio Tonabnehmer entsprechen dem höchstmöglichen Standard „Made in Germany“. Jeder clearaudio Tonabnehmer ist ein handgefertigtes Meisterstück und verleiht Ihrer HiFi-Anlage die entscheidende Klangverbesserung an der analogen Quelle. Die konsequente Forschung in der Optimierung unserer patentierten MC Tonabnehmer führt bis heute zu einer andauernden Alleinstellung.
- Page 12 Justage ist größtenteils von Ihrem Tonarm und / oder Plattenspieler abhängig. Wir bedanken uns bei Ihnen für Ihr Vertrauen und wünschen Ihnen viel Freude mit Ihrem neuen clearaudio MC Tonabnehmer. clearaudio electronic GmbH ACHTUNG: NICHT FÜR SCHELLACK PLATTEN (78 U/min) GEEIGNET Dieser Tonabnehmer ist nur zur Montage an Tonarmen bestimmt und darf nicht für andere Zwecke verwendet werden.
- Page 13 User manual / Bedienungsanleitung Inhaltsverzeichnis 1. Zubehör im Lieferumfang ......14 2. Montage ............15 - 16 3. Einstellen der Auflagekraft ......17 4. Besondere Hinweise ........17 - 18 5. Technische Daten .........19 Garantiehinweise ..........20 - 21 Made in Germany Page / Seite 13...
-
Page 14: Zubehör Im Lieferumfang
(Art. Nr. BIN070904) Setting Template • Clearaudio (Art. Nr. AC005/IEC) Weight Watcher touch Clearaudio • (Art. Nr. AC163) Elixir of Sound Clearaudio • (Art. Nr. AC003) Clearaudio Diamond cleaner brush • (Art. Nr. AC014) © clearaudio electronic GmbH Page / Seite 14... -
Page 15: Montage
Zur Montage an Ihrem Tonarm empfiehlt es sich den Nadelschutz auf dem Tonabnehmer zu belassen, um Beschädigungen zu vermeiden. Montieren Sie mit Hilfe der beiliegenden Schrauben Ihren clearaudio MC-Tonabnehmer. (Die Aufnahmegewinde im Tonabnehmergehäuse entsprechen der metrischen Norm für M 2,5 mm Schrauben und weisen den international genormten Abstand von 12,7 mm auf.) - Page 16 (RCA) Stecker Eingangsbuchsen Vorverstärkers stecken. Vorverstärker-Lautstärke-Stellung immer auf „0“ stellen. Netzstecker Vorverstärkers Stromnetz anschließen. Unser Tipp für die Tonabnehmereinstellung: Wählen Sie einen hellen Arbeitsplatz, gutes Werkzeug und bewahren Sie Ruhe und Konzentration. © clearaudio electronic GmbH Page / Seite 16...
-
Page 17: Einstellen Der Auflagekraft
Reinigen Sie auch die Nadel regelmäßig mit einem weichen Pinsel oder mit einer im Fachhandel erhältlichen Reinigungsflüssigkeit (clearaudio Nadelreiniger Art. Nr. AC003). Bitte achten Sie darauf, dass hierbei keine Flüssigkeit auf den Tonabnehmerkörper gelangt und dass mit der Bürste immer von hinten nach vorne gereinigt wird. - Page 18 • verwenden und den Nadelschutz mit einem Gummiband sichern. • Sollte eine Wartung oder Reparatur an Ihren clearaudio Produkt erforderlich sein, kontaktieren Sie bitte Ihren Händler oder Vertrieb. Gerne können wir Sie auch über die nächste Servicestelle informieren. WICHTIG! Unbedingt lesen! Versuchen Sie keinesfalls den Nadelträger selbst auszubauen!
-
Page 19: Technische Daten
15 μ/mN Spulenanordnung: Absolut Drehpunkt-Symmetrisch Material der Spulen: 24 Karat Gold Systemkörper: Panzerholz Herstellergarantie: 2 Jahre* *Nur bei korrekt ausgefüllter und eingesandter Garantiekarte an clearaudio oder online registrierter Garantie innerhalb von 14 Tagen (https://clearaudio.de/de/service/registration.php). Made in Germany Page / Seite 19... -
Page 20: Warranty Information
The full, extended warranty period for the cartridge is 2 years. To receive this full Clearaudio warranty, you must either complete and return the relevant section of the warranty registration card to Clearaudio, or register your product online at https://clearaudio.de/en/service/registration.php, within 14 days of purchase. - Page 21 ESPAÑOL GARANTIA Para obtener información acerca de la garantia póngase en contacto con su distribuidor Clearaudio. GUARDE SU RECIBO DE COMPRA Su recibo de compra es su prueba permanente de haber adquirido un aparato de valor, Este recibo deberá...
- Page 22 User manual / Bedienungsanleitung © clearaudio electronic GmbH Page / Seite 22...
- Page 23 User manual / Bedienungsanleitung Made in Germany Page / Seite 23...
- Page 24 Irrtümer vorbehalten- Kopien und Abdrucke – auch nur auszugsweise – bedürfen der schriftlichen Genehmigung durch die clearaudio electronic GmbH, Deutschland. Clearaudio Electronic accepts no liability for any misprints. Technical specifications are subject to change or improvement without prior notice. Product availability is as long as stock lasts.
Need help?
Do you have a question about the Jubilee MC and is the answer not in the manual?
Questions and answers