
Related Manuals for Chainway C66


Summary of Contents for Chainway C66
- Page 1 SHENZHEN CHAINWAY INFORMATION TECHNOLOGY CO.,LTD Mobile Data Terminal C66 User Manual...
-
Page 2: Table Of Contents
Content Content ..................1 Statement ..................3 Chapter 1 Product intro ..............5 Intro ..................5 Precaution before using battery ........... 6 Charger ................7 Notes .................. 8 Chapter 2 Installation instructions ............. 9 2.1 Appearance ................9 2.2 Install Micro SD and SIM cards ..........10 2.3 Battery charge ............... - Page 3 6.6 Keyboard ................22 6.7 Network ................. 23 6.8 Keyboard emulator ..............24 Chapter 7 Device characteristic ............25...
-
Page 4: Statement
(licensed program). Except as noted below, such license may not be assigned, sublicensed, or otherwise transferred by the user without prior written consent of Chainway. No right to copy a licensed program in whole or in part is granted, except as permitted under copyright law. -
Page 6: Chapter 1 Product Intro
Chapter 1 Product intro 1.1 Intro C66 is an industrial-grade smart handheld terminal that has been designed and manufactured by Shenzhen Chainway information technology co, ltd .It is based on Android 7.1 / Android 9.0, which runs fast and has a long battery life. To meet the needs of multi- industry applications like logistics express, warehouse inventory, manufacturing, retail, etc., It can help customers to quickly access... -
Page 7: Precaution Before Using Battery
1.2 Precaution before using battery Do not leave battery unused for long time, no matter it is in device or inventory. If battery has been used for 6 months already, it should be check for charging function or it should be disposed correctly. -
Page 8: Charger
1.3 Charger The charger output voltage/current is 9V DC/2A. The plug considered as disconnect device of adapter. -
Page 9: Notes
1.4 Notes Note: Using the incorrect type battery has danger of explosion. Please dispose the used battery according to instructions. Note: Due to the used enclosure material, the product shall only be connected to a USB Interface of version 2.0 or higher. The connection to so called power USB is prohibited. -
Page 10: Chapter 2 Installation Instructions
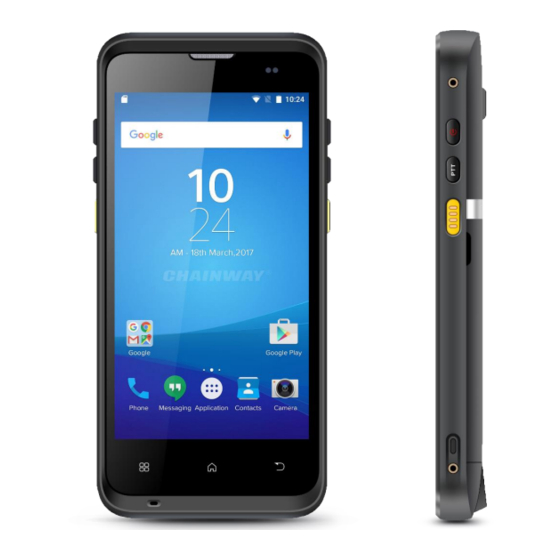
Chapter 2 Installation instructions 2.1 Appearance C66 back and front appearances are showing as follows:... -
Page 11: Install Micro Sd And Sim Cards
Buttons instruction Button Description 1. Power Locate on right side, press to ON/OFF device. Side Locate on right side, its function can be defined by software. 2. PTT key button Scanning button located on both sides. There are two scanning 3.SCAN buttons. -
Page 12: Battery Charge
2.3 Battery charge By using USB Type-C contact, the original adaptor should be used for charging the device. Make sure not to use other adaptors to charge the device. -
Page 13: Buttons And Function Area Display
2.4 Buttons and function area display C66 has 6 side buttons, 2D scanning module locates on the top. HD camera and flashlight locate at rear. NFC identification surrounds the camera. -
Page 14: Chapter 3 Call Function
Chapter 3 Call function 3.1 Calling numbers 1. Click icon 2. Click number key to input phone numbers. 3. Click icon to call. 4. Click icon to end call. 3.2 Contacts 1. Click contacts to open contacts list. 2. Click icon to add new contacts. -
Page 15: Chapter 4 Barcode Reader-Writer
Chapter 4 Barcode reader-writer 1. In App Center, to open 2D barcode scan test. 2. Press “SCAN” button or click scan key to start scanning, the parameter “Auto interval” can be adjusted. Caution: Please scan codes in correct way otherwise the scanning will be failed. - Page 16 Max. radiant power: 0.6mW Wave length: 655nM IEC 60825-1 (Ed.2.0). 21CFR 1040.10 and 1040.11 standard.
-
Page 17: Chapter 5 Rfid Reader
Chapter 5 RFID reader 5.1 NFC Click App Center, open “NFC” to read and write tag information. -
Page 18: Chapter 6 Other Functions
Chapter 6 Other functions 6.1 PING tool 1. Open “PING” in App Center. 2. Setup PING parameter and select external/internal address. -
Page 19: Bluetooth
6.2 Bluetooth 1. Open “BT Printer” in App Center. 2. In the list of detected devices, click the device that you want to pair. 3. Select printer and click “Print” to start printing contents. -
Page 20: Gps
6.3 GPS 1. Click “GPS” in App Center to open GPS test. 2. Setup GPS parameters to access GPS information. -
Page 21: Volume Setup
6.4 Volume setup 1. Click “Volume” in App Center. 2. Setup volume by requirements. -
Page 22: Sensor
6.5 Sensor 1. Click “Sensor” in App Center. 2. Setup the sensor by requirements. -
Page 23: Keyboard
6.6 Keyboard 1. Click “Keyboard” in App Center. 2. Setup and test the main value of the device. -
Page 24: Network
6.7 Network 1. Click “Network” in App Center. 2. Test WIFI/Mobile signal by requirements. -
Page 25: Keyboard Emulator
6.8 Keyboard emulator The keyboard emulator can be used in multiple operating background and output formats directly. And it includes Prefix/Suffix/Enter/TAB. Please check Keyboard emulator manual for more details. -
Page 26: Chapter 7 Device Characteristic
Chapter 7 Device characteristic Physical characteristics Size 160x76x15.5mm / 6.3*2.99*0.61in <287g/10.12oz(with battery) Weight Display 5.45-inch display, IPS LTPS 1440*720 Touch panel Corning Gorilla Glass, multi-touch panel, gloves and wet hands supported Battery 4300mAh removable main battery, 5200mAh optional pistol battery, support QC3.0 and RTC Standby: over 300 hours (only main battery) Continuous use: over 12 hours (depending on user environment) - Page 27 User environment Operating -20℃ to 50℃ temp. Storage Temp. 40℃ to 70℃ Humidity 5%RH - 95%RH non condensing Sealing IP65, IEC sealing standard Drop Multiple 1.5m/4.9ft drops (at least 20 times) to the specification concrete across the operating temperature range Multiple 2.4m/7.87ft drops (at least 20 times) to the concrete after installed rubber bumper Communication...
- Page 28 Developing Environment Chainway software develop kit Language Java Develop Eclipse/Android Studio...
Need help?
Do you have a question about the C66 and is the answer not in the manual?
Questions and answers
Use front scanner
To use the front scanner on the Chainway C66:
1. Open the demo application on the device.
2. Ensure the barcode scanner is enabled using the app settings.
3. Point the front scanner at the barcode or label.
4. Press the trigger button or designated scan key to capture the barcode.
5. The scanned data will appear in the application.
For additional options, you can configure settings such as suffixes, prefixes, or automatic actions after scanning in the app settings.
This answer is automatically generated