
Related Manuals for Chainway AZ-C72


Summary of Contents for Chainway AZ-C72
- Page 1 Mobile Data Terminal AZ-C72 User Manual www.rfidcard.com E-mail : sales@rfidcard.com Tel : +86-131-3958-0585 https://...
-
Page 2: Table Of Contents
Contents Chapter 1 Product Intro ....................3 1.1 Intro ......................... 3 1.2 Precaution before using battery ..............4 1.3 Charger ........................5 1.4 Notes ........................6 Chapter 2 Installation Guide.................... 7 2.1 Appearance ......................7 2.2 Install Micro SD, SIM cards ................8 2.3 Battery Charging .................... -
Page 3: Chapter 1 Product Intro
Chapter 1 Product Intro 1.1 Intro AZ-C72 device is a smart mobile PDA that integrated with various features such UHF, wireless communication, data acquisition, wireless transmission and data processing etc. It is configured with Andriod 6.0 OS and it possesses high reliability and expansibility. With a set of... -
Page 4: Precaution Before Using Battery
1.2 Precaution before using battery Do not leave battery unused for long time, no matter it is in device or inventory. If battery has been used for 6 months already, it should be check for charging function or it should be disposed correctly. The lifespan of Li-ion battery is around 2 to 3 years, it can be circularly charged for 300 to 500 times. -
Page 5: Charger
1.3 Charger The charger type is GME10D-050200FGu, output voltage/current is 5V DC/2A. The plug considered as disconnect device of adapter. -
Page 6: Notes
1.4 Notes Note: Using the incorrect type battery has danger of explosion. Please dispose the used battery according to instructions. Note: Due to the used enclosure material, the product shall only be connected to a USB Interface of version 2.0 or higher. The connection to so called power USB is prohibited. -
Page 7: Chapter 2 Installation Guide
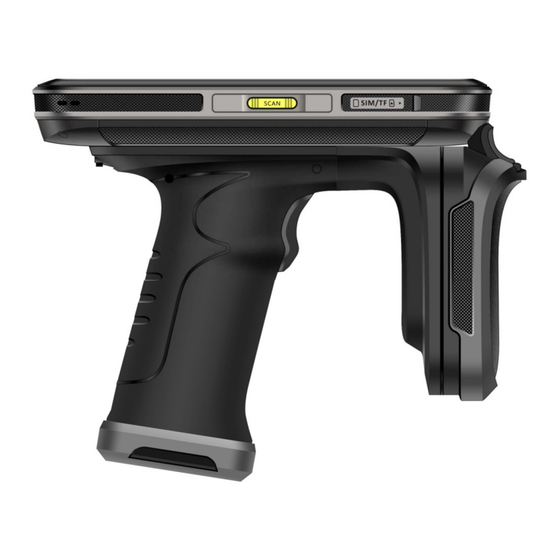
Chapter 2 Installation Guide 2.1 Appearance... -
Page 8: Install Micro Sd, Sim Cards
2.2 Install Micro SD, SIM cards 2.3 Battery Charging By using USB Type-C contact, the original adaptor should be used for charging the device. Make sure not to use other adaptors to charge the device. -
Page 9: Buttons And Function Area
2.4 Buttons and Function Area AZ-C72 has 4 side buttons and 4 main keys, handheld connection port locates at rear, 2D scanning module and camera locate at top. Card Tray Power Button Setup SCAN SCAN Buttons instruction Button Description 1.Power Located on left side, press to ON/OFF device. -
Page 10: Chapter 3 Call Function
Chapter 3 Call function 3.1 Calling numbers 1. Click icon 2. Click number key to input phone numbers. 3. Click icon to call. 4. Click icon to end call. 3.2 Contacts 1. Click contacts to open contacts list. to add new contacts. 2. -
Page 11: Chapter 4 Barcode Reader-Writer
Chapter 4 Barcode reader-writer 1. In App Center, to open 2D barcode scan test. 2. Press “SCAN” button or click scan key to start scanning, the parameter “Auto interval” can be adjusted. Caution: Please scan codes in correct way otherwise the scanning will be failed. - Page 12 Max. radiant power: 0.6mW Wave length: 655nM IEC 60825-1 (Ed.2.0). 21CFR 1040.10 and 1040.11 standard.
-
Page 13: Chapter 5 Infrared Read-Write Function
Chapter 5 Infrared read-write function 1. Open infrared function in App Center. 2. Click button “Open” to start infrared scanning function. Click “LED” for infrared scanning aim assist. Depending on different application status to compile different commands to realize infrared read and write function. -
Page 14: Chapter 6 Rfid Reader
Chapter 6 RFID reader 6.1 UHF Click App Center, open “UHF” to scan, read and write tag information, also kill and lock tags. -
Page 16: Chapter 7 Other Functions
Chapter 7 Other functions 7.1 PING tool 1. Open “PING” in App Center. 2. Setup PING parameter and select external/internal address. -
Page 17: Bluetooth
7.2 Bluetooth 1. Open “BT Printer” in App Center. 2. In the list of detected devices, click the device that you want to pair. 3. Select printer and click “Print” to start printing contents. -
Page 18: Gps
7.3 GPS 1. Click “GPS” in App Center to open GPS test. 2. Setup GPS parameters to access GPS information. -
Page 19: Volume Setup
7.4 Volume setup 1. Click “Volume” in App Center. 2. Setup volume by requirements. -
Page 20: Sensor
7.5 Sensor 1. Click “Sensor” in App Center. 2. Setup the sensor by requirements. -
Page 21: Keyboard
7.6 Keyboard 1. Click “Keyboard” in App Center. 2. Setup and test the main value of the device. -
Page 22: Network
7.7 Network 1. Click “Network” in App Center. 2. Test WIFI/Mobile signal by requirements. -
Page 23: Chapter 8 Device Characteristic
Chapter 8 Device characteristic Physical characteristics Size 164.2mm*80.0mm*24.3mm Weight 654g (battery included) Display 5.2 inch,IPS FHD 1920*1080P 4 main keyboards, 1 power button, 2 scan buttons, Touch panel 1 multi-function button Battery Li-ion, rechargeable, 8000mAh Expansion Supports up to 32 GB Micro SD card 1 slot for SIM card, 1 slot for SIM or TF card, PSAM Expansion Slot supported... - Page 24 Communication 2G: 850/900/1800/1900MHz 3G: 850/900/1900/2100MHz 4G: B1, B3, B5, B7, B8, B20, B40 2G: 850/900/1800/1900MHz 3G: 850/900/1700/1900MHz 4G: B2, B4, B7, B12, B17 2G: 900/1800MHz 3G: 900/1900/2000/2100MHz 4G: B1, B3, B5, B38, B39, B40, B41 IEEE802.11a/b/g/n, embedded antenna, 5 Gigabit WLAN WIFI max.
-
Page 25: Appendix
Appendix... -
Page 26: Restrictions
Restrictions: AT BE BG HR CY DE GR HU IE MT NL RO SK This device is restricted to indoor use where operated in the European Community using frequency in 5150MHz-5350MHz to reduce the potential for interference. -
Page 27: Simplified Eu Declaration Of Conformity
Simplified EU declaration of conformity Hereby, we declare that the radio equipment type C71 is in compliance with Directive 2014/53/EU. Signature:... -
Page 28: Sar Information
SAR Information The SAR limit of Europe is 2.0 W/kg. Device types AZ-C72 has also been tested against this SAR limit. The highest SAR value reported under this standard during product certification for use at the ear is 0.219W/kg and when properly worn on the body is 1.216 W/kg.
Need help?
Do you have a question about the AZ-C72 and is the answer not in the manual?
Questions and answers