Table of Contents
Advertisement
Quick Links
Advertisement
Table of Contents

Related Manuals for Joy-it JT-UM25C


Summary of Contents for Joy-it JT-UM25C
- Page 1 JT-UM25C...
-
Page 2: Table Of Contents
TABLE OF CONTENTS Introduction Device Overview Menus and Navigation General Use Main Menu (Measurement Results) Quickcharge Detection Charging Record Cable Impedance Measurement Graph System Settings PC-Software Connection Using the Software Android App Additional Informations Support Published: 13.12.2018 Copyright by Joy-IT... -
Page 3: Introduction
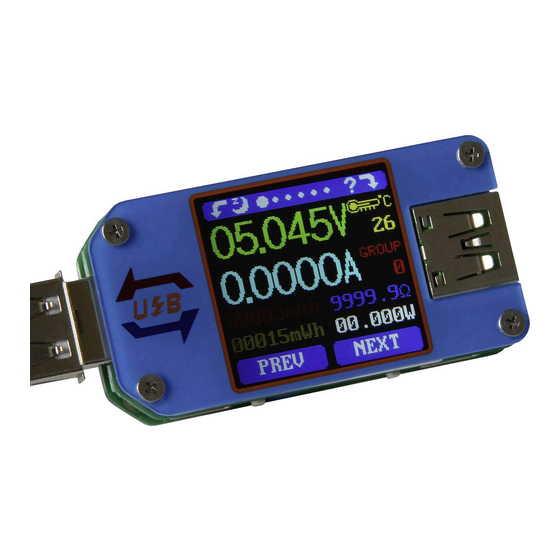
Quickcharge 2.0 and 3.0, as well as Apple 2.4A, 2.1A, 1A, 0.5A and Android DCP and also offers convenient evaluation via a radio interface. With a measuring range of up to 24V and 5A, the JT-UM25C is suitable for practically all applications. The integrated 1.44" LCD display can be adjusted in five brightness levels and always provides an overview of all measured values. - Page 4 USB A Port (Male) USB C Input (Only VBUS, GND, CC1, CC2) 1,44“ Color Display USB C Output (Only VBUS, GND, CC1, CC2) Bluetooth Status (changes when connecting from a flashing light to a permanent light) Published: 13.12.2018 Copyright by Joy-IT...
-
Page 5: Menus And Navigation
Quick Charge Recognition Charging Record System Settings Cable Impedance Measurement Graph to switch between the menu pages. Press and hold to switch to the next data group. Press and hold to reset the current data group. Published: 13.12.2018 Copyright by Joy-IT... -
Page 6: Main Menu (Measurement Results)
The values of the data groups 1-9 are stored when the power of the encoder is interrupted and are counted again after the encoder is switched on again. The values in data group 0, on the other hand, flash when the meter is switched on again and are then reset to 0. Published: 13.12.2018 Copyright by Joy-IT... -
Page 7: Charging Record
The "REC" indicator changes from red to green. To set the current trigger value, press and hold to highlight the value. Press the button to adjust the value. The value can be set between 0.01A and 0.30A. Published: 13.12.2018 Copyright by Joy-IT... -
Page 8: Cable Impedance
4V switch-off state. The load current must be reduced. Then restart the measurement from the first step. After the resistance test of the data connec- tion cable has been completed, the tester must be switched off and on again to continue the measurement. Published: 13.12.2018 Copyright by Joy-IT... -
Page 9: Measurement Graph
Then press the button to change the setting and press the button again to cycle through the setting options. Press and hold the button at each setting state to exit the setting menu. Published: 13.12.2018 Copyright by Joy-IT... -
Page 10: Pc-Software
Then use the Bluetooth search in the settings of your computer to search for new Bluetooth devices. Add the UM25C device as soon as it is found. If you are asked for a PIN during connection setup, please use pin 1234 or 0000. Published: 13.12.2018 Copyright by Joy-IT... - Page 11 JT-UM25C Published: 13.12.2018 Copyright by Joy-IT...
- Page 12 To do this, select the option "Bluetooth settings" in the Bluetooth connection overview. In the window that now opens, select the "COM ports" tab. The necessary interface in this case is "UM25C'Port'". Published: 13.12.2018 Copyright by Joy-IT...
-
Page 13: Using The Software
Now open the "UM25C PC Software V1.3" which you have already installed on your computer. First set the corresponding COM port to which the measuring device is connected on your computer and start the connection with the "Connect" button. Published: 13.12.2018 Copyright by Joy-IT... - Page 14 With a right click within the voltage-current diagram further options are available to you. Here you can automatically scale the X-axis, copy the current data to the clipboard or export it as an Excel file, export the current graph as an image or delete the current diagram. Published: 13.12.2018 Copyright by Joy-IT...
-
Page 15: Android App
Activate Bluetooth with the Bluetooth button on the meter and then connect to the meter using the Bluetooth settings on your device. Use either 0000 or 1234 as PIN during connection setup. After the installation and the connection have been completed, you can start the application. Published: 13.12.2018 Copyright by Joy-IT... - Page 16 Accumulated mAh and mWh QuickCharge detection, D+ and D- data voltage signal Screen brightness adjustment and temperature adjustment Go to next page Reset current data group Display rotation Go to previous page Charging record Main measurements Published: 13.12.2018 Copyright by Joy-IT...
-
Page 17: Additional Informations
Possibility of return in your area: We will send you a parcel stamp with which you can return the device to us free of charge. Please contact us by e-mail at Service@joy-it.net or by telephone. Information on packaging: If you do not have suitable packaging material or do not wish to use your own, please contact us and we will send you suitable packaging. -
Page 18: Support
We also support you after the purchase. If you still have questions or problems, we are also available by e-mail, telephone and ticket support system. E-Mail: service@joy-it.net Ticket-System: http://support.joy-it.net Phone: +49 (0)2845 98469 – 66 (9:30 - 17:00 o‘clock) For further information please visit our website: www.joy-it.net Published: 13.12.2018 Copyright by Joy-IT...
Need help?
Do you have a question about the JT-UM25C and is the answer not in the manual?
Questions and answers