Hach TitraLab User Manual
Ph & alkalinity content analyzer
Hide thumbs
Also See for TitraLab:
- Basic user manual (89 pages) ,
- User manual (40 pages) ,
- User manual (38 pages)

Subscribe to Our Youtube Channel
Related Manuals for Hach TitraLab


Summary of Contents for Hach TitraLab
- Page 1 DOC022.53.90466 TitraLab pH & Alkalinity content analyzer USER MANUAL 05/2013, Edition 1 © HACH Company, 2013. All rights reserved. Printed in Germany...
-
Page 3: Table Of Contents
Table of contents Section 1 Specifications ........................5 Section 2 General information....................... 7 2.1 Safety information..........................7 2.1.1 Warning labels ........................... 7 2.1.2 Safety information for the correct use of the instrument ............8 2.1.3 Chemical and biological safety ....................8 2.2 Overview of product.......................... - Page 4 Table of contents 4.9 System ..............................30 4.9.1 Alkalinity units...........................30 4.9.2 End Point Value........................30 4.9.3 Data Logger..........................31 4.9.4 Data Output (printer/computer) ....................31 4.9.5 Calibration validity ........................31 4.9.6 Date/Hour ..........................31 4.9.7 Display contrast........................31 4.9.8 Language ..........................31 4.9.9 Theoretical Cal.........................31 Section 5 Maintenance..........................33 5.1 Maintenance schedule ........................33 5.2 Power off the instrument ........................33 5.3 Clean the burette..........................33...
-
Page 5: Section 1 Specifications
Section 1 Specifications These are subject to change without notice! Performance specifications Acid–base titration Measuring principle pH: potentiometric determination Application area Determination of pH and Alkalinity in water Min. 0.1 mL or 10 mg/L CaCO Measuring range Recommended max. 10 mL or 1000 mg/L CaCO Maximum titration system capacity of 20 mL or 2000 mg/L CaCO Resolution Dependent on the selected units... - Page 6 Specifications Certification Certification Electrical security According CE, EN 61010 Electromagnetic compatibility According CE, EN 50081-2 and EN 50082-2 Warranty Warranty 1 year Only for supplied electrode and BCN cable. Only for supplied stirrers.
-
Page 7: Section 2 General Information
Section 2 General information N O T I C E The manufacturer is not responsible for any damages due to misapplication or misuse of this product including, without limitation, direct, incidental and consequential damages, and disclaims such damages to the full extent permitted under applicable law. The user is solely responsible to identify critical application risks and install appropriate mechanisms to protect processes during a possible equipment malfunction. -
Page 8: Safety Information For The Correct Use Of The Instrument
The TitraLab pH & Alkalinity content system is used for the titrimetric determination of alkalinity in waters. Intended for the analysis of natural, treated water and waste water. -
Page 9: Front And Back View
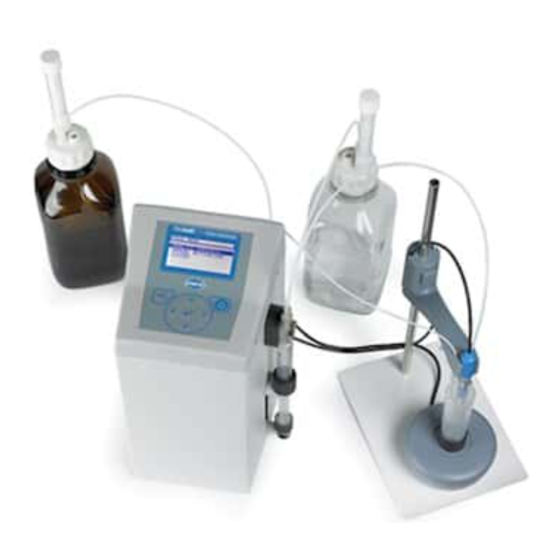
General information • TitraLab can be used directly for waters having an alkalinity concentration of up to 20 mmol/L. For samples containing higher concentrations of alkalinity, a smaller test portion can be used for analysis. The recommended lower limit is 0,4 mmol/L. - Page 10 General information Figure 2 Back view Connector for mouse Connector for power supply Connector for printer or computer Connector for magnetic stirrer Electrode connector Burette valve, IN socket Temperature connector of the electrode Burette valve, OUT socket...
-
Page 11: Section 3 Installation
Section 3 Installation D A N G E R Only qualified personnel should conduct the tasks described in this section of the manual. Safety of any system incorporating this instrument is responsibility of the assembler of the system. WA R N I N G Risk of injury to eyes, skin and respiratory When working with chemicals and/or solvents, always observe the relevant accident prevention regulations and wear appropriate personal protective clothing for eye, face, hand, body and/or... - Page 12 Installation Figure 3 Scope of delivery TitraLab pH & Alkalinity content system pH electrode with cable Tube with bottle closure, DIN 45 thread O-ring to secure tube Tube to attach to electrode 10 Adapter for power supply Titration stand holder including magnetic stirrer...
-
Page 13: Operating Environment
The burette dispenses the titrant: Hydrochloric acid (HCl) 0.1 N (0.1 M) or Sulfuric acid ) 0.1 N (0.05 M). The burette comprises the syringe, stepper motor and valve. The stepper motor and valve are already installed in the TitraLab; the syringe has to be installed by the user. - Page 14 Installation WA R N I N G Risk of injury to pinch points and cuts Make sure that the titrator is never used/operated without the syringe cover. Do not introduce your fingers on the bottom of the cover while the instrument is connected. Make sure that the system is only assembled by qualified and trained personnel.
-
Page 15: Installation Of The Titration Stand
Installation Figure 4 Installation of the burette Push the piston into the syringe body. Screw the syringe tip onto the valve. Slide the attachment sleeve onto the syringe. Place the attachment sleeve into the bracket. Unscrew the six screws and remove the syringe cover. Screw the piston onto the dosage arm. - Page 16 3.4.2.1 Electrical connection of the magnetic stirrer 1. Connect the cable of the magnetic stirrer to the port on the back of the STIRRER TitraLab. The power is supplied via the TitraLab.
-
Page 17: Installation Of Tubes
To prevent twisting of the tubes, you should always connect flange tube connections before those with grommets. The system is delivered with two tubes; these are supplied pre-installed on the TitraLab and only need to be connected to the relevant titrant bottle and to the electrode. -
Page 18: Connection Of The Electrode
The system is delivered with a tube with bottle closure (DIN 45 thread). This feed tube is supplied pre-installed on the TitraLab and only needs to be connected to the titrant bottle. 1. Connect the tube from the IN socket of the burette valve to the titrant bottle (HCl or ). -
Page 19: Power Supply, External
Installation 3.4.4.1 Connection of the tube to the electrode The sensor holder has a tube guide. 1. Connect the tube on the OUT socket of the burette valve. 2. Place the electrode in the sensor holder. 3. Insert the tube into the cannula of the sensor holder. Push the free end of the tube into the tube guide of the sensor holder until the end of the tube is flush with the tip of the electrode (1). -
Page 20: Keypad
Installation Figure 10 Plug connector attachment Slide the plug connector into the power supply Click the plug connector into place Note: To change the plug connector, press in the catch and slide the plug connector upward. Keypad Navigation key UP •... -
Page 21: Optical Mouse (Optional)
OK key (Check mark) 3.5.1 Optical mouse (optional) On TitraLab pH & Alkalinity, all functions executed with OK can also be performed with an optical mouse. 1. Connect the mouse cable to the port labeled on the back of the TitraLab.... - Page 22 Installation...
-
Page 23: Section 4 Operation
1. Connect the input connector of the power supply to the port on the back of POWER IN the TitraLab. 2. Connect the power supply to a power socket. 3. Press below the display to switch on the instrument. -
Page 24: First Steps After Installation
Operation 4.2.1.1 Change the language setting The instrument functions in the selected language until the option is changed. 1. Turn the instrument on. 2. Select SYSTEM > LANGUAGE. 3. Select the required language. 4. Press to confirm the selection. 4.2.1.2 Change the data output setting The instrument functions in the selected data output until the option is changed. -
Page 25: Menu Structure
Operation Menu structure Section 6 Troubleshooting provides a list of all error and warning messages, and also describes all necessary countermeasures. MAIN MENU ANALYZE PH+ALKALINITY Titration program to determine pH and Alkalinity content. Insert Sample: 1 Dispense the sample in a titration cell (50.0 mL). Start Analysis Start analysis. - Page 26 Operation MAIN MENU SYSTEM System settings; refer to section 4.9, page The unit and factor to determine alkalinity can be adjusted individually. Units Alkalinity By default: mg/L CaCO Unit Unit selection. meq/L CaCO mmol/L CaCO ppm CaCO mg/L CaCO °dH °e °Clark...
-
Page 27: Ph And Alkalinity Content
ANALYZE PH + ALKALINITY "INSERT SAMPLE: 1" 5. Select START ANALYSIS The following steps are carried out automatically by TitraLab: • Measurement of pH • Subsequent commencement of titration 6. The result is shown on the display and, depending on the setting, sent to a printer or computer. -
Page 28: Ph Calibration
Operation pH calibration 1. Place a magnetic stirring bar and pH 7.00 calibration solution in a titration cell. 2. Attach the titration cell to the magnetic stirrer. 3. Lower the electrode into the titration cell. Note: Make sure that the electrode cannot be damaged by the stirring bar or come into contact with the bottom of the titration cell. -
Page 29: Ph Calibration With A User Define Control Solution
Operation pH calibration with a user define control solution A user define pH calibration solution can be entered as a third calibration point. A two-point calibration must be performed first (refer to 4.6 pH calibration). After this, proceed as follows: 1. -
Page 30: System
Operation System This function can be used to adapt the titrator to specific requirements. 4.9.1 Alkalinity units The unit and factor for calculation must be adjusted individually. By default the instrument will calculate the alkalinity in mg/L CaCO . F = 100.09 Valid only if:... -
Page 31: Data Logger
Operation 4.9.3 Data Logger This section describes the functions of the data log. • Up to 55 results are stored. • The results can be displayed, printed or sent to a computer. • When the data log is full, the oldest result is overwritten automatically. 1. - Page 32 Operation...
-
Page 33: Section 5 Maintenance
Section 5 Maintenance WA R N I N G Risk of injury Before maintenance or repair work is conducted, thoroughly rinse the instrument with deionized water and make sure that there are no residual chemicals in the tubes and pumps. Only use genuine replacement parts and accessories. - Page 34 Maintenance...
-
Page 35: Section 6 Troubleshooting
Section 6 Troubleshooting Error messages Error displayed Cause Resolution The maximum volume is reached Empty the titration cell and restart the Maximum volume reached. before the titration is completed. The titration. titration is cancelled automatically. Expired calibration. Validity of calibration has expired. Perform new calibration. - Page 36 Troubleshooting...
-
Page 37: Section 7 Replacement Parts And Accessories
Replacement parts Description Cat. No TitraLab pH & Alkalinity in water, with 1x 10 mL syringe. Accessories included: electrode holder LLV2309.97.1002 with magnetic stirrer, pH combined electrode, 10 titration cells and stirring bars pH combined electrode, pH 0 to 14, -10 to +100 °C LZW5014T.97.002... - Page 38 Replacement parts and accessories...
-
Page 39: Section 8 Contact Information
HACH Company Repair Service in the Repair Service in Canada: Repair Service in World Headquarters United States: Latin America, the Hach Sales & Service Caribbean, the Far East, P.O. Box 389 HACH Company Canada Ltd. Indian Subcontinent, Africa, Loveland, Colorado... - Page 40 Contact information HACH LANGE D.O.O. ΗΑCH LANGE E.Π.Ε. HACH LANGE D.O.O. HACH LANGE MAROC SARLAU Fajfarjeva 15 Αυλίδος 27 Ivana Severa bb SI-1230 Domžale GR-115 27 Αθήνα HR-42 000 Varaždin Villa 14 – Rue 2 Casa Tel. +386 (0)59 051 000...
- Page 41 Index Burette ..............13 Magnetic stirrer ............16 Maintenance schedule ..........33 Data logger ..............5 Product contents ............11 Error messages............35 Safety information ............7 Specifications .............. 5 Flange tube connections ........... 17 Titration stand ............15 Keypad ..............20 Warning labels ............
- Page 42 Index...
Need help?
Do you have a question about the TitraLab and is the answer not in the manual?
Questions and answers