Table of Contents
Advertisement
eNBioAccess-T1 User Guide
© Copyright 2013, NITGEN Co., Ltd.
All rights reserved
It is strictly prohibited to compile, duplicate or publish part or whole of this manual prior written
consent of NITGEN.
The specification of this product may be changed without prior notice to improve its functionality.
The logo of NITGEN&COMPANY is a registered trademark of NITGEN Co., Ltd.
Other names or trademarks are registered trademarks of their respective owners.
(05836) (Munjeong-dong, Daemyung VALEON) 12
Songpa-gu, Seoul, Korea
Tel : 82-2-6488-3232 , Fax : 82-2-6488-3099,
E-Mail: customer@nitgen.com; http://www.nitgen.com
th
Floor, 127, Beobwon-ro,
Version Eng-1.6
Advertisement
Table of Contents

Related Manuals for Nitgen eNBioAccess-T1


Summary of Contents for Nitgen eNBioAccess-T1
- Page 1 The specification of this product may be changed without prior notice to improve its functionality. The logo of NITGEN&COMPANY is a registered trademark of NITGEN Co., Ltd. Other names or trademarks are registered trademarks of their respective owners.
-
Page 2: Revison History
User Guide <Revison History> Version Date Description Firmware Version 2016-3-30 Initial Release 2_000_0014 2016-4-08 Change Wordings and Add Notes 2_000_0015 2016-7-08 Add RS485 function 2_000_0023 2016-7-15 Change Door Open interval 2_000_0025 2016-9-12 Change Door Open interval 2_000_0026 2016-10-17 Add scope of RS485 ID... -
Page 3: Product Descriptions
User Guide <Product Descriptions> The NITGEN access control system of eNBioAccess-T1 is the optimized product by organically combining the globally recognized core technologies of NITGEN, such as a fingerprint recognition algorithm, optical sensors, embedded design technology, and software application technology. -
Page 4: Glossaries
User Guide <Glossaries> Administrator (Admin) - The administrator can access to the terminal menu mode. He/she has the authority to add/modify/delete terminal users and to change the operating environment by changing settings. - If there is no registered administrator in the terminal, anybody can access to the terminal menu and change settings. -
Page 5: Table Of Contents
User Guide Table of Contents <Revison History> ....................... 2 <Product Descriptions> ....................... 3 <Glossaries> ......................... 4 Table of Contents ......................... 5 1. Before Getting Started ..................... 7 1.1. Safety Notes ............................. 7 1.2. Product Details ..........................8 1.3. LED signals displayed during operation ..................9 1.4. - Page 6 User Guide 5.1. When the fingerprint authentication time is too long or fails ............24 5.2. When the fingerprint is not entered well ..................24 5.3. When the RF card authentication fails ..................24 5.4. When the network is not connected ....................24 5.5.
-
Page 7: Before Getting Started
User Guide 1. Before Getting Started 1.1. Safety Notes Warning Do not operate the terminal with wet hands, and pay attention not to let any liquid Keep the terminal away such as water enter inside the from inflammables. -
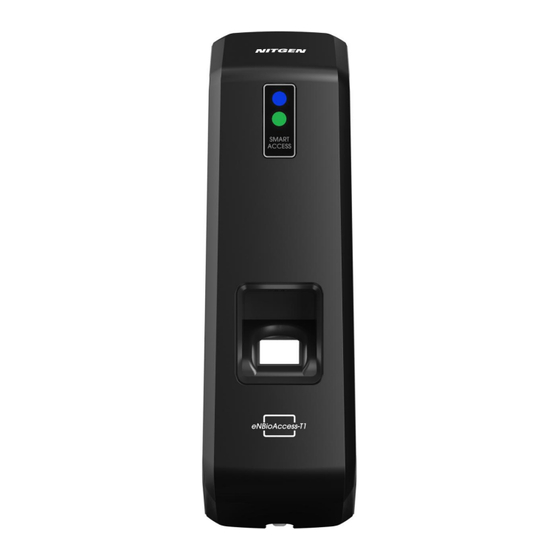
Page 8: Product Details
User Guide 1.2. Product Details Status LED Fingerprint Sensor Card Sensor (138-827) (Bangi-dong, Hyundai Topics Building) 4 Floor, Wiryeoseongdae- ro, Songpa-gu, Seoul, Korea Tel : 82-2-6488-3232 , Fax : 82-2-6488-3099, E-Mail: customer@nitgen.com; http://www.nitgen.com... -
Page 9: Led Signals Displayed During Operation
User Guide 1.3. LED signals displayed during operation Lighting : Normal status ● Flickering : When the input of fingerprint and card user is on standby Lighting : Light up for 1 second upon successful authentication. ● Flickering : Flicker at one second interval when FW is downloaded and when an administrator application is entered. - Page 10 User Guide Enter the fingerprint of your forefinger if possible. When using your forefinger, you can enter your fingerprint correctly and safely. Make sure that the fingerprint is unclear or wounded. Too dry, wet, blurry or wounded fingerprints are difficult to recognize. In this case, the fingerprint of another finger should be registered.
-
Page 11: Product Descriptions
User Guide 2. Product Descriptions 2.1. Product Features Easy to verify your ID via fingerprint - The use of the fingerprint recognition technology (Biometrics) can prevent forgetting your password, losing your card or key, or avoid the risk of their theft. The use of personal fingerprints enhances the security of authentication. -
Page 12: Configuration Diagram
User Guide 2.2. Configuration Diagram 2.2.1. Standalone Use (Access) DC12V Adapter Electrical Lock (Lock+, Lock-, Monitor) 2.2.2. Connecting to the PC server (Access, T&A) TCP/IP TCP/IP Fingerprint Authentication TCP/IP Server Internet / WAN / LAN Remote Administrator Program (User and Terminal Setting... -
Page 13: Product Specification
User Guide 2.3. Product Specification ITEM SPEC REMARKS 400MHz 32Bit RISC CPU 4MB Nor Flash + 256MB Nand Flash MEMORY 64MB RAM 1:1 < Within 0.2 second Authentication Speed 1:N < Within 1 second (Based on 2,000 fingerprints) 10,000 User / 10,000 Card... -
Page 14: Environment Setting
User Guide 3. Environment Setting 3.1. Checkpoints before environment setting 3.1.1. To run iAccess Plus (Mobile App) Search “iAccess ” at the smartphone app store to install a mobile app. Press “iAccess ” Plus Plus icon installed on your smartphone to run the program. The initial screen will appear. After 2-3 seconds, it will automatically go to the Intro menu. -
Page 15: User Management
User Guide 3.2. User Management 3.2.1. Add User Select [Add] on the [User Management] screen, and the following screen will appear. Enter your registration information on the Add User screen. When the information is completely entered, select the [Save] button in the top right of the screen. -
Page 16: Change
User Guide 3.3.3. Change Click the user to change on the [User Management] screen, the screen will go to the [User Details] screen. When you select the [Save] button after modifying the items except the ID, if there is any additional authentication means, the terminal becomes the input standby status and carries out additional registration. -
Page 17: Terminal Setting
User Guide 3.3. Terminal Setting 3.3.1. Setting via “iAccess ” Plus Select [Setting] on the bottom right, and the following screen will appear. To change the terminal settings, press the [Edit] button on the top right to switch to the edit mode. - Page 18 User Guide Card Format The type of card to be used can be set. Settings Display Method No Use Do not use the card authentication Use a low-frequency (125KHz) EM card MIFARE Use a high-frequency (13.56MHz) MIFARE card HID 26bit...
- Page 19 User Guide Node ID Set the terminal ID to add to ACM Pro in the range of 1 to 2000. Use DHCP Set whether to use a static IP. Terminal IP Set the terminal IP. Server IP When the terminal is used in conjunction with Access Manager, set the server IP.
-
Page 20: To Set The Terminal Ip Via Access Manager
User Guide 3.3.2. To set the terminal IP via Access Manager By running terminal search items in the terminal management menu of Access Manager Professional, perform the setting of terminal IP. When clicking the Search button on the above screen, the unregistered terminals in Access Manager Professional will appear as shown below. - Page 21 User Guide When clicking the “...” button, the detailed setting screen will appear as shown below. To change the terminal ID and network settings, select the terminal to set, enter the change value, and click the “ID Change” or “IP Change” button. Then, you can check that the terminal value is changed.
- Page 22 User Guide Set Terminal ID and Terminal Network and then click the “Request Connect” button at the bottom, and the terminal will appear as the unregistered status on the Access Manager Professional screen and the settings will be finished.
-
Page 23: How To Use Terminal
User Guide 4. How to Use Terminal 4.1. Authentication 4.1.1. Fingerprint Authentication Place your finger on the fingerprint sensor. Then, the fingerprint sensor will light on and receive fingerprint input. Keep your finger on the fingerprint sensor until the light turns off completely. -
Page 24: Troubleshooting
User Guide 5. Troubleshooting 5.1. When the fingerprint authentication time is too long or fails When the terminal operates by the 1:N (Server) authentication in the network mode, if the server is used for personal or business use, a server load may reduce the fingerprint recognition rate and require the long fingerprint authentication time. -
Page 25: When The Authentication Is Successful But The Door Does Not Open
User Guide 5.5. When the authentication is successful but the door does not open Check that the access is controlled by the time zone. 5.5. When the user is not registered This product is set by default to operate as a network mode. - Page 26 User Guide FCC Information This device complies with part 15 of the FCC Rules. Operation is subject to the following two conditions : (1) This Device may not cause harmful interface, and (2) This device must accept any interference received, including interference that may cause undesired operation.
Need help?
Do you have a question about the eNBioAccess-T1 and is the answer not in the manual?
Questions and answers