Table of Contents
Advertisement
Available languages
Available languages
Advertisement
Chapters
Table of Contents

Related Manuals for Optika B-150 ALC Series


Summary of Contents for Optika B-150 ALC Series
- Page 1 INSTRUCTION MANUAL Model B-150 series (B-151 / B-153 / B-155 / B-157 / B-159) B-150 ALC series (B-151ALC / B-153ALC / B-155ALC / B-157ALC / B-159ALC) B-150R-PL series (B-151R-PL / B-152R-PL / B-153R-PL / B-155R-PL / B-157R-PL / B-159R-PL) Ver.
-
Page 2: Table Of Contents
Summary Warning Symbols and conventions Safety Information Intended use Overview B-151 / B-151R-PL B-153 - B-155 - B-157 - B-159 /B-152R-PL -B-153R-PL -B-155R-PL -B-157R-PL -B-159R-PL 5 B-151ALC - B-153ALC - B-155ALC - B-157ALC - B-159ALC Unpacking Assembling B-151 / B-151ALC / B-151R-PL B-152R-PL / B-153 / B-153ALC / B-153R-PL B-155 / B-155ALC / B-155R-PL B-157 / B-157ALC / B-157R-PL... -
Page 3: Symbols And Conventions
Warning This microscope is a scientific precision instrument designed to last for many years with a minimum of maintenance. It is built to high optical and mechanical standards and to withstand daily use. We remind you that this manual contains important information on safety and maintenance, and that it must therefore be made accessible to the instrument users. -
Page 4: Overview
Overview B-151 / B-151R-PL EYEPIECE OBSERVATION HEAD NOSEPIECE OBJECTIVES STAGE CLIPS STAGE CONDENSER FINE FOCUS KNOB LED CHARGE INDICATOR (ONLY “R” VERSION) COARSE FOCUS KNOB MAIN SWITCH / INTENSITY ADJUSTMENT DIAL TENSION ADJUSTMENT COLLAR Page 4... -
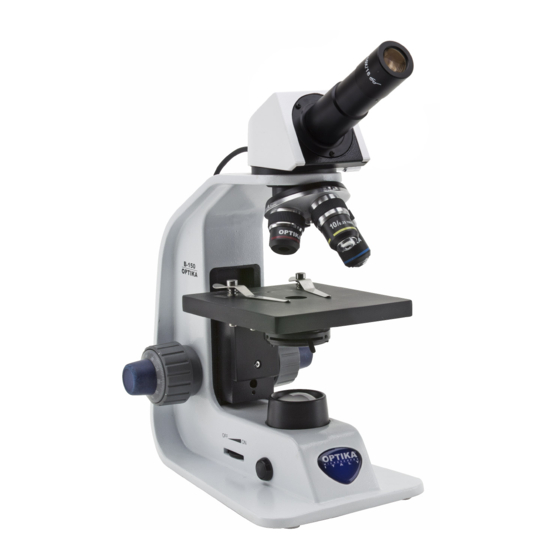
Page 5: B-153 - B-155 - B-157 - B-159 /B-152R-Pl -B-153R-Pl -B-155R-Pl -B-157R-Pl -B-159R-Pl
B-153 - B-155 - B-157 - B-159 /B-152R-PL -B-153R-PL -B-155R-PL -B-157R-PL -B-159R-PL EYEPIECE OBSERVATION HEAD -) MONOCULAR (B-152 / B-153 / B-155) -) BINOCULAR (B-157 / B-159) NOSEPIECE OBJECTIVES SLIDE STAGE HOLDER CONDENSER FINE FOCUS KNOB LED CHARGE COARSE INDICATOR FOCUS KNOB (ONLY “R”... -
Page 6: B-151Alc - B-153Alc - B-155Alc - B-157Alc - B-159Alc
B-151ALC - B-153ALC - B-155ALC - B-157ALC - B-159ALC ALC CONNECTION CABLE ALC ON/OFF BUTTON MAIN SWITCH / INTENSITY ADJUSTMENT DIAL Page 6... -
Page 7: Unpacking
Unpacking The microscope is housed in a moulded Styrofoam container. Remove the tape from the edge of the container and lift the top half of the container. Take some care to avoid that the optical items (objectives and eyepieces) fall out and get damaged. Using both hands (one around the arm and one around the base), lift the microscope from the container and put it on a stable desk. -
Page 8: B-152R-Pl / B-153 / B-153Alc / B-153R-Pl
B-152R-PL / B-153 / B-153ALC / B-153R-PL ⑤ ① ② ③ ④ ⑥ ⑦ ⑧ ⑤ Objectives ① Frame B-152R-PL (4X / 10X / 40X) ② Monocular observation head ③ Eyepiece B-153 (all) (4X / 10X / 40X / 60X) ⑥... -
Page 9: B-157 / B-157Alc / B-157R-Pl
B-157 / B-157ALC / B-157R-PL ⑤ ① ③ ② ④ ⑥ ⑦ ⑧ ① Frame ⑤ Objectives (4X / 10X / 40X / 60X) ② Binocular observation head ⑥ Dust cover ③ Eyepiece ⑦ Green filter ④ Tension adjustment tool ⑧... -
Page 10: Assembling The Microscope
Assembling the microscope 1. Remove the dust cap from the microscope frame and from the bottom of the observation head. 2. Insert the optical head above the stand and tighten the screw. (Fig. 1) • Hold the head with one hand during the lo- cking in order to avoid that the head falls. -
Page 11: Polarizing Set (Optional)
Polarizing set (optional) 1. Place the polarizer on the light exit ① at the base of the microscope. (Fig. 5) ① Fig. 5 2. Loosen the head fixing knob ② and remove the head from the microscope frame. (Fig. 6) ②... -
Page 12: Use Of The Microscope
Use of the microscope Light intensity adjustment Operate on the light intensity adjustment dial to turn ON / OFF the microscope and to increase / decrease the illumination voltage ①. (Fig. 8) ① Fig. 8 Use of ALC system 1. Adjust the desired brightness through the eyepie- ces using the light intensity dial (chapter 8.1). -
Page 13: Stage
Stage All models except B-151 series Stage accepts standard slides 26 x 76 mm, thickness 1,2 mm with coverslide 0,17mm. (Fig. 11) 1. Open the spring arm of the slide holder ① and place the slide from the front on the stage. 2. -
Page 14: Use Of Oil Immersion Objective
Use of oil immersion objective B-155 and B-159 models only 1. Focus the specimen with a low power objective. 2. Lower the stage. 3. Put a drop of oil (provided) on the area of the specimen to be observed. (Fig. 14) • Make sure that there are no oil bubbles. -
Page 15: Use With Rechargeable Batteries
Use with rechargeable batteries This operation can be done only with “R” models. When the microscope is plugged with the power sup- ply, the LED indicator for the battery recharge ① is lit. (Fig. 17) • LED red: battery under charge •... -
Page 16: Maintenance
Do not disassemble objectives or eyepieces in attempt to clean them. For the best results, use the OPTIKA cleaning kit (see catalogue). If you need to send the microscope to Optika for maintenance, please use the original packaging. Page 16... -
Page 17: Troubleshooting
10. Troubleshooting Review the information in the table below to troubleshoot operating problems. PROBLEM CAUSE SOLUTION I. Optical Section: LED operates, but field of view re- Power supply is unplugged. Connect mains dark. Brightness is too low Set brightness to a proper level Batteries are uncharged Fully charge the batteries Dirt or dust is visible in the field of... -
Page 18: Equipment Disposal
Equipment disposal Art.13 Dlsg 25 July 2005 N°151. “According to directives 2002/95/EC, 2002/96/EC and 2003/108/EC relating to the reduction in the use of hazardous substances in electrical and electronic equipment and waste disposal.” The basket symbol on equipment or on its box indicates that the product at the end of its useful life should be collected separately from other waste. - Page 19 OPTIKA S.r.l. ® Via Rigla, 30 - 24010 Ponteranica (BG) - ITALY Tel.: +39 035.571.392 ® info@optikamicroscopes.com - www.optikamicroscopes.com OPTIKA Spain spain@optikamicroscopes.com OPTIKA USA usa@optikamicroscopes.com OPTIKA China china@optikamicroscopes.com OPTIKA India india@optikamicroscopes.com OPTIKA Central America camerica@optikamicroscopes.com...
- Page 20 Serie B-150 MANUALE DI ISTRUZIONI Modelli Serie B-150 (B-151 / B-153 / B-155 / B-157 / B-159) Serie B-150 ALC (B-151ALC / B-153ALC / B-155ALC / B-157ALC / B-159ALC) Serie B-150R-PL (B-151R-PL / B-152R-PL / B-153R-PL / B-155R-PL / B-157R-PL / B-159R-PL) Ver.
- Page 21 Sommario Avvertenza Simboli Informazioni sulla sicurezza Utilizzo previsto Descrizione dello strumento B-151 / B-151R-PL B-153 - B-155 - B-157 - B-159 / B-152R-PL -B-153R-PL -B-155R-PL -B-157R-PL -B-159R-PL 24 B-151ALC - B-153ALC - B-155ALC - B-157ALC - B-159ALC Disimballaggio Assemblaggio B-151 / B-151ALC / B-151R-PL B-152R-PL / B-153 / B-153ALC / B-153R-PL B-155 / B-155ALC / B-155R-PL B-157 / B-157ALC / B-157R-PL...
-
Page 22: Simboli
Avvertenza Questo microscopio è uno strumento scientifico di alta precisione, progettato per durare a lungo con una minima manutenzione; la realizzazione è secondo i migliori standard ottici e meccanici, per poter essere utilizzato quotidianamente. Vi ricordiamo che questo manuale contiene informazioni importanti per la sicurezza e per la manutenzione dello strumento, e deve quindi essere messo a disposizione di coloro che lo utilizzeranno. -
Page 23: Descrizione Dello Strumento
Descrizione dello strumento B-151 / B-151R-PL OCULARE TESTA DI OSSERVAZIONE REVOLVER OBIETTIVI MOLLETTINE FERMACAMPIONE TAVOLINO CONDENSATORE MANOPOLA MICROMETRICA DI MESSA A FUOCO LED INDICATORE DI CARICA (SOLO VERSIONE “R”) MANOPOLA MACROMETRICA INTERRUTTORE / MANOPOLA DI MESSA A FUOCO REGOLAZIONE INTENSITÀ ANELLO REGOLAZIONE TENSIONE... -
Page 24: B-153 - B-155 - B-157 - B-159 / B-152R-Pl -B-153R-Pl -B-155R-Pl -B-157R-Pl -B-159R-Pl
B-153 - B-155 - B-157 - B-159 / B-152R-PL -B-153R-PL -B-155R-PL -B-157R-PL -B-159R-PL OCULARE TESTA DI OSSERVAZIONE -) MONOCULARE (B-152 / B-153 / B-155) -) BINOCULARE (B-157 / B-159) REVOLVER OBIETTIVI FERMA- TAVOLINO VETRINO CONDENSATORE MANOPOLA MICROMETRICA DI MESSA A FUOCO LED INDICATORE MANOPOLA DI CARICA... -
Page 25: B-151Alc - B-153Alc - B-155Alc - B-157Alc - B-159Alc
B-151ALC - B-153ALC - B-155ALC - B-157ALC - B-159ALC CAVO DI COLLEGAMENTO TASTO ON/OFF SISTEMA ALC INTERRUTTORE / MANOPOLA REGOLAZIONE INTENSITÀ Pagina 25... -
Page 26: Disimballaggio
Disimballaggio Il microscopio si trova in un imballaggio di polistirolo espanso stampato. Dopo aver tolto il nastro adesivo da tutti gli imballi, sollevare la metà superiore dell’imballaggio. Fare attenzione a non far cadere o danneggiare i com- ponenti ottici (obiettivi e oculari). Estrarre il microscopio dal suo imballaggio con entrambe le mani (una intorno al braccio e una intorno alla base) e appoggiarlo su un piano stabile. -
Page 27: B-152R-Pl / B-153 / B-153Alc / B-153R-Pl
B-152R-PL / B-153 / B-153ALC / B-153R-PL ⑤ ① ② ③ ④ ⑥ ⑦ ⑧ ⑤ Obiettivi ① Stativo ② Testa di osservazione monoculare B-152R-PL (4X / 10X / 40X) B-153 (tutti) (4X / 10X / 40X / 60X) ③ Oculare ⑥... -
Page 28: B-157 / B-157Alc / B-157R-Pl
B-157 / B-157ALC / B-157R-PL ⑤ ① ③ ② ④ ⑥ ⑦ ① Stativo ⑤ Obiettivi (4X / 10X / 40X / 60X) ② Testa di osservazione binoculare ⑥ Copertina ③ Oculare ⑦ Filtro verde ④ Chiave regolazione tensione ⑧ Alimentatore B-159 / B-159ALC / B-159R-PL ⑤... -
Page 29: Procedura Di Assemblaggio
Procedura di assemblaggio 1. Rimuovere il tappo di protezione dallo stativo e dalla parte sottostante della testa di osservazio- 2. Inserire la testa sullo stativo e serrare la vite di fissaggio. (Fig. 1) • Tenere sempre la testata con una mano du- rante il serraggio della vite per evitare che la stessa cada. -
Page 30: Set Di Polarizzazione (Opzionale)
Set di polarizzazione (opzionale) 1. Posizionare il polarizzatore ① sulla lente di cam- po del microscopio. (Fig. 5) ① Fig. 5 2. Allentare la manopola di fissaggio della testa ② e rimuovere la testa di osservazione dallo stativo. (Fig. 6) ②... -
Page 31: Uso Del Microscopio
Uso del microscopio Regolazione intensità luminosa Agire sulla rotellina di regolazione dell’intensità lumi- nosa per accendere e spegnere lo strumento e per aumentare o diminuire il voltaggio dell’illuminazione ①. (Fig. 8) ① Fig. 8 Uso del sistema ALC 1. Regolare la luminosità desiderata agli oculari usando la rotellina di regolazione dell’intensità... -
Page 32: Tavolino
Tavolino Tutti i modelli tranne la serie B-151 Il tavolino accetta vetrini standard 26 x 76 mm, spes- sore 1,2 mm con coprioggetto 0,17mm. (Fig. 11) 1. Allargare il braccio movibile del fermapreparati ① e posizionare frontalmente i vetrini sul tavolino. 2. -
Page 33: Uso Di Obiettivi Ad Immersione
Uso di obiettivi ad immersione Solo modelli B-155 e B-159 1. Mettere a fuoco con un obiettivo a basso ingran- dimento. 2. Abbassare il tavolino. 3. Mettere una goccia di olio (in dotazione) sulla zona del campione da osservare. (Fig. 14) • Assicurarsi che non ci siano bolle d’aria. -
Page 34: Uso Con Batterie Ricaricabili
Uso con batterie ricaricabili Questa operazione viene eseguita solo sui mo- delli “R”. Quando il microscopio è collegato all’alimentatore, il LED indicatore della ricarica delle batterie ① si ac- cende. (Fig. 17) • LED rosso: batteria in ricarica • LED verde: batteria carica. Quando il microscopio è... -
Page 35: Manutenzione
Non smontare gli obiettivi o gli oculari per cercare di pulirli. Per un migliore risultato, utilizzare il kit di pulizia OPTIKA (vedi catalogo). Se si necessita di spedire il microscopio al produttore per la manutenzione, si prega di utilizzare l’imballo origi- nale. - Page 36 10. Risoluzione dei problemi Consultare le informazioni riportate nella tabella seguente per risolvere eventuali problemi operativi. PROBLEMA CAUSA SOLUZIONE I. Sezione Ottica: Il microscopio è acceso, ma il campo L’alimentatore è scollegato. Collegarlo visivo è scuro. La luminosità è troppo bassa Regolarla ad un livello adeguato Batterie scariche Caricare le batterie...
- Page 37 Smaltimento Ai sensi dell’articolo 13 del decreto legislativo 25 luglio 2005 n°151. “Attuazione delle direttive 2002/95/CE, 2002/96/CE e 2003/108/CE, relative alla riduzione dell’uso di sostanze pericolose nelle apparecchiature elettriche ed elettroniche, nonché allo smaltimento dei rifiuti”. Il simbolo del cassonetto riportato sulla apparecchiatura o sulla sua confezione indica che il prodotto alla fine del- la propria vita utile deve essere raccolto separatamente degli altri rifiuti.
- Page 38 Via Rigla, 30 - 24010 Ponteranica (BG) - ITALY Tel.: +39 035.571.392 info@optikamicroscopes.com - www.optikamicroscopes.com OPTIKA Spain spain@optikamicroscopes.com OPTIKA USA usa@optikamicroscopes.com 100 Lauman Lane, Suite A, Hicksville, NY 11801 OPTIKA China Tel: (877) 877-7274 | Fax: (516) 801-2046 Email: Info@nyscopes.com china@optikamicroscopes.com www.microscopeinternational.com OPTIKA India india@optikamicroscopes.com OPTIKA Central America camerica@optikamicroscopes.com...
Need help?
Do you have a question about the B-150 ALC Series and is the answer not in the manual?
Questions and answers