Advertisement
Installation and Operating Instructions
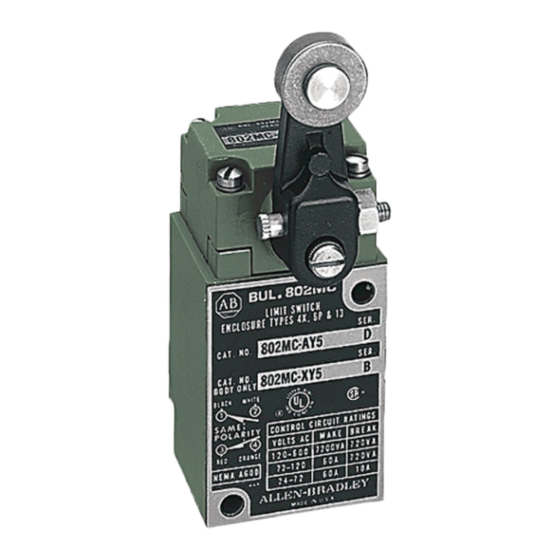
Bulletin 802M (2-Circuit Standard) and
802MC (2-Circuit Corrosion Resistant) Limit Switch
Mounting
Two clearance holes for #10 screws are provided for front mounting. The adapter foot included with
the 2-circuit standard version may be used when it is desired to mount the switch to the dimensions of
a 4-circuit and other larger size limit switches. Place the adapter foot end with the tapped hole into the
rectangular recess at the lower rear corner of the switch and securely tighten (approx. 32 in-lbs.) the
adapter foot with the mounting screw provided. Make sure the exposed end of the adapter foot is flush
with the rear surface of the switch. See Figure 1.
To be compatible with the exposed metal parts of the corrosion resistant version (Bulletin 802MC),
use Type 316 stainless steel mounting hardware.
Figure 1
Wiring
Bulletin 802M and Bulletin 802MC limit switches are pre-wired and factory sealed. Refer to wiring
diagram on nameplate for proper circuit hookup.
CAUTION: The contacts in each switching element must be wired with the same polarity.
The indicating light is prewired and permanently sealed; the LED cannot be replaced.
Optional wiring formats: Some switches may be equipped with a mini-type male connector. If the
mating cord (not supplied by Allen-Bradley) contains a green lead, it should be permanently
reidentified with a color other than green to guard against its use as an equipment grounding
conductor. Refer to wiring diagram on nameplate for proper circuit hook-up.
Some switches may be equipped with 24V DC (Red) LED indicating light. One side of the light will be
wired to either the normally open (LF) or the normally closed (LC) contacts. The other side of the
indicting light will be available through an extra cable lead or mini-type connector pin. This permits
wiring of the inidcating light with the load controlled by the limit switch. Refer to wiring diagram on
nameplate for proper circuit hook-up.
Actuator Head Positioning
All actuator head styles may be placed in any
of four positions on the switch body. Loosen the
four captive head screws, place the head in the
desired position and securely retighten (approx.
11 in-lbs.) the four screws. Figure 2 shows the
rotary operating head with a roller lever.
Figure 2
Lever Positioning
The lever used with rotary actuated devices is
adjustable to any position through 360
the shaft. Loosen the lock pin nut, move the
lever to the desired position and securely
retighten the lock pin nut. See Figure 3. Refer
to your Allen-Bradley Sensors catalog for a
complete selection of operating levels.
Figure 3
o
around
Advertisement
Table of Contents

Subscribe to Our Youtube Channel
Related Manuals for Rockwell Automation Allen-Bradley Bulletin 802MC Series


Summary of Contents for Rockwell Automation Allen-Bradley Bulletin 802MC Series
- Page 1 Installation and Operating Instructions Bulletin 802M (2-Circuit Standard) and 802MC (2-Circuit Corrosion Resistant) Limit Switch Mounting Two clearance holes for #10 screws are provided for front mounting. The adapter foot included with the 2-circuit standard version may be used when it is desired to mount the switch to the dimensions of a 4-circuit and other larger size limit switches.
- Page 2 Changing Direction of Actuation The switch action of spring return, rotary actuated devices can be set to operate with clockwise only, counterclockwise only or clockwise and counterclockwise shaft movement. To change the direction of actuation, loosen the four head mounting screws and remove the operating head from the switch body.
Need help?
Do you have a question about the Allen-Bradley Bulletin 802MC Series and is the answer not in the manual?
Questions and answers