
Related Manuals for King Canada KHP-10T-GG


Summary of Contents for King Canada KHP-10T-GG
-
Page 1: Instruction Manual
10 TON HyDRAULIC SHOP PRESS wITH GRID GUARD 06/2015 INSTRUCTION MANUAL MODEL: KHP-10T-GG COPYRIGHT © 2015 ALL RIGHTS RESERVED BY KING CANADA TOOLS INC. -
Page 2: Warranty Information
King Canada service center. Contact your retailer or visit our web site at www.kingcanada.com for an updated listing of our authorized service centers. In cooperation with our authorized serviced center, King Canada will either repair or replace the product if any part or parts covered under this warranty which examination proves to be defective in workmanship or material during the warranty period. -
Page 3: Safety Instructions
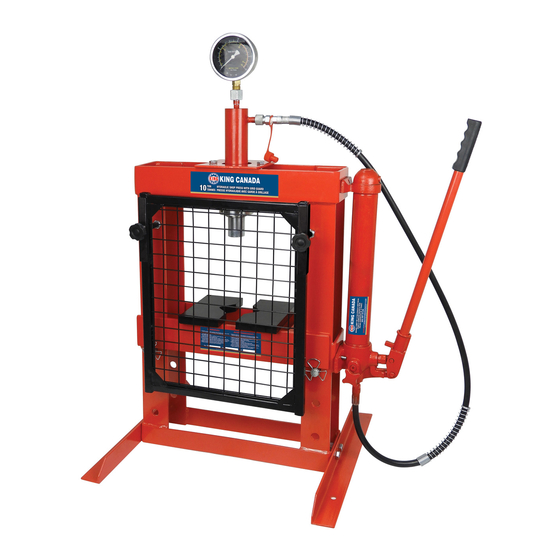
GENERAL & SPECIFIC SAFETy INSTRUCTIONS GENERAL SAFETy RULES 1. KNOw yOUR TOOL 8. DON’T OVERREACH. Read and understand the owners manual and labels affixed to Keep proper footing and balance at all times. 9. MAINTAIN TOOL wITH CARE. the tool. Learn its application and limitations as well as its specific potential hazards. - Page 4 6. bed frame posts (2). 7. Hydraulic pump. 8. Hydraulic pump release valve. 9. Hydraulic pump handle. 10. Hydraulic pump oil filler nut. 11. Grid guard. MODEL KHP-10T-GG Maximum capacity 120 Ton Stroke 7-1/8” Working range 0 - 13-3/8” Bed width 13-3/16”...
- Page 5 ASSEMbLy, OPERATION AND MAINTENANCE ASSEMbLy- Refer to the parts diagram in this manual as a guide to assemble this hydraulic shop press. 1) Attach one base section (#8) to the base of the frame (#17) using hex. bolts (#7), washers (#10), spring washers (#10A) and hex. nuts (#11). Then attach the other base section to the other side of the frame.
Need help?
Do you have a question about the KHP-10T-GG and is the answer not in the manual?
Questions and answers