Advertisement
Table of Contents
Advertisement
Table of Contents

Related Manuals for lamber LP6-ek


Summary of Contents for lamber LP6-ek
- Page 1 INSTRUCTIONS MANUAL POT-WASHING MACHINE LP31/L-ek...
-
Page 3: Declaration Of Conformity
DECLARATION OF CONFORMITY The following : LAMBER – Via Italia 6 – 26855 Lodi Vecchio (LO) ITALY Declare under our responsibility that: Apparatus: Professional POT WASHER Trademark: LAMBER Manufacturer : LAMBER Mod. for which this declaration refers to the conformity of the following standards: ... - Page 5 The directive mentioned above, to which make reference for further details, provides for punitive actions in case of illegal disposal of such waste. Lamber guarantees a percentage of recovery at least of 90% in medium weight for each equipment. The 80% - always as regards the medium weight- of recovered material is recycled or reused.
-
Page 6: Table Of Contents
CONTENTS ENGLISH General norms pag. Introduction and safety norms pag. First section - FOR THE USER pag. Control panel pag. Working and use, cleansing agents, maintenance, possible troubles pag. Placement of objets pag. Cleaning and preventive maintenance pag. Daily cleaning of the interior of the machine pag. -
Page 7: Introduction And Safety Norms
INTRODUCTION ENGLISH AND SAFETY NORMS INTRODUCTION The machines are Industrial pot-washing machines. Noise level of the machine, less than 70 dB(A). PRELIMINARY OBSERVATION Carefully read the instructions reported in the present user manual, as it gives important indications about safety of installation, operation and maintenance: carefully keep the present manual for further consultations;... - Page 8 Observe the safety notes indicated and the dosage recommendations for the use of chemicals. When using chemicals, wear protective clothing, gloves and goggles. Use only suitable products for industrial dishwashers directly recommended by Lamber. Do not mix cleaning products to avoid crystallization that could ruin the detergent dispenser.
- Page 9 INSTRUCTIONS FOR THE USER...
-
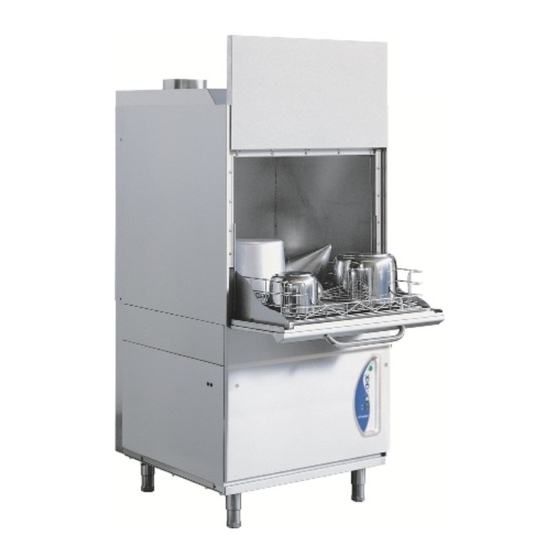
Page 10: Control Panel
CONTROL PANEL Main switch Cycle lamp Wash time selection pushbutton Cycle pushbutton Température lampe Door opening lamp Drain pump pushbutton Wash and rinse thermometer OPTIONAL Dis.1... -
Page 11: First Section - For The User
ENGLISH First Section - FOR THE USER WORKING AND USE The Pot-washing machines can wash up to 30-20-10 baskets every hour. The machine protection degree is IP21, therefore it should not be washed with direct high pressure jet water; The objects to be washed should be correctly arranged for a good washing-up result; We suggest to descale dishes, from time to time, in order to remove calcareous and/or starchy sediments by soaking it in suitable solutions suggested by your cleansing agent supplier. - Page 12 - lamp 2 flashing – medium cycle 5 minutes "C". The cycle will automatically start - lamps 1 and 2 lightening at the same time again. long cycle of 7 minutes. - Endless cycle (maximum 15 minutes) : The washing period cycle has to be chosen the door being closed and the cycle put on regarding the dirt that has to be removed.
- Page 13 OBJETS POSITIONING Warning ! Insert the baskets inside the Only use the baskets machine with the objets as supplied with the pot-washer shown in the picture. LP6-LP8 LP31-LP38 Clearance LP6-LP31: H max=640 mm LP8-LP38: H max=840 mm To achieve optimal cleaning results, make sure that objets are correctly stored 1350 inside the machine LP31-LP38...
- Page 14 DAY MAINTENANCE CLEANING PREVENTIVE MAINTENANCE IMPORTANT : Before carrying out the Attention. Before carrying out cleaning the inside of the machine, make sure that there cleaning and maintenance operations, are no foreign objects that could damage the disconnect the equipment from the rusty steel inside the tank.
- Page 15 DAILY CLEANING OF THE INTERIOR OF THE POT-WASHER Attention. Before carrying out cleaning the inside of the machine, make sure that there are no foreign objects that could damage the rusty steel inside the tank. The eventual rust particles could come from non- stainless steel dishes, from baskets or damaged water pipes not rust-proof.
- Page 16 Remove the tank filters Remove the frontal tank filter. Remove the overflow pipe Remose support Clean the pump filter by Clean the washing arm means of a brush Wipe with a cloth the tank Insert the central support . and check for any debris on the bottom.
- Page 17 Before insertion Remove the frontal tank filter. overflow check the presence silicon joint cod.0200304 After insert the overflow in his place Replace the lower washing Insert all tank filter in their Make sure is correctly in his place place Screw the lower rinse arm. Replace the s.s.disc cod.
- Page 18 Replace the upper wash arm Control the wash arm is in his place Keeping with a hand the Screw the upper rinse arm. Check that the wash and washing arm in place, screw rinse arms are free to rotate the s.s. disc cod.0201010 (upper and lower) ATTENTION! Daily...
- Page 19 DETERGENT and RINSE-AID Attention. During the use of chemicals is advisable to wear appropriate clothing, such as gloves and protectives glasses. It’s therefore important to consider some factors. Firsf of all, it is necessary to use only strongly anti-foaming Alkali and Chlore Products specific for industrial dishwasher, manufactured by Companies recognized as seriousness.
- Page 20 PROBLEMS - CAUSES - SOLUTIONS PROBLEMS CAUSES SOLUTIONS The machine doesn't catch Main switch is switched off; Turn ON the main switch; Power plug is not inserted Insert the power plug The water doesn't go in Water cock closed; Open water cock; The Overflow is not in place;...
- Page 21 DESCALING When hard water is used you can find inside the machine and also on dishes calcareous sediments which must be removed both for hygienic and operating reasons by a descaling operation. Operating process and frequency of this intervention are suggested by your cleansing agent supplier who has suitable products, generally containing phosphoric acid.
- Page 22 USEFUL HINTS OF STAINLESS STEEL MAINTENANCE Stainless steel is so called because it is not affected by oxidation,this is due to a thin molecular layer of oxide on the surface which protects againts further oxidation. There are, howevwr, substances which can modify or destroy this layer,giving rise to corrosion:besides preventing the protective film of oxide from reforming,these substances corrode the stainless steel itself and can cause irreparable damage.
- Page 23 INSTRUCTIONS FOR THE INSTALLER The following instructions are addressed to a qualified personnel, the only one authorised to carry-out checks and repair, if any. The Manufacturer declines any responsibility in the case of interventions made by a non qualified personnel.
-
Page 27: Second Section - For The Installer
ENGLISH Second Section - FOR THE INSTALLER UNPACKING AND DELIVERY CHECKS When the case with the machine has been received, unpack it as follows: Remove the upper cover and the wooden case side walls, take care not to damage the machine, Remove possible accessories boxes, Remove the protecting cellophane,... -
Page 28: Installation
Chack that this basic requirement is ELECTRICAL CONNECTION complied with and, in case of doubt, ask for a careful check of the installation by a qualified personal. WARNING: : Danger to life due to live components! In addition, the equipment shall be part of During all electric operation, disconnect the machine an equipotential system, the effectiveness from the network and verify the absence of... -
Page 29: Water Connections
WATER CONNECTIONS WATER DRAIN Carefully comply with any national or Reachable from the machine front side after regional regulations in force. opening the front panel (to do this turn the two front screws out); Water installation must have the following Arrange a discharge at floor level provided characteristics: with siphon and connect to the floor drain by... - Page 30 VAPOUR EXHAUST * During washing and rinsing cycles, vapours come out of the upper chimney. To convey these vapours, connect with the cap as showed in the drawing.
-
Page 31: Setting Of Fan's Stop Time
Setting of fan’s stop time (Only for machines with steam condenser CVP) At the end of the washing, the steam suction fan starts running automatically. The suction continues for a time that can be programmed from 5 to 80 seconds after the rinse end . As default, the fan’s functioning time is programmed for a 20’’... - Page 32 How to disable-enable the AUTOMATIC START By default the machine is provided with MANUAL start by cycle pushbutton ‘C’. It’s possible to set (enable) the AUTOMATIC start of the cycle at the door closing by following the instructions below: Turn on the machine by wall switch and press switch ‘A’ that you can find on the control panel. At this moment the thermometers’...
-
Page 33: Connections Scheme
CONNECTIONS SCHEME Black Black Black Staples Black Black Black Staples... - Page 34 A LIST OF DRAWBACKS POSSIBLY OCCURRING WITH THE USE OF THE POT-WASHING MACHINE, THEIR CAUSES AND POSSIBLE REMEDIES DRAWBACK POSSIBLE CAUSES AND REMEDIES Lamp "C" does not turn on a) check that the wall-mounting switch is ON and the respective fuses are not burnt. b) check that fuses of the transformer are not burnt.
- Page 35 The tank does not stop being a) check that the air traps of the pressure filled upon reaching switches have no porosities and the the desired level connection pipe is not disconnected. b) check that the pressure switches are working and correctly calibrated. c) check that there is no dirt in the solenoid valve.
- Page 36 DRAWBACK POSSIBLE CAUSES AND REMEDIES Tank temperature insufficient a) check that the thermostat is not faulty or not calibrated. b) check that the temperature of the feeding water is in the range from 50°-0/10°C, as specified. c) check that the thermostat is set to the right temperature and operates correctly.
- Page 37 DRAWBACK POSSIBLE CAUSES AND REMEDIES If the drawback is not due to any of the causes listed here above, proceed as follows: In the case of electrical heating machines 1) check that the coil of remote control switch MT3 is not broken. 2) check that the safety thermostat did not trigger.
- Page 42 SCHEDA ELETTRONICA FICHE ELECTRONIQUE P .C.BOARD ELEKTRONISCHE STEURUNG FUNZIONE CICLO - TABELLA SELEZIONE - TABELLA SELEZIONE TEMPI DI LAVAGGIO FONCTION CYCLE - TABLEAU SELECTION TEMPS DE LAVAGE TEMPI DI RISCIACQUO CYCLE FUNCTION - WASH TIME SELECTION TABLE - TABLEAU SELECTION consum o acqua ABLAUFSAUFGABE TEMPS DE RINÇAGE...
Need help?
Do you have a question about the LP6-ek and is the answer not in the manual?
Questions and answers