Advertisement
Advertisement
Table of Contents

Related Manuals for White Rodgers BP150


Summary of Contents for White Rodgers BP150
- Page 2 Line Voltage Programmable Thermostat Installation Instructions & User Guide For BP150, BP150C, BP125C,1E65-151 Congratulations on the purchase of your White-Rodgers thermostat! ™ Save these instructions for future use! Questions? Contact White-Rodgers Customer Service at 1-877-654-9394 37-7457B...
- Page 3 WARNING WARNING Before installing and operating this product, the owner and/or installer must read, understand and follow these instructions and keep them handy for future reference. If these instructions are not followed, the warranty will be considered null and void and the manufacturer deems no further responsibility for this product.
- Page 4 1. Description This programmable electronic thermostat can be used to control electric heating units such as electric baseboards, convectors, or aeroconvectors. It keeps the temperature of a room at the requested set point with a high degree of accuracy. This product is designed for installations with electrical current –...
-
Page 5: Installation
2. Installation Selection of the thermostat location The thermostat must be mounted to a connection box on a wall facing the heating unit, at around 1.5 m (5 feet) above the floor level, on a section of the wall exempt from pipes or air ducts. - Page 6 3. Using a screwdriver, loosen the screw retaining the mounting base of the thermostat until it is loose (do not completely remove the screw). Then, remove the mounting base at the back of the thermostat by pushing it downwards and then towards you. 4.
- Page 7 5. Pass the wires from the wall through the opening on the mounting base and connect them using the supplied solderless connectors. When making the connection with aluminum wire, make sure that you are using connectors identified CO/AL. Please note that the thermostat wires do not have polarity. Therefore, the way they are connected is not important.
- Page 8 6. Place all the wires into the connection box. 7. Align the little slots located on the top of the thermostat with those on the mounting base and secure the thermostat to the mounting base. Note that you can also position the thermostat on the left or the right side of the junction box. Then, tighten the screw at the bottom of the unit.
-
Page 9: Operation
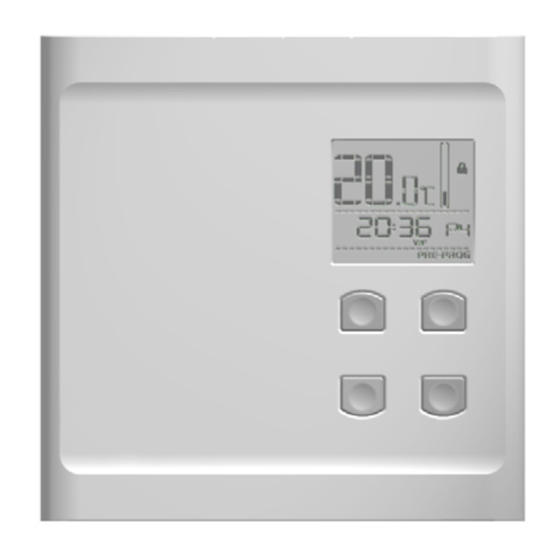
3. Operation Ambient temperatur e Heating power indicator Frost-fr ee warning Security mode Fan mode Hour Pr ogramming period Anticipated start Mode (Manual; Days (L/M : Monday, Automatic; M/T : T uesday, Pr eprogrammed M/W : W ednesday, J/T : Thursday, + button (to increase) V/F : Friday, S/S : Satur day and... - Page 10 Adjustment of the hour and the day To adjust the hour and the day: 1. In any mode (Manual, Automatic or Preprogrammed), out of any adjustment mode, press down the button and release it. 2. The current time mode (24H/12H) is displayed. Press down the button to select the desired format.
-
Page 11: Ambient Temperature
Ambient temperature The figures displayed above the hour indicate the ambient temperature. It can be displayed in degrees Celsius or Fahrenheit (see “Display in degrees Celsius/ Fahrenheit”). To adjust the set point, out of any adjustment mode, press down the button to increase the set point (it will blink), or the button to decrease it. - Page 12 The adjustment is thus completed and the thermostat returns to normal operation. It is possible to exit the degrees Celsius/Fahrenheit adjustment mode at any time : • By pressing down the button. • By not pressing down any buttons during 1 minute. In any case, the adjustment is saved.
- Page 13 Programming procedure of the Automatic mode Programming the Automatic mode can be done in the Automatic mode or the Manual mode. 1. Out of any adjustment mode, press down the button during 3 seconds and release it. It then enters into the programming of period 1 of the 5 days of the week.
- Page 14 At the end of the programming period 4 of the weekend, the programming is completed and the thermostat returns to normal operation. It is possible to exit the Automatic mode’s programming at any time : • By pressing down the button.
- Page 15 Preprogrammed mode ( The Preprogrammed mode allows a quick and easy preprogram of the thermostat. 18 preprograms (01 to 18) are defined in factory and easily accessible. This mode gives you the possibility to quickly program the thermostat using commonly used preprograms.
- Page 16 3. Choose the preprogram number by pressing down the buttons. Confirm by pressing down the button. It is possible to exit the selection of the preprogram at any time: • By pressing down the button. • By not pressing down any buttons during 1 minute. In any case, the selection is saved.
-
Page 17: Anticipated Start
Anticipated start This mode enables the room to reach the selected temperature at the programmed hour. In fact, the thermostat estimates the delay required to reach the set point of the next period at the programmed hour. This delay is obtained by the observation of the temperature variations in the room and the results obtained during the preceding anticipated starts. - Page 18 Frost-free warning icon is displayed when the temperature set point is between 3°C (37°F) and 5°C (41°F). A minimum temperature will be maintained to ensure frost control. Security mode It is possible to impose minimum and maximum temperature set points by activating this mode.
- Page 19 4. L___ is displayed instead of the hours and the adjustment of the minimum set point flashes. Press down the button to adjust the minimum set point temperature. The adjustment can range from --.- (Heating off) to 30°C by intervals of 0.5°C (or 86°F by intervals of 1°F).
- Page 20 4. Press down the button to select the icon (indicated by its flashing). Press down the button to confirm your choice. 5. All icons disappear except the icon that continues to flash. Press down the button to deactivate the Security mode (indicated by the icon that turns off). Press down the button to confirm your choice.
- Page 21 Security mode, the minimum and maximum set points in Security mode, the Anticipated start, the time mode (24h/12h), the day, the hour and the Nightlight mode. Backlight (models BP150, BP150C only) By default, the backlight turns on when pressing down a button and turns off after 15 seconds of inactivity.
- Page 22 Nightlight mode (models BP150, BP150C only) You can activate the Nightlight mode to permanently turn on the backlight. To activate or deactivate this mode, you must simultaneously press both buttons for 3 seconds until the backlight blinks. Release the buttons. The Nightlight mode will be activated (or deactivated if it was previously activated).
-
Page 23: Troubleshooting
4. Troubleshooting Problem Solution In normal operating conditions, the thermostat housing can reach The thermostat is hot. nearly 40°C / 100°F at maximum load. That is normal and will not affect the effective operation of the thermostat. Check if the thermostat is properly connected. Refer to the installation Heating is always on. - Page 24 5. Preprograms Quick selection 8 hours of sleep 9 hours of sleep Wake up time: Wake up time: Hour at Hour at which which you come you come back from back from work: work: * preprogram by default Detailed preprograms 8 hours of sleep Monday-Friday Saturday-Sunday...
- Page 25 10am 21°C / 70°F 16.5°C / 62°F 21°C / 70°F 16.5°C / 62°F 21°C / 70°F 16.5°C / 62°F 10am 21°C / 70°F 16.5°C / 62°F 21°C / 70°F 16.5°C / 62°F 21°C / 70°F 16.5°C / 62°F 10am 21°C / 70°F 16.5°C / 62°F 21°C / 70°F 16.5°C / 62°F...
-
Page 26: Technical Specifications
6. Technical Specifications Supply voltage : 120/208/240 VAC, 50/60 Hz Minimum electrical current with a resistive load : 1.25 A 150 W @ 120 V 260 W @ 208 V 300 W @ 240 V Maximum electrical current with a resistive load : 12.5 A 1500 W @ 120 V 2600 W @ 208 V...
Need help?
Do you have a question about the BP150 and is the answer not in the manual?
Questions and answers